.svg)

.png)
Handling permissions in Flutter isn’t just about showing a popup and moving on. In real-world apps, permission flow directly impacts UX, retention, store reviews, and even compliance. This guide walks through how to design permission handling the right way, based on production experience from apps with large user bases.
The Real Problem (From Production Apps)
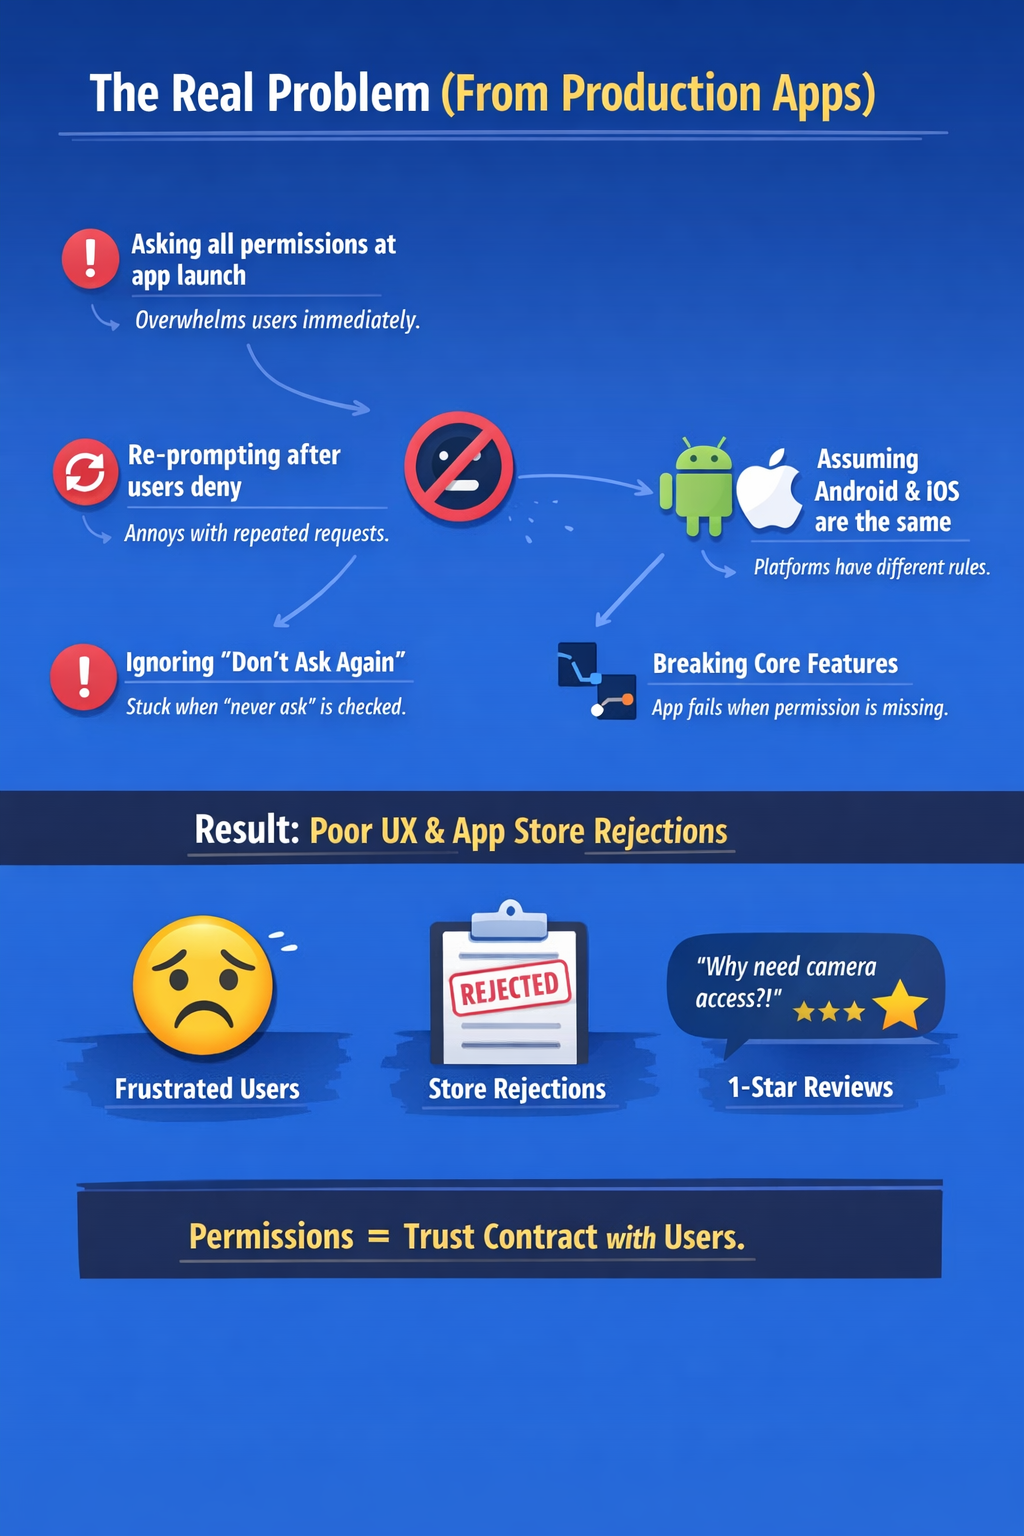
Most Flutter apps fail at permissions not because of code issues, but because of poor strategy and timing.
- Asking all permissions at app launch
Users are overwhelmed before they even understand the app’s value, leading to instant denial. - Re-prompting permissions after users deny them
Repeated prompts feel spammy and desperate, breaking user trust and patience. - Not handling “Don’t ask again” / permanently denied states
Apps get stuck in broken flows with no clear recovery path or user guidance. - Assuming Android and iOS behave the same
Platform-specific permission models are ignored, causing unexpected crashes or rejected builds.
- Breaking core flows when permission is missing
Instead of graceful fallbacks, users hit dead ends or blank screens.
Result
- Poor UX – Users feel forced instead of guided
- App Store / Play Store rejections – Non-compliant permission usage
- One-star reviews – “Why does this app need camera access??”
Key takeaway
Permissions are not a technical feature — they are a trust contract with your users.
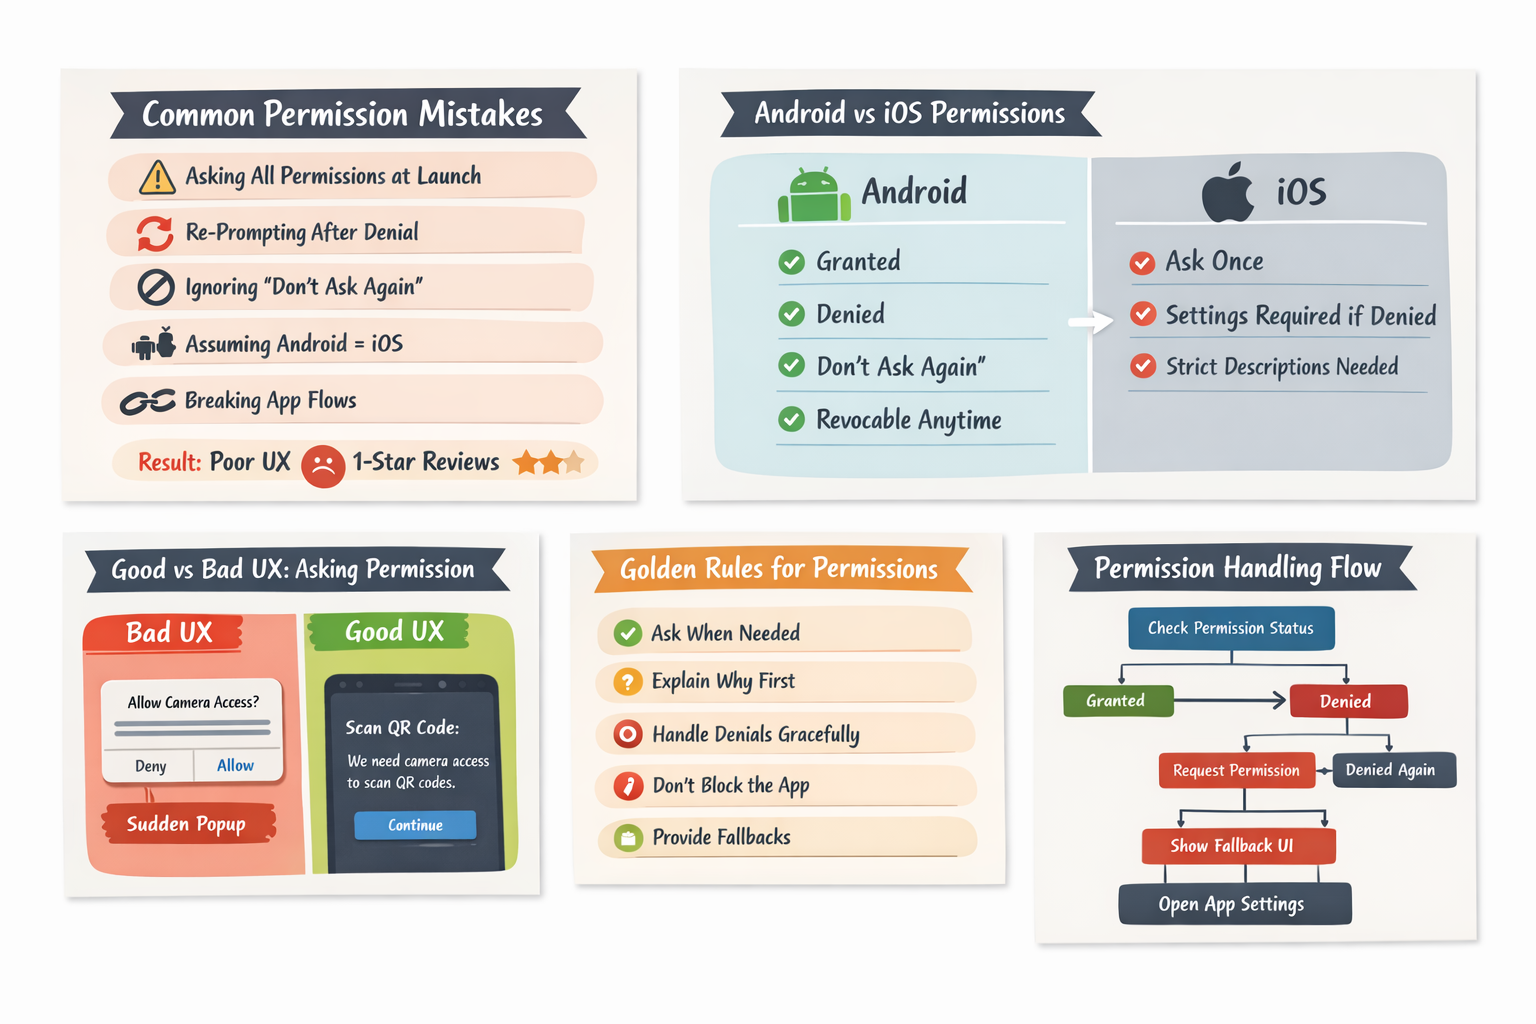
Platform Reality Check (Android vs iOS)
Permissions behave very differently on Android and iOS. Treating them the same is a common and costly mistake.
Android
- Runtime permissions (since Android 6.0)
Permissions are requested while the app is running, not at install time. - Permission states can be:
- Granted – App can access the feature normally
- Denied – User rejected the request but can be asked again
- Permanently denied (“Don’t ask again”) – App must guide users to system settings
- User can revoke permission anytime from Settings
Even after granting, users can change their mind, so checks must be continuous.
iOS
- Permission prompt appears only once
If the user denies it, the system will never show the prompt again. - Denied = manual Settings intervention
The only recovery path is educating users and redirecting them to iOS Settings. - Apple is strict about permission usage descriptions
Every permission must clearly explain why it’s needed and how it’s used.
One wrong or vague permission description = App Review rejection
Key Insight:
- Android allows recovery through re-requests.
- iOS requires perfect first-time permission messaging.
Golden Rules for Permission Handling
Based on what actually works in real production apps
- Never ask permissions on app launch: Users haven’t seen value yet, so early prompts almost always get denied.
- Ask only when the feature is used: Contextual permission requests feel logical and increase acceptance rates.
- Explain why before triggering the system dialog: A simple pre-permission screen builds trust and sets clear expectations.
- Handle denied & permanently denied states: Always detect the permission state and guide users instead of looping requests.
- Don’t block the app unless the feature is critical: Non-essential permissions should never stop users from using the app.
- Provide graceful fallbacks: Offer alternatives (manual input, limited mode, read-only views) when access is denied.
Recommended Flutter Package
In most production-grade Flutter apps, this is the de-facto standard for handling permissions:
dependencies:
  permission_handler: ^12.0.1
Basic Permission Flow (Correct Way)
Step 1: Check Permission Status
Before doing anything, check the current permission state. Never assume.
Future<bool> hasCameraPermission() async {
  final status = await Permission.camera.status;
  return status.isGranted;
}
This matters because it avoids unnecessary permission prompts, respects users’ choices once they’ve made a decision, and prevents repetitive dialogs from appearing every time the app is opened. As a result, the experience feels smoother, less intrusive, and more respectful of user intent.
Step 2: Explain Before Asking (UX Matters)
Bad UX
- The system permission popup appears without context
- Users don’t understand why access is required
- Leads to confusion and a high chance of denial
Good UX
- Show a brief, human-readable explanation first
- Clearly communicate the benefit to the user
Here is the example explanation:
“We need camera access to scan QR codes.”
Only after this explanation should you trigger the system permission dialog.
Why this works, Users feel informed and in control, which significantly increases trust and permission acceptance rates.
Step 3: Request Permission
Future<bool> requestCameraPermission() async {
  final status = await Permission.camera.request();
  return status.isGranted;
}
Step 4: Handling All Permission States (Very Important)
Future<void> handleCameraPermission() async {
  final status = await Permission.camera.status;

  if (status.isGranted) {
    // Proceed with feature
  } else if (status.isDenied) {
    final result = await Permission.camera.request();
    if (!result.isGranted) {
      // Show fallback UI
    }
  } else if (status.isPermanentlyDenied) {
    // Open app settings
    await openAppSettings();
  }
}
Why this matters
- Prevents infinite permission loops: The app doesn’t keep asking for a permission the user has already refused.
- Correctly handles “Don’t ask again”: When permission is permanently denied, the only valid path is guiding the user to system settings.
- Avoids dead-end UX: Users are never stuck without feedback or a next step—they either proceed, see a fallback, or are guided to settings.
Key takeaway
Always handle all permission states explicitly. Assuming users will eventually say “yes” leads to broken flows and poor user trust.
Step 5: iOS-Specific Configuration (Most Common Mistake)
In ios/Runner/Info.plist, always provide clear, human-readable reasons for each permission:
<key>NSCameraUsageDescription</key>
<string>This app uses the camera to scan QR codes.</string>

<key>NSLocationWhenInUseUsageDescription</key>
<string>Location is required to show nearby stores.</string>
Important Guidelines
- Never use generic text like: “Camera permission required”
- Always explain what feature needs the permission and how it benefits the user
- Write descriptions as if you’re speaking directly to a human—not the system
Why this matters
- Apple does review these strings
- Vague or misleading descriptions can lead to App Store rejection
- Clear explanations increase user trust and permission acceptance
Rule of thumb: If the text wouldn’t make sense to a non-technical user, rewrite it.
Step 6: Android-Specific Configuration (Most Common Mistake)
Declare permissions correctly
In AndroidManifest.xml, only declare permissions your app truly needs:
<uses-permission android:name="android.permission.CAMERA" />
Android 13+ (API 33+) changes
Android 13 introduced granular media permissions, replacing broad storage access:
- READ_MEDIA_IMAGES
- READ_MEDIA_VIDEO
- READ_MEDIA_AUDIO
What this means
- Do NOT request legacy storage permissions (READ_EXTERNAL_STORAGE) by default
- Request only the specific media type your feature requires
- Ask at the moment the feature is used, not at app launch
Why this matters
Prevents unnecessary permission prompts
- Aligns with modern Android privacy expectations
- Reduces permission denial and Play Store review issues
Key takeaway: Least-privilege access is no longer optional on Android—it’s expected.
Best Practices from Large-Scale Applications
Successful large-scale apps follow a thoughtful and user-centric permission strategy. Permissions should be grouped based on features, not by technical type, so users clearly understand why access is needed. Permission decisions should be cached locally to avoid repeated prompts and unnecessary checks.
It’s also important to track permission denial events using analytics to identify UX issues and drop-offs. Permissions should be requested again only after clear user intent, never automatically. Most importantly, apps should be designed in a way that core functionality continues to work—even when permissions are not granted.
Common Pitfalls to Avoid
Many apps fail due to poor permission handling. Avoid requesting multiple permissions at once, as it overwhelms users. Never show the system permission dialog without prior explanation, and don’t block the entire app if a permission is denied. Permissions should not be assumed to remain granted forever, as users can revoke them at any time. Additionally, ignoring the permanently denied state can lead to broken flows and frustrated users.
Testing Checklist (Must Not Be Skipped)
Thorough testing is critical for permission-related flows. Always test scenarios such as denying permissions on a fresh install, allowing permissions on first launch, and selecting “Don’t ask again.” Verify behavior when permissions are revoked manually from system settings. On iOS, test denial followed by app relaunch, and ensure compatibility testing on Android 13+ devices, where permission behavior has changed significantly.
Conclusion
Permission handling in real-world Flutter apps is about trust, timing, and clarity, not just APIs. Asking too early, re-prompting blindly, or ignoring denied states leads to poor UX, bad reviews, and store issues.
Great apps request permissions contextually, explain the reason clearly, respect platform differences, and always handle “no” gracefully.
Remember: permissions are a trust contract, not a technical step. When users feel informed and in control, acceptance and retention naturally improve.