.svg)


The Problem Every Flutter Developer Faces
Picture this: You're building your Flutter app, testing features, making API calls. Everything works perfectly on your phone. Then one day, you build a release version and realize you've shipped it with your development API keys pointing to your test server. 😱
Or worse—you're testing a "delete all data" feature and accidentally wipe out real user data because you forgot you were connected to the production database.
Every developer runs into this problem. It's not a matter of if, but when. The solution? Flutter Flavors.
Flavors let you have different versions of your app (Development, QA/Testing, and Production) all from the same codebase. Think of it like having a work outfit, gym outfit, and party outfit—same person, different settings.

What Are Flutter Flavors?
Imagine you're working on a food delivery app. You need:
- A version where you test stuff - Break things, try crazy features, connect to fake data. Users should never see this.
- A version where your QA team tests - More stable, real-looking data, but still not the final product.
- The actual app that users download - Everything works perfectly, uses real servers, has real user data.
You could create three separate projects... but that's a nightmare. Every bug fix would need to be done three times.
Flavors solve this. One codebase, three different versions. Each version can have:
- Different app names ("MyApp Dev", "MyApp QA", "MyApp")
- Different app icons (so you can tell them apart)
- Different API URLs (dev server, staging server, production server)
- Different configurations (logging on/off, feature flags, etc.)
Why This Matters
Testing Without Fear
Testing a payment feature? Your dev version uses test credit cards and fake money. Your production version uses real payments. No accidental charges.
Installing Multiple Versions
You can install dev, qa, and production versions on your phone simultaneously. They won't conflict because they have different bundle IDs.
Team Collaboration
Your QA team wants to test today's build? Give them the QA version—cleaner than dev but not production-ready.
Production Debugging
Something broke in production? Enable extra logging in your dev version to investigate, without exposing those logs to users.
The Three Flavors Explained
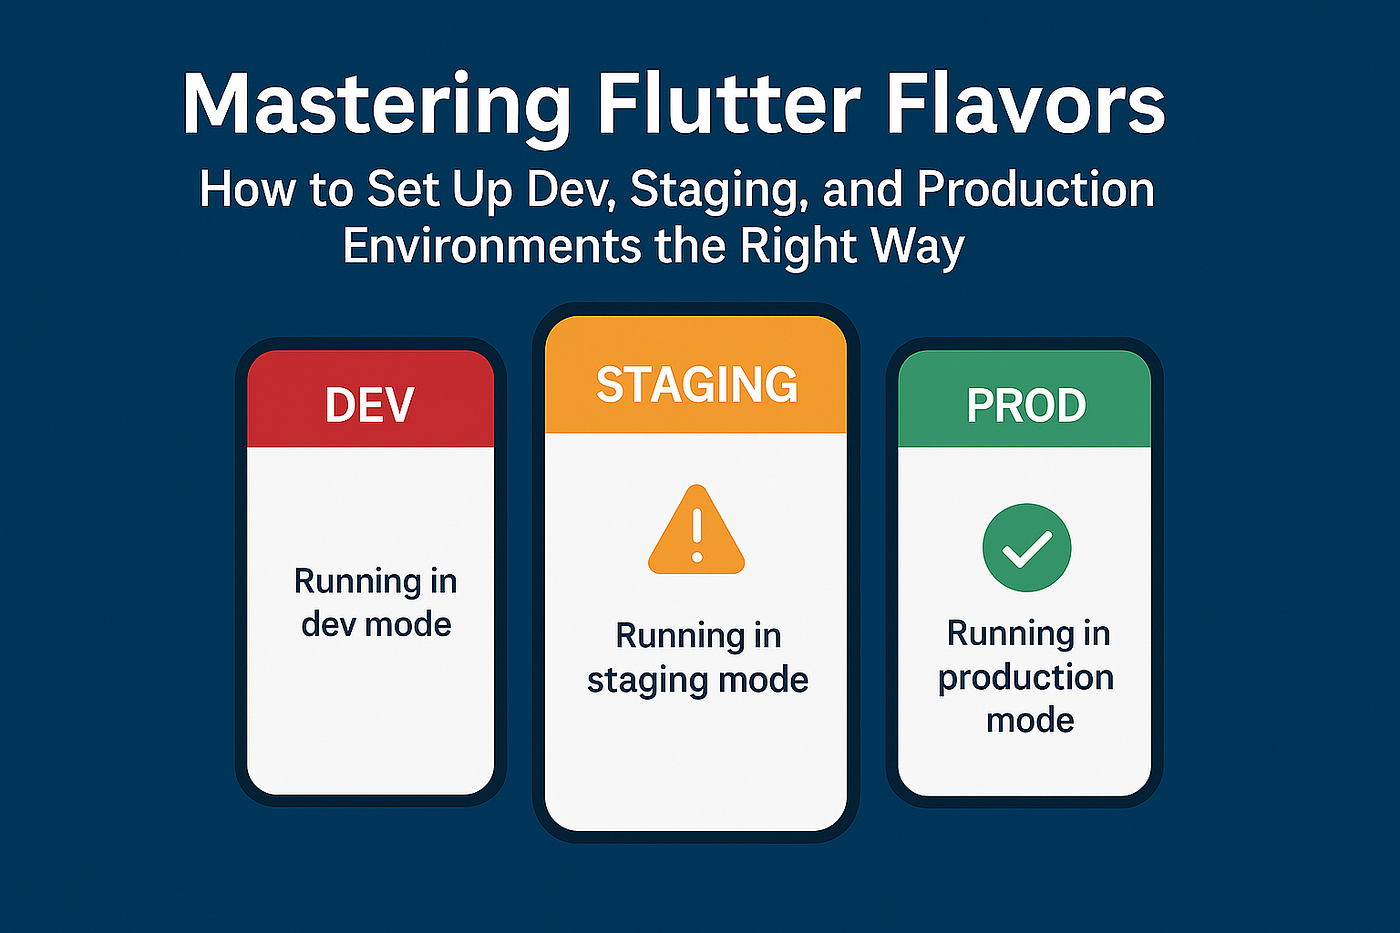
Development (Dev)
Your playground where you work and test.
- API: https://dev-api.myapp.com or localhost
- Features:
- Lots of console logs
- Debug banners
- Red app icon
- Relaxed security
- Fake/mock data
This is your messy desk where actual work happens.
QA/Staging
The dress rehearsal before going live.
- API: https://staging-api.myapp.com
- Features:
- Some logging (less than dev)
- Real-like data (copies of production)
- Orange app icon
- Analytics enabled
- Almost production-ready
Final practice before the big performance.
Production (Prod)
What users download from app stores.
- API: https://api.myapp.com
- Features:
- Minimal logging (errors only)
- Real user data
- Your brand's app icon
- Full security
- Crash reporting enabled
- Everything polished
The actual product on the shelf.
Setting Up Android
Open android/app/build.gradle and add this:
gradle
android {
    // ... your existing code

    flavorDimensions "default"

    productFlavors {
        dev {
            dimension "default"
            applicationIdSuffix ".dev"
            versionNameSuffix "-dev"
            resValue "string", "app_name", "MyApp Dev"
        }

        qa {
            dimension "default"
            applicationIdSuffix ".qa"
            versionNameSuffix "-qa"
            resValue "string", "app_name", "MyApp QA"
        }

        prod {
            dimension "default"
            resValue "string", "app_name", "MyApp"
        }
    }
}
This creates three flavors with different names and package suffixes. The suffixes prevent conflicts when installing multiple versions.
Now update android/app/src/main/AndroidManifest.xml:
xml
<application
    android:label="@string/app_name"
    android:icon="@mipmap/ic_launcher">
That @string/app_name automatically uses the right name for each flavor.
Android setup complete! 🎉
Setting Up iOS
iOS requires Xcode configuration.
Open Xcode:
bash
open ios/Runner.xcworkspaceCreate Build Configurations
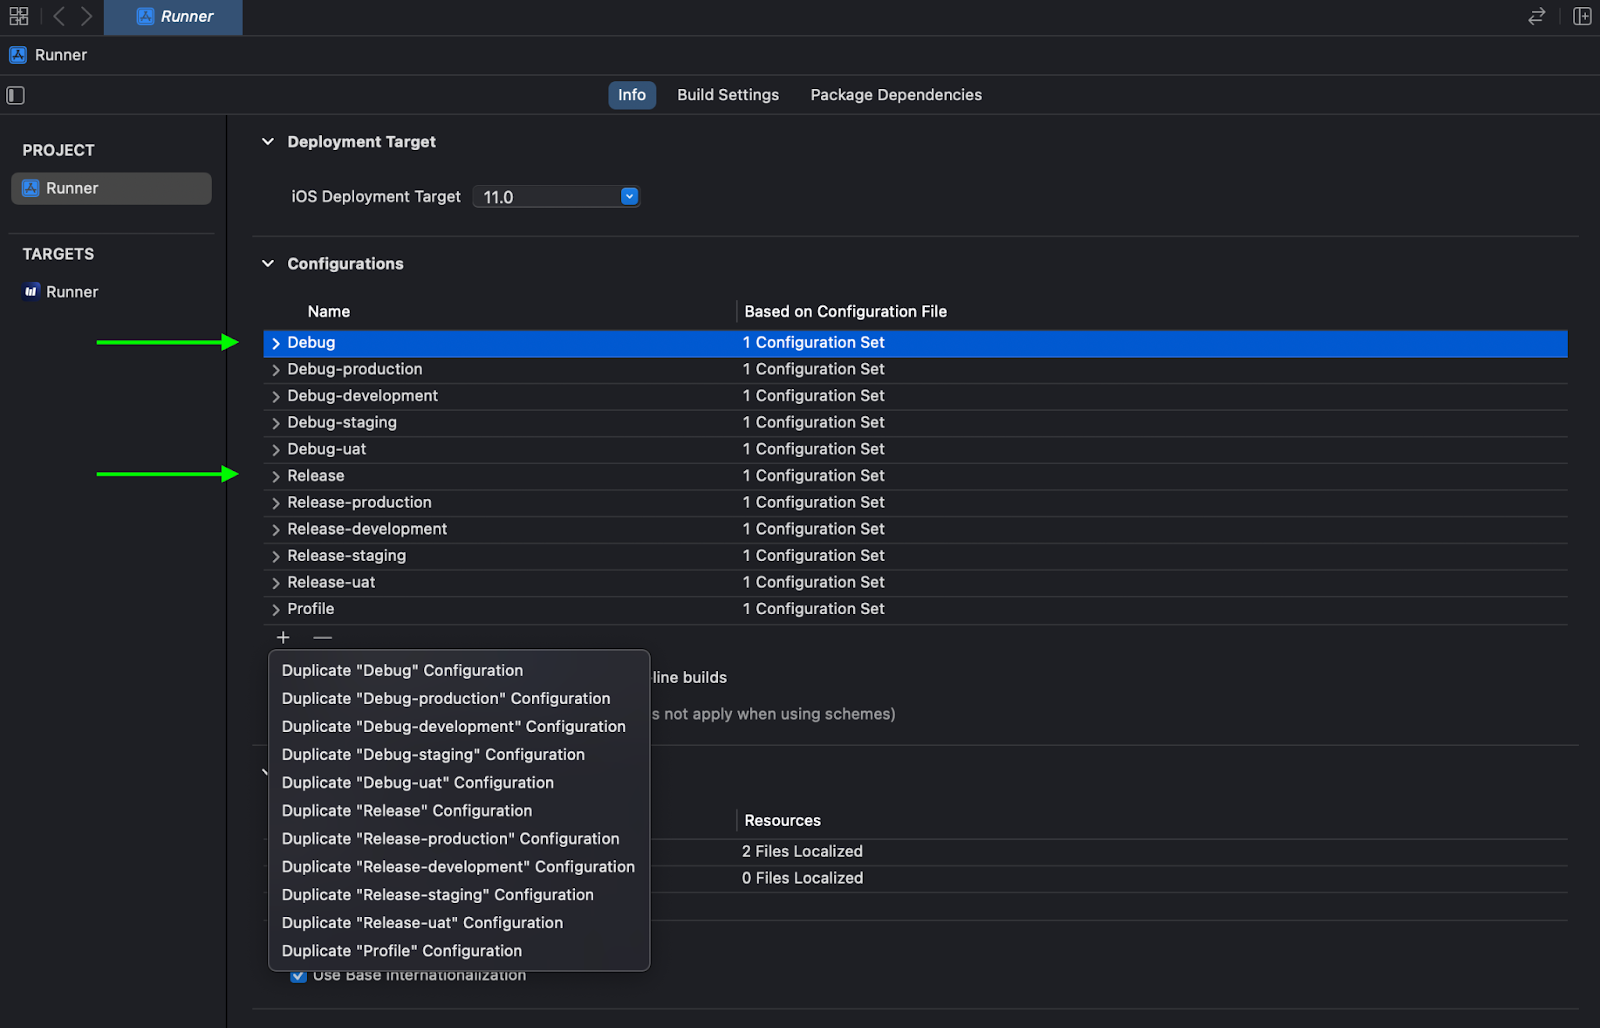
Build configurations are like different "profiles" for building your app.
- Click on your project (Runner) in the left sidebar
- Go to the "Info" tab
- Find "Configurations"
- Click "+" and duplicate each configuration
Create these:
- Debug → Debug-dev, Debug-qa, Debug-prod
- Release → Release-dev, Release-qa, Release-prod
- Profile → Profile-dev, Profile-qa, Profile-prod
Each flavor needs its own build settings.
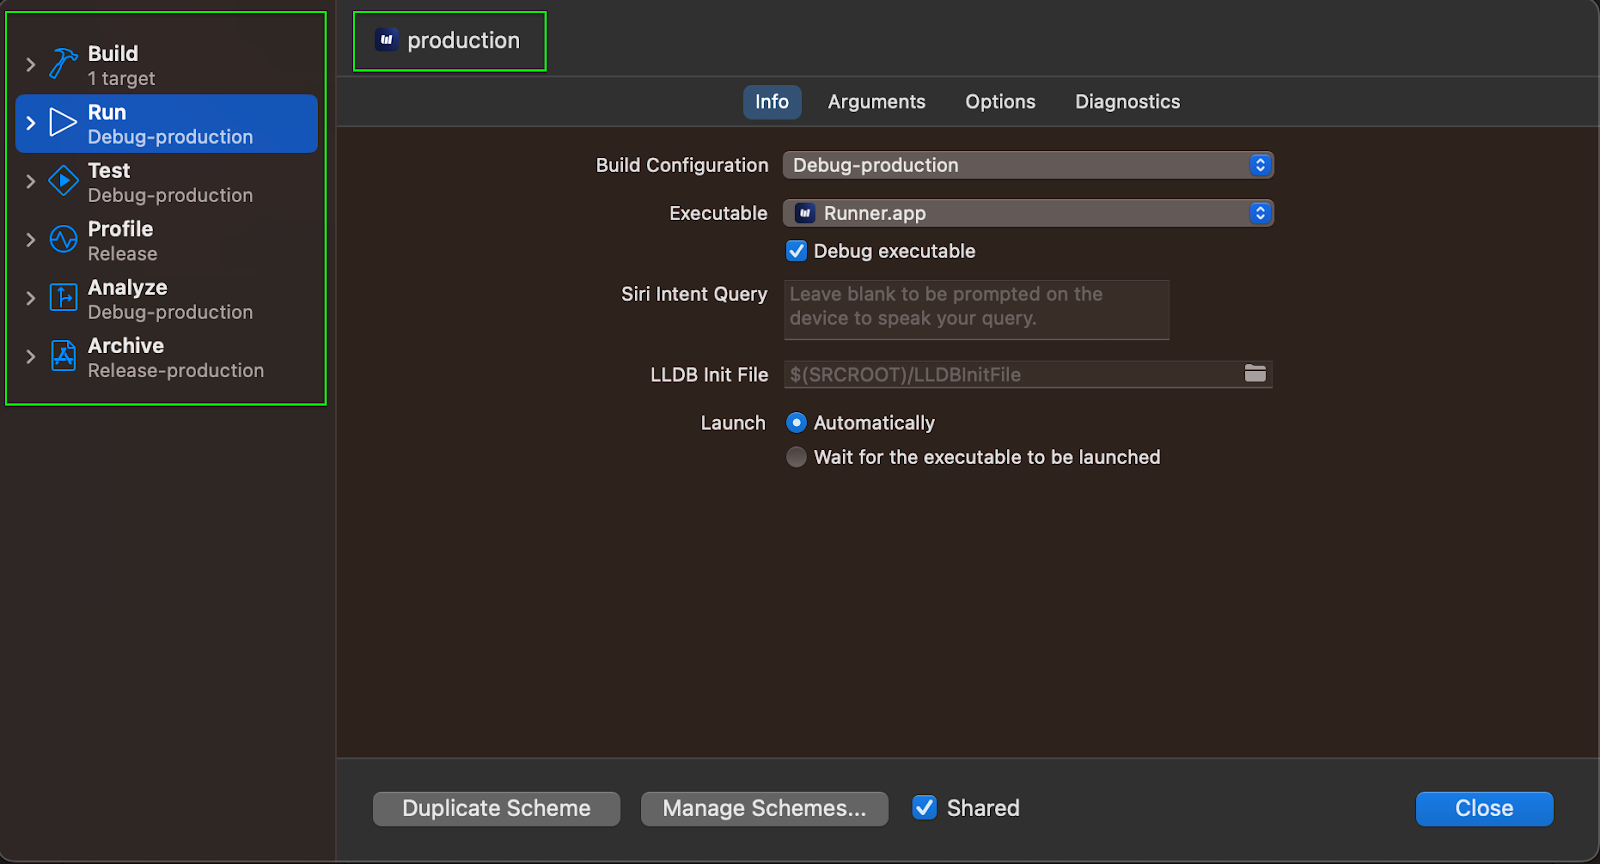
Create Schemes
Schemes are shortcuts to build specific flavors.
- Go to Product → Scheme → Manage Schemes
- Click on "Runner" → gear icon → Duplicate
- Name it "dev" and check "Shared"
- Repeat for "qa" and "prod"
Set Bundle Identifiers
Each flavor needs a unique ID.
- Click Runner target (blue icon)
- Go to "Build Settings"
- Search "Product Bundle Identifier"
- Set them:
- All *-dev configs: com.yourcompany.myapp.dev
- All *-qa configs: com.yourcompany.myapp.qa
- All *-prod configs: com.yourcompany.myapp
Different bundle IDs let you install all three versions simultaneously.
iOS setup done! 💪
The Flutter Code
Create separate entry points for each flavor.
Create lib/app_config.dart:
dart
enum Flavor { dev, qa, prod }

class AppConfig {
  static late Flavor flavor;
  static late String apiUrl;
  static late String appName;

  static void init({
    required Flavor flavor,
    required String apiUrl,
    required String appName,
  }) {
    AppConfig.flavor = flavor;
    AppConfig.apiUrl = apiUrl;
    AppConfig.appName = appName;
  }

  // Helper methods
  static bool get isDevelopment => flavor == Flavor.dev;
  static bool get isQA => flavor == Flavor.qa;
  static bool get isProduction => flavor == Flavor.prod;

  // Feature flags
  static bool get showLogs => !isProduction;
  static bool get showDebugBanner => isDevelopment;
  }
This stores which flavor you're in and the API URL. Helper methods make checking the current flavor easy.
Create lib/main_dev.dart:
dart
import 'package:flutter/material.dart';
import 'app_config.dart';
import 'main.dart' as app;

void main() {
  AppConfig.init(
    flavor: Flavor.dev,
    apiUrl: 'https://dev-api.example.com',
    appName: 'MyApp Dev',
  );

  app.main();
}
Create lib/main_qa.dart:
dart
import 'package:flutter/material.dart';
import 'app_config.dart';
import 'main.dart' as app;

void main() {
  AppConfig.init(
    flavor: Flavor.qa,
    apiUrl: 'https://qa-api.example.com',
    appName: 'MyApp QA',
  );

  app.main();
}
Create lib/main_prod.dart:
dart
import 'package:flutter/material.dart';
import 'app_config.dart';
import 'main.dart' as app;

void main() {
  AppConfig.init(
    flavor: Flavor.prod,
    apiUrl: 'https://api.example.com',
    appName: 'MyApp',
  );

  app.main();
}
Update lib/main.dart:
dart
import 'package:flutter/material.dart';
import 'app_config.dart';

void main() {
  runApp(const MyApp());
}

class MyApp extends StatelessWidget {
  const MyApp({Key? key}) : super(key: key);

  @override
  Widget build(BuildContext context) {
    return MaterialApp(
      title: AppConfig.appName,
      debugShowCheckedModeBanner: AppConfig.showDebugBanner,
      theme: ThemeData(
        // Different colors for easy identification
        primarySwatch: _getThemeColor(),
      ),
      home: const HomePage(),
    );
  }

  MaterialColor _getThemeColor() {
    switch (AppConfig.flavor) {
      case Flavor.dev:
        return Colors.red;      // Red for dev
      case Flavor.qa:
        return Colors.orange;   // Orange for QA
      case Flavor.prod:
        return Colors.blue;     // Blue for production
    }
  }
}

class HomePage extends StatelessWidget {
  const HomePage({Key? key}) : super(key: key);

  @override
  Widget build(BuildContext context) {
    return Scaffold(
      appBar: AppBar(
        title: Text(AppConfig.appName),
      ),
      body: Center(
        child: Column(
          mainAxisAlignment: MainAxisAlignment.center,
          children: [
            Text(
              'Current Flavor: ${AppConfig.flavor.name}',
              style: Theme.of(context).textTheme.headlineMedium,
            ),
            const SizedBox(height: 20),
            Text(
              'API URL: ${AppConfig.apiUrl}',
              style: Theme.of(context).textTheme.bodyLarge,
            ),
            const SizedBox(height: 20),
            if (AppConfig.showLogs)
              const Text(
                '🛠️ Debug Mode Active',
                style: TextStyle(color: Colors.red),
              ),
          ],
        ),
      ),
    );
  }
}
Each "main" file sets up the correct configuration before starting the app. The main app uses these configurations to show different colors and settings.
Running Your Flavored App
Development:
bash
flutter run --flavor dev -t lib/main_dev.dart
QA:
bash
flutter run --flavor qa -t lib/main_qa.dart
Production:
bash
flutter run --flavor prod -t lib/main_prod.dart
The --flavor flag tells the build system which flavor to use. The -t flag specifies which main file to start from.
Building Release Versions
Android APKs:
bash
flutter build apk --flavor dev -t lib/main_dev.dart
flutter build apk --flavor qa -t lib/main_qa.dart
flutter build apk --flavor prod -t lib/main_prod.dart
For Play Store:
bash
flutter build appbundle --flavor prod -t lib/main_prod.dart
iOS:
bash
flutter build ios --flavor dev -t lib/main_dev.dart
flutter build ios --flavor qa -t lib/main_qa.dart
flutter build ios --flavor prod -t lib/main_prod.dart
VS Code Shortcuts
Typing long commands gets old fast. Set up shortcuts in .vscode/launch.json:
json
{
  "version": "0.2.0",
  "configurations": [
    {
      "name": "Dev",
      "request": "launch",
      "type": "dart",
      "program": "lib/main_dev.dart",
      "args": ["--flavor", "dev"]
    },
    {
      "name": "QA",
      "request": "launch",
      "type": "dart",
      "program": "lib/main_qa.dart",
      "args": ["--flavor", "qa"]
    },
    {
      "name": "Prod",
      "request": "launch",
      "type": "dart",
      "program": "lib/main_prod.dart",
      "args": ["--flavor", "prod"]
    }
  ]
}
Now just select "Dev", "QA", or "Prod" from the dropdown and hit run. Much easier! 🎮
Using Configurations in Your Code
The real magic—using these configurations in your app.
API calls:
dart
import 'package:http/http.dart' as http;
import 'app_config.dart';

class ApiService {
  static String get baseUrl => AppConfig.apiUrl;

  Future<void> fetchUsers() async {
    final url = '$baseUrl/users';  // Uses the right URL automatically
    final response = await http.get(Uri.parse(url));

    if (AppConfig.showLogs) {
      print('API Response: ${response.body}');  // Only logs in dev/qa
    }

    // Handle response...
  }
}
Conditional features:
dart
class MyButton extends StatelessWidget {
  @override
  Widget build(BuildContext context) {
    return ElevatedButton(
      onPressed: () {
        // Do something

        // Detailed logs only in development
        if (AppConfig.isDevelopment) {
          print('Button pressed at ${DateTime.now()}');
          print('Current user: ...');
          print('App state: ...');
        }
      },
      child: Text('Click Me'),
    );
  }
}
Manual Firebase Integration with Flavors
Firebase requires separate configuration files for each flavor. We'll set this up manually for both Android and iOS.
Step 1: Create Firebase Projects
Go to Firebase Console and create three projects:
- myapp-dev (for Development)
- myapp-qa (for QA/Staging)
- myapp-prod (for Production)
Step 2: Register Android Apps
For each Firebase project, register an Android app:
In myapp-dev project:
- Click "Add app" → Select Android
- Android package name: com.example.myapp.dev (matches your dev applicationId)
- App nickname: "MyApp Dev Android"
- Download the google-services.json file
In myapp-qa project:
- Click "Add app" → Select Android
- Android package name: com.example.myapp.qa
- App nickname: "MyApp QA Android"
- Download the google-services.json file
In myapp-prod project:
- Click "Add app" → Select Android
- Android package name: com.example.myapp
- App nickname: "MyApp Prod Android"
- Download the google-services.json file
Step 3: Place Android Config Files
Create flavor-specific directories and place the downloaded files:
android/app/src/dev/google-services.json      (from myapp-dev project)
android/app/src/qa/google-services.json       (from myapp-qa project)
android/app/src/prod/google-services.json     (from myapp-prod project)
Create the directories if they don't exist:
bash
mkdir -p android/app/src/dev
mkdir -p android/app/src/qa
mkdir -p android/app/src/prod
Then move each downloaded google-services.json to its respective directory.
Step 4: Register iOS Apps
For each Firebase project, register an iOS app:
In myapp-dev project:
- Click "Add app" → Select iOS
- iOS bundle ID: com.example.myapp.dev
- App nickname: "MyApp Dev iOS"
- Download the GoogleService-Info.plist file
In myapp-qa project:
- Click "Add app" → Select iOS
- iOS bundle ID: com.example.myapp.qa
- App nickname: "MyApp QA iOS"
- Download the GoogleService-Info.plist file
In myapp-prod project:
- Click "Add app" → Select iOS
- iOS bundle ID: com.example.myapp
- App nickname: "MyApp Prod iOS"
- Download the GoogleService-Info.plist file
Step 5: Place iOS Config Files
Create directories for iOS config files:
bash
mkdir -p ios/flavors/dev
mkdir -p ios/flavors/qa
mkdir -p ios/flavors/prod
Place the downloaded plist files:
ios/flavors/dev/GoogleService-Info.plist     (from myapp-dev project)
ios/flavors/qa/GoogleService-Info.plist      (from myapp-qa project)
ios/flavors/prod/GoogleService-Info.plist    (from myapp-prod project)
Step 6: Add Firebase SDK to Project
Add firebase_core to your pubspec.yaml:
yaml
dependencies:
  flutter:
    sdk: flutter
  firebase_core: ^3.6.0
Run:
bash
flutter pub getStep 7: Create Firebase Options Files
Create lib/firebase_options_dev.dart:
dart
import 'package:firebase_core/firebase_core.dart' show FirebaseOptions;
import 'package:flutter/foundation.dart'
    show defaultTargetPlatform, kIsWeb, TargetPlatform;

class DefaultFirebaseOptions {
  static FirebaseOptions get currentPlatform {
    if (kIsWeb) {
      throw UnsupportedError(
        'DefaultFirebaseOptions have not been configured for web',
      );
    }
    switch (defaultTargetPlatform) {
      case TargetPlatform.android:
        return android;
      case TargetPlatform.iOS:
        return ios;
      default:
        throw UnsupportedError(
          'DefaultFirebaseOptions are not supported for this platform.',
        );
    }
  }

  static const FirebaseOptions android = FirebaseOptions(
    apiKey: 'YOUR_DEV_ANDROID_API_KEY',
    appId: 'YOUR_DEV_ANDROID_APP_ID',
    messagingSenderId: 'YOUR_DEV_SENDER_ID',
    projectId: 'myapp-dev',
    storageBucket: 'myapp-dev.appspot.com',
  );

  static const FirebaseOptions ios = FirebaseOptions(
    apiKey: 'YOUR_DEV_IOS_API_KEY',
    appId: 'YOUR_DEV_IOS_APP_ID',
    messagingSenderId: 'YOUR_DEV_SENDER_ID',
    projectId: 'myapp-dev',
    storageBucket: 'myapp-dev.appspot.com',
    iosBundleId: 'com.example.myapp.dev',
  );
}
Create similar files for QA and Production:
- lib/firebase_options_qa.dart (replace 'myapp-dev' with 'myapp-qa' and use QA credentials)
- lib/firebase_options_prod.dart (replace 'myapp-dev' with 'myapp-prod' and use Prod credentials)
Step 8: Update Main Files for Firebase
Update lib/main_dev.dart:
dart
import 'package:firebase_core/firebase_core.dart';
import 'firebase_options_dev.dart';
import 'package:flutter/material.dart';
import 'app_config.dart';
import 'main.dart' as app;

void main() async {
  WidgetsFlutterBinding.ensureInitialized();

  await Firebase.initializeApp(
    options: DefaultFirebaseOptions.currentPlatform,
  );

  AppConfig.init(
    flavor: Flavor.dev,
    apiUrl: 'https://dev-api.example.com',
    appName: 'MyApp Dev',
  );

  app.main();
}
Update lib/main_qa.dart:
dart
import 'package:firebase_core/firebase_core.dart';
import 'firebase_options_qa.dart';
import 'package:flutter/material.dart';
import 'app_config.dart';
import 'main.dart' as app;

void main() async {
  WidgetsFlutterBinding.ensureInitialized();

  await Firebase.initializeApp(
    options: DefaultFirebaseOptions.currentPlatform,
  );

  AppConfig.init(
    flavor: Flavor.qa,
    apiUrl: 'https://qa-api.example.com',
    appName: 'MyApp QA',
  );

  app.main();
}
Update lib/main_prod.dart:
dart
import 'package:firebase_core/firebase_core.dart';
import 'firebase_options_prod.dart';
import 'package:flutter/material.dart';
import 'app_config.dart';
import 'main.dart' as app;

void main() async {
  WidgetsFlutterBinding.ensureInitialized();

  await Firebase.initializeApp(
    options: DefaultFirebaseOptions.currentPlatform,
  );

  AppConfig.init(
    flavor: Flavor.prod,
    apiUrl: 'https://api.example.com',
    appName: 'MyApp',
  );

  app.main();
}
Firebase Android Configuration
Adding Google Services Plugin
Update android/app/build.gradle.kts to add the Google services plugin:
kotlin
plugins {
    id("com.android.application")
    id("kotlin-android")
    id("dev.flutter.flutter-gradle-plugin")
}
// Add this at the bottom of the file
apply plugin: 'com.google.gms.google-services'
If you're using the older .gradle format:
gradle
plugins {
    id 'com.android.application'
    id 'kotlin-android'
    id 'dev.flutter.flutter-gradle-plugin'
}

// Add this at the bottom
apply plugin: 'com.google.gms.google-services'
Adding Google Services Dependency
Update android/build.gradle (the project-level one) to include the Google services classpath:
gradle
buildscript {
    repositories {
        google()
        mavenCentral()
    }

    dependencies {
        classpath 'com.android.tools.build:gradle:8.1.0'
        classpath "org.jetbrains.kotlin:kotlin-gradle-plugin:1.8.0"
        // Add this line
        classpath 'com.google.gms:google-services:4.4.0'
    }
}
For newer Gradle versions using settings.gradle.kts:
kotlin
pluginManagement {
    repositories {
        google()
        mavenCentral()
        gradlePluginPortal()
    }
}

plugins {
    id("dev.flutter.flutter-plugin-loader") version "1.0.0"
    id("com.android.application") version "8.1.0" apply false
    id("org.jetbrains.kotlin.android") version "1.8.0" apply false
    // Add this line
    id("com.google.gms.google-services") version "4.4.0" apply false
}
How Android Finds the Right Config File
Android automatically looks for google-services.json files in flavor-specific directories:
android/app/src/dev/google-services.json      → Used for dev flavor
android/app/src/qa/google-services.json       → Used for qa flavor
android/app/src/prod/google-services.json     → Used for prod flavor
When you build with --flavor dev, Gradle uses the google-services.json from android/app/src/dev/. When you build with --flavor prod, it uses the one from android/app/src/prod/. Simple!
Verifying Android Firebase Setup
Build the app to verify everything works:
bash
flutter build apk --flavor dev -t lib/main_dev.dart
flutter build apk --flavor qa -t lib/main_qa.dart
flutter build apk --flavor prod -t lib/main_prod.dart
If you see errors about missing google-services.json, verify:
- The file exists in the correct directory (android/app/src/[flavor]/google-services.json)
- The package name in the file matches your flavor's applicationId
- The Google services plugin is properly applied in your gradle files
Firebase iOS Configuration
iOS configuration is a bit more involved because Xcode needs to know which GoogleService-Info.plist file to use for each build configuration.
iOS Directory Structure
After running the FlutterFire script, your iOS directory should have:
ios/flavors/dev/GoogleService-Info.plist
ios/flavors/qa/GoogleService-Info.plist
ios/flavors/prod/GoogleService-Info.plist
Setting Up Xcode to Use the Right Files
You need to tell Xcode which plist file to use for each build configuration.
Open Xcode:
bash
open ios/Runner.xcworkspace
Option 1: Using Build Phases (Recommended)
This approach copies the correct file at build time.
- In Xcode, select the Runner project
- Select the Runner target
- Go to "Build Phases" tab
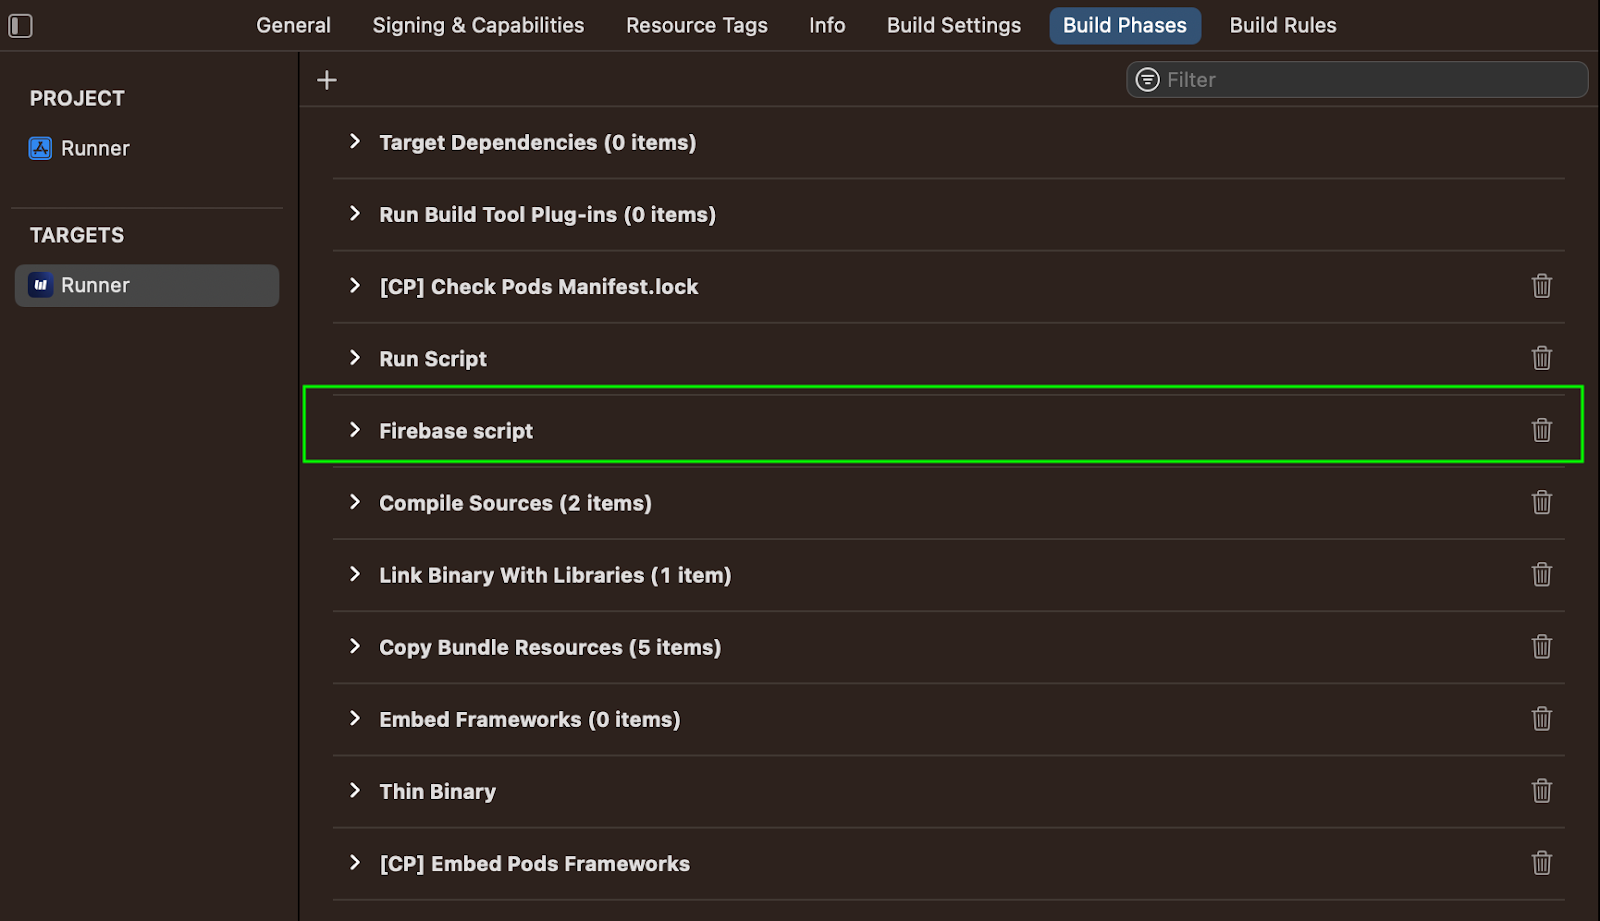
- Click "+" and select "New Run Script Phase"
- Drag this new phase to just before "Copy Bundle Resources"
- Name it "Copy GoogleService-Info.plist"
- Add this script:
bash
# Copy the correct GoogleService-Info.plist based on configuration

# Define paths
DEV_PLIST="${PROJECT_DIR}/flavors/dev/GoogleService-Info.plist"
QA_PLIST="${PROJECT_DIR}/flavors/qa/GoogleService-Info.plist"
PROD_PLIST="${PROJECT_DIR}/flavors/prod/GoogleService-Info.plist"
DEST="${BUILT_PRODUCTS_DIR}/${PRODUCT_NAME}.app/GoogleService-Info.plist"

# Copy the appropriate file based on configuration
if [[ $CONFIGURATION == *"dev"* ]]; then
    echo "Using Dev Firebase config"
    cp "${DEV_PLIST}" "${DEST}"
elif [[ $CONFIGURATION == *"qa"* ]]; then
    echo "Using QA Firebase config"
    cp "${QA_PLIST}" "${DEST}"
elif [[ $CONFIGURATION == *"prod"* ]]; then
    echo "Using Prod Firebase config"
    cp "${PROD_PLIST}" "${DEST}"
else
    echo "Using Prod Firebase config (default)"
    cp "${PROD_PLIST}" "${DEST}"
fi
This script checks your build configuration name and copies the right plist file.
Option 2: Using xcconfig Files
Alternatively, you can reference the files in your xcconfig files.
Create or update these files in ios/Flutter/:
Debug-dev.xcconfig:
#include "Generated.xcconfig"
PRODUCT_BUNDLE_IDENTIFIER = com.example.myapp.dev
PRODUCT_NAME = MyApp Dev
GOOGLE_SERVICE_INFO_PLIST_PATH = ${SRCROOT}/flavors/dev/GoogleService-Info.plist
Debug-qa.xcconfig:
#include "Generated.xcconfig"
PRODUCT_BUNDLE_IDENTIFIER = com.example.myapp.qa
PRODUCT_NAME = MyApp QA
GOOGLE_SERVICE_INFO_PLIST_PATH = ${SRCROOT}/flavors/qa/GoogleService-Info.plist
Debug-prod.xcconfig:
#include "Generated.xcconfig"
PRODUCT_BUNDLE_IDENTIFIER = com.example.myapp
PRODUCT_NAME = MyApp
GOOGLE_SERVICE_INFO_PLIST_PATH = ${SRCROOT}/flavors/prod/GoogleService-Info.plist
Repeat for Release and Profile configurations.
Minimum iOS Version for Firebase
Firebase requires iOS 13.0 or higher. Update your ios/Podfile:
ruby
# Uncomment this line and set to 13.0 or higher
platform :ios, '13.0'
Then run:
bash
cd ios
pod install
cd ..
Verifying iOS Firebase Setup
Build for iOS to verify:
bash
flutter build ios --flavor dev -t lib/main_dev.dart
flutter build ios --flavor qa -t lib/main_qa.dart
flutter build ios --flavor prod -t lib/main_prod.dart
Common iOS Firebase Issues:
Issue 1: "FirebaseApp not configured" The build script isn't copying the plist file correctly. Check the Run Script Phase in Xcode.
Issue 2: "File not found: GoogleService-Info.plist" The plist file path is wrong. Verify the files exist in ios/flavors/[flavor]/GoogleService-Info.plist.
Issue 3: Wrong Firebase project connected The wrong plist file is being used. Print the configuration in the build script to debug:
bash
echo "Configuration: $CONFIGURATION"Testing Firebase Connection
Add this to your app to verify Firebase is working:
dart
import 'package:firebase_core/firebase_core.dart';

class FirebaseTestPage extends StatelessWidget {
  @override
  Widget build(BuildContext context) {
    final firebaseApp = Firebase.app();

    return Scaffold(
      appBar: AppBar(title: Text('Firebase Test')),
      body: Padding(
        padding: EdgeInsets.all(16),
        child: Column(
          crossAxisAlignment: CrossAxisAlignment.start,
          children: [
            Text('Firebase App Name: ${firebaseApp.name}'),
            SizedBox(height: 10),
            Text('Project ID: ${firebaseApp.options.projectId}'),
            SizedBox(height: 10),
            Text('App ID: ${firebaseApp.options.appId}'),
            SizedBox(height: 10),
            Text('Flavor: ${AppConfig.flavor.name}'),
            SizedBox(height: 20),
            Text(
              'If the Project ID matches your ${AppConfig.flavor.name} '
              'Firebase project, you\'re all set! ✅',
              style: TextStyle(
                fontWeight: FontWeight.bold,
                color: Colors.green,
              ),
            ),
          ],
        ),
      ),
    );
  }
}
Run the app with each flavor and verify the Project ID matches:
- Dev flavor → should show your dev Firebase project ID
- QA flavor → should show your QA Firebase project ID
- Prod flavor → should show your prod Firebase project ID
Common Mistakes to Avoid
Mistake #1: Mismatched Flavor Names
Android says "dev", iOS says "development", Flutter says "Dev". Nothing works.
Fix: Use identical names everywhere: dev, qa, prod (lowercase).
Mistake #2: Missing the -t Flag
bash
flutter run --flavor dev # Wrong - missing target file
Fix: Always include both flags:
bash
flutter run --flavor dev -t lib/main_dev.dartMistake #3: Identical Bundle IDs
All flavors use com.example.myapp. Can't install multiple versions.
Fix: Make them unique:
- com.example.myapp.dev
- com.example.myapp.qa
- com.example.myapp
Mistake #4: Hardcoded URLs
dart
// Wrong - hardcoded production URL
final url = 'https://api.example.com/users';
Fix: Use the config:
dart
// Right - uses correct URL per flavor
final url = '${AppConfig.apiUrl}/users';
Mistake #5: Committing Secrets
Pushing firebase_options_*.dart files with API keys to GitHub.
Fix: Add to .gitignore:
lib/firebase_options*.dart
android/app/google-services.json
android/app/src/*/google-services.json
ios/flavors/*/GoogleService-Info.plist
Useful Tips
Different Theme Colors
Give each flavor a different color. When you have 3 versions installed, you'll appreciate this:
dart
MaterialColor _getThemeColor() {
  switch (AppConfig.flavor) {
    case Flavor.dev:
      return Colors.red;      // Red = testing/danger
    case Flavor.qa:
      return Colors.orange;   // Orange = almost ready
    case Flavor.prod:
      return Colors.blue;     // Blue = professional
  }
}
App Name Prefix
Show which flavor you're in:
dart
title: AppConfig.isDevelopment
  ? '${AppConfig.appName} - DEBUG'
  : AppConfig.appName,
Different App Icons
Create different icons for each flavor. You can identify them instantly on your phone.
Feature Flags
Add these to AppConfig:
dart
class AppConfig {
  // ... existing code ...

  static bool get enableAnalytics => !isDevelopment;
  static bool get enableCrashReporting => isProduction;
  static bool get showDebugInfo => isDevelopment;
  static bool get allowScreenshots => !isProduction;
}
Real Example: E-Commerce App
Here's how flavors work in a shopping app:
dart
class CheckoutService {
  // Test Stripe key in dev/qa, real key in production
  static String get stripeKey {
    if (AppConfig.isProduction) {
      return 'pk_live_REAL_KEY';
    } else {
      return 'pk_test_TEST_KEY';
    }
  }

  Future<void> processPayment(double amount) async {
    final url = '${AppConfig.apiUrl}/payments';

    // Log only in non-production
    if (AppConfig.showLogs) {
      print('Processing payment: \$${amount}');
      print('Using API: $url');
      print('Stripe key: ${stripeKey.substring(0, 10)}...');
    }

    // Make the payment call
    // ...
  }
}
In dev: Uses test Stripe key, lots of logs, dev API. In qa: Uses test Stripe key, some logs, staging API. In prod: Uses real Stripe key, minimal logs, production API.
One codebase, three behaviors. 🎯
Summary
You now know:
✅ What flavors are and why they matter
✅ How to set up flavors for Android and iOS
✅ Creating different entry points in Flutter
✅ Running and building different flavors
✅ Integrating Firebase with flavors
✅ Common mistakes and how to avoid them
✅ Real-world examples and practical tips
Start with just dev and prod. Add QA later if needed. Test by building and installing both versions on your phone. Add configurations gradually—don't try to set up everything at once.
Resources
Articles referenced while creating this guide:
Tutorials:
Documentation:
Final Thoughts
Setting up flavors might feel like extra work initially, but it pays off immediately. It's like organizing your closet—annoying to do, but amazing once it's done.
Start small, take it step by step, and don't worry about mistakes. Everyone makes them. The important thing is learning a professional practice that makes development easier and safer.
Future you will thank present you for setting this up properly. 🚀
Happy coding! 💙