.svg)

The Problem Nobody Talks About Until It's Too Late
Imagine this: your iOS app ships to the App Store. A security researcher downloads it, runs frida-ps on a jailbroken device, and within twenty minutes has extracted your API key from the binary. They replay your authentication token, impersonate users, and scrape your entire user database — all before you wake up and check Slack.
Or consider a simpler scenario: a user connects to a public Wi-Fi network at an airport. An attacker on the same network runs a proxy tool, intercepts your app's HTTP requests, and steals a valid session token. Because you store that token in UserDefaults, it survives app restarts and remains valid for weeks.
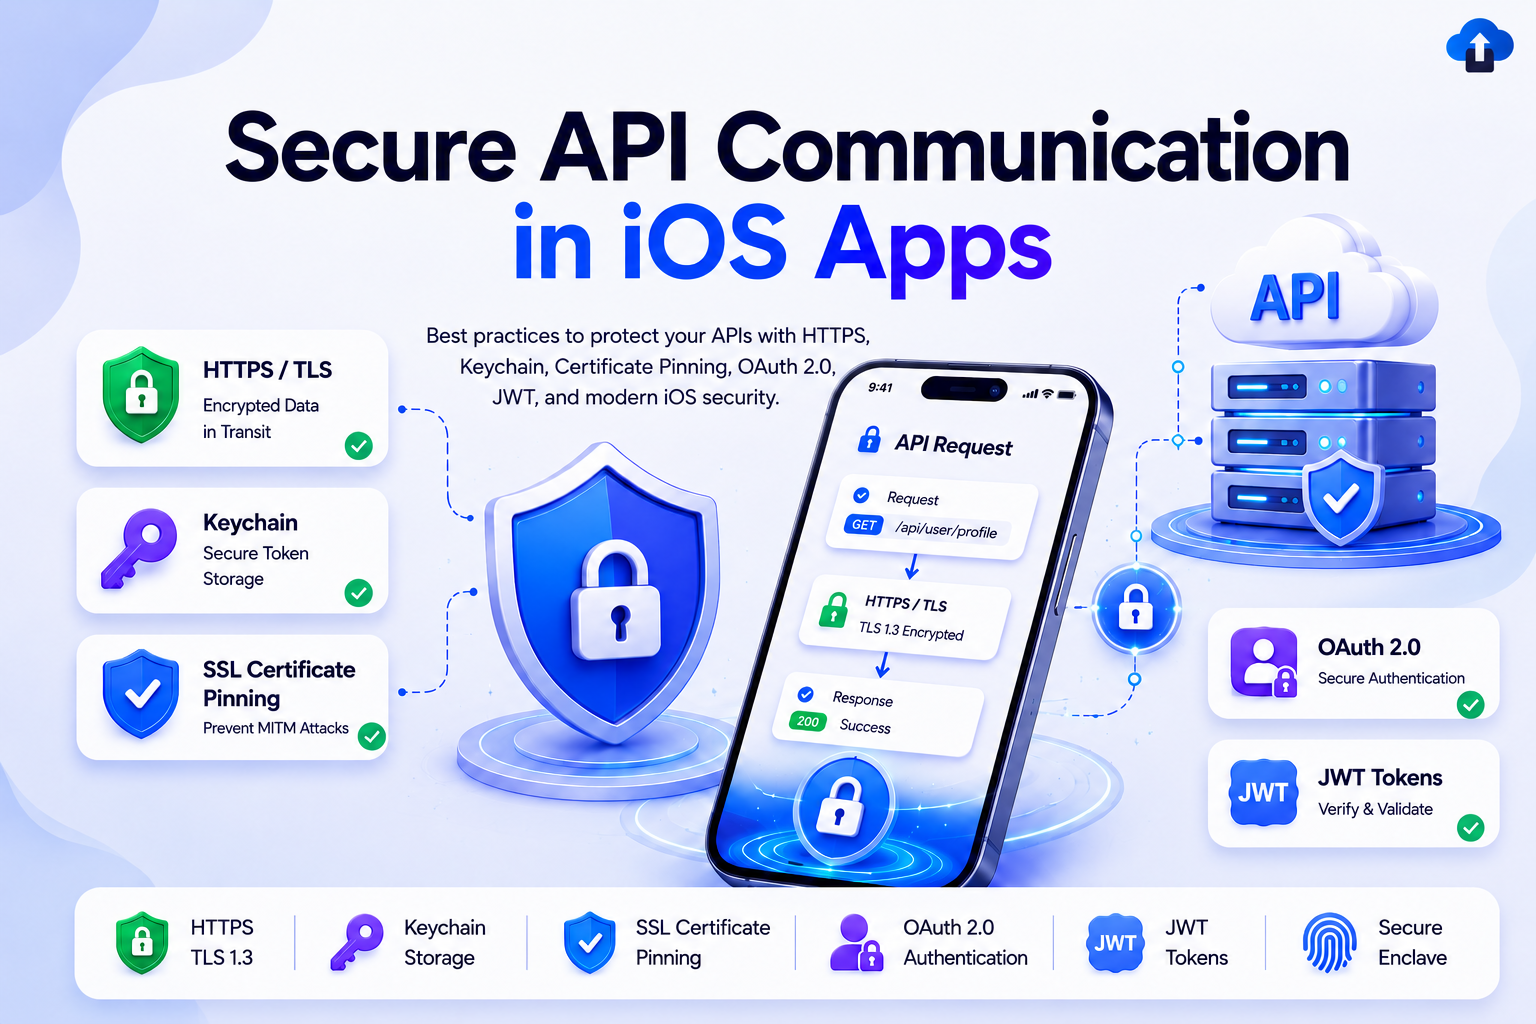
Neither of these is a hypothetical. Both happen to production apps every week. HTTPS alone does not protect you. This guide walks through every layer of defense a professional iOS app should have in 2026.
Introduction: Why API Security Is a Layered Problem
Most developers understand that APIs should use HTTPS. Fewer understand that transport encryption is only one layer of a secure architecture. The real attack surface is much wider:
- What happens after your token reaches the device? If it is stored insecurely, it can be read by malware or extracted from a backup.
- What if your certificate is spoofed? A well-funded attacker can install a custom root certificate on a device, invalidating HTTPS trust entirely.
- What happens if your binary is reverse-engineered? Any secret compiled into your app can be extracted — API keys, base URLs, encryption salts.
- What if a valid token is replayed? If your API lacks replay protection, a captured request can be re-sent indefinitely.
Security is not a feature you add at the end of a sprint. It is an architectural decision you make from day one.
Understanding API Threats in Mobile Apps
Before writing a single line of code, you need to understand the actual threat model for a mobile client communicating with a backend API.
Understanding these vectors tells you exactly which defenses to build and why.
Secure Networking Architecture in iOS
A production-grade iOS networking layer follows a clear, auditable flow:
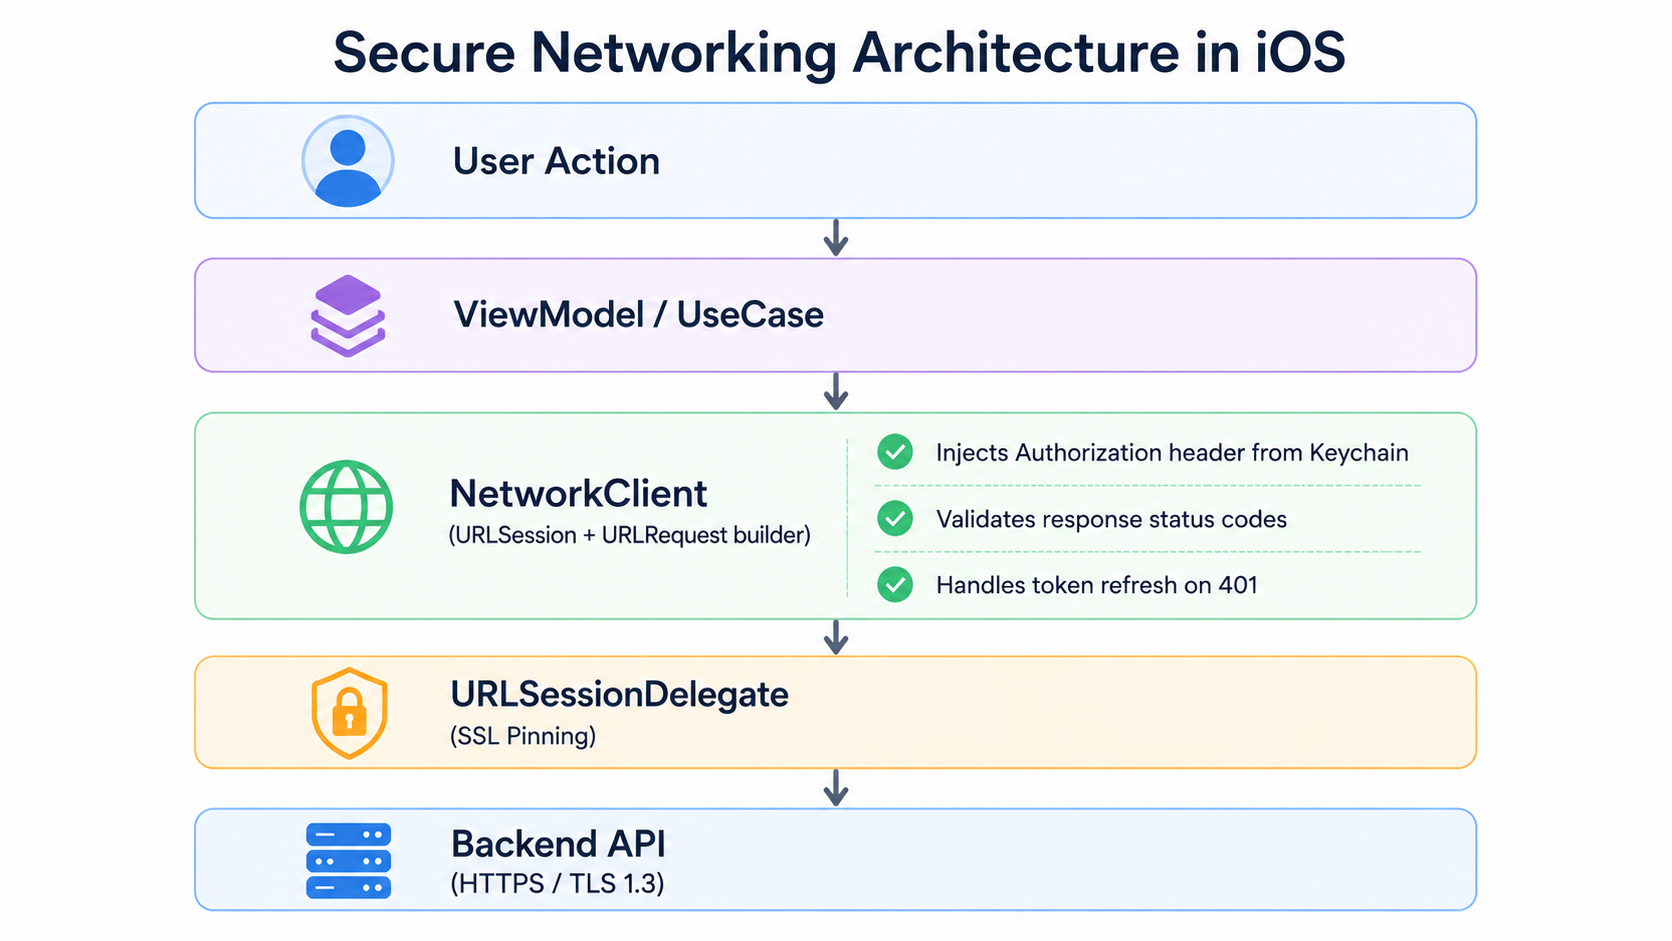
The key principle: no view or business-logic layer ever touches raw tokens or constructs network requests directly. Token management and request signing are centralized in a single NetworkClient class, making security audits straightforward and token rotation trivial.
Using HTTPS Correctly: App Transport Security
iOS enforces App Transport Security (ATS) by default, requiring TLS 1.2 or higher for all connections. Never disable it globally. An Info.plist entry like this is a serious red flag in any code review:
<!-- DANGEROUS: Do not ship this -->
<key>NSAppTransportSecurity</key>
<dict>
 <key>NSAllowsArbitraryLoads</key>
 <true/>
</dict>

If you must allow a non-secure third-party domain (e.g., for a legacy media CDN), scope the exception precisely:
<!-- Acceptable: scoped exception, never global -->
<key>NSAppTransportSecurity</key>
<dict>
 <key>NSExceptionDomains</key>
 <dict>
 <key>legacy-cdn.example.com</key>
 <dict>
 <key>NSExceptionAllowsInsecureHTTPLoads</key>
 <true/>
 <key>NSIncludesSubdomains</key>
 <false/>
 </dict>
 </dict>
</dict>
ATS also enforces forward secrecy and certificate validity. For your own API, never relax these constraints.
Secure API Requests with URLSession
Modern iOS networking should use async/await with URLSession. Avoid third-party networking libraries for security-critical paths unless you deeply understand their internals.
A clean, production-ready NetworkClient:
// NetworkClient.swift
final class NetworkClient {
 private let session: URLSession
 private let tokenStore: TokenStore

 init(session: URLSession = .shared, tokenStore: TokenStore) {
 self.session = session
 self.tokenStore = tokenStore
 }

 func request<T: Decodable>(
 _ endpoint: Endpoint,
 as type: T.Type
 ) async throws -> T {
 var urlRequest = try endpoint.urlRequest()

 // Inject token from Keychain, never from memory or UserDefaults
 if let token = tokenStore.accessToken {
 urlRequest.setValue("Bearer \(token)", forHTTPHeaderField: "Authorization")
 }

 urlRequest.timeoutInterval = 30
 urlRequest.cachePolicy = .reloadIgnoringLocalCacheData

 let (data, response) = try await session.data(for: urlRequest)

 guard let httpResponse = response as? HTTPURLResponse else {
 throw NetworkError.invalidResponse
 }

 switch httpResponse.statusCode {
 case 200...299:
 return try JSONDecoder().decode(T.self, from: data)
 case 401:
 // Attempt token refresh before failing
 try await tokenStore.refreshAccessToken()
 return try await request(endpoint, as: type)
 case 429:
 throw NetworkError.rateLimited
 default:
 throw NetworkError.httpError(httpResponse.statusCode)
 }
 }
}
Key points in this design: the token is pulled from TokenStore (backed by Keychain) at the last moment before the request is sent. The request never logs the Authorization header. A 401 triggers an automatic refresh before bubbling up as an error.
Storing Tokens Securely with Keychain
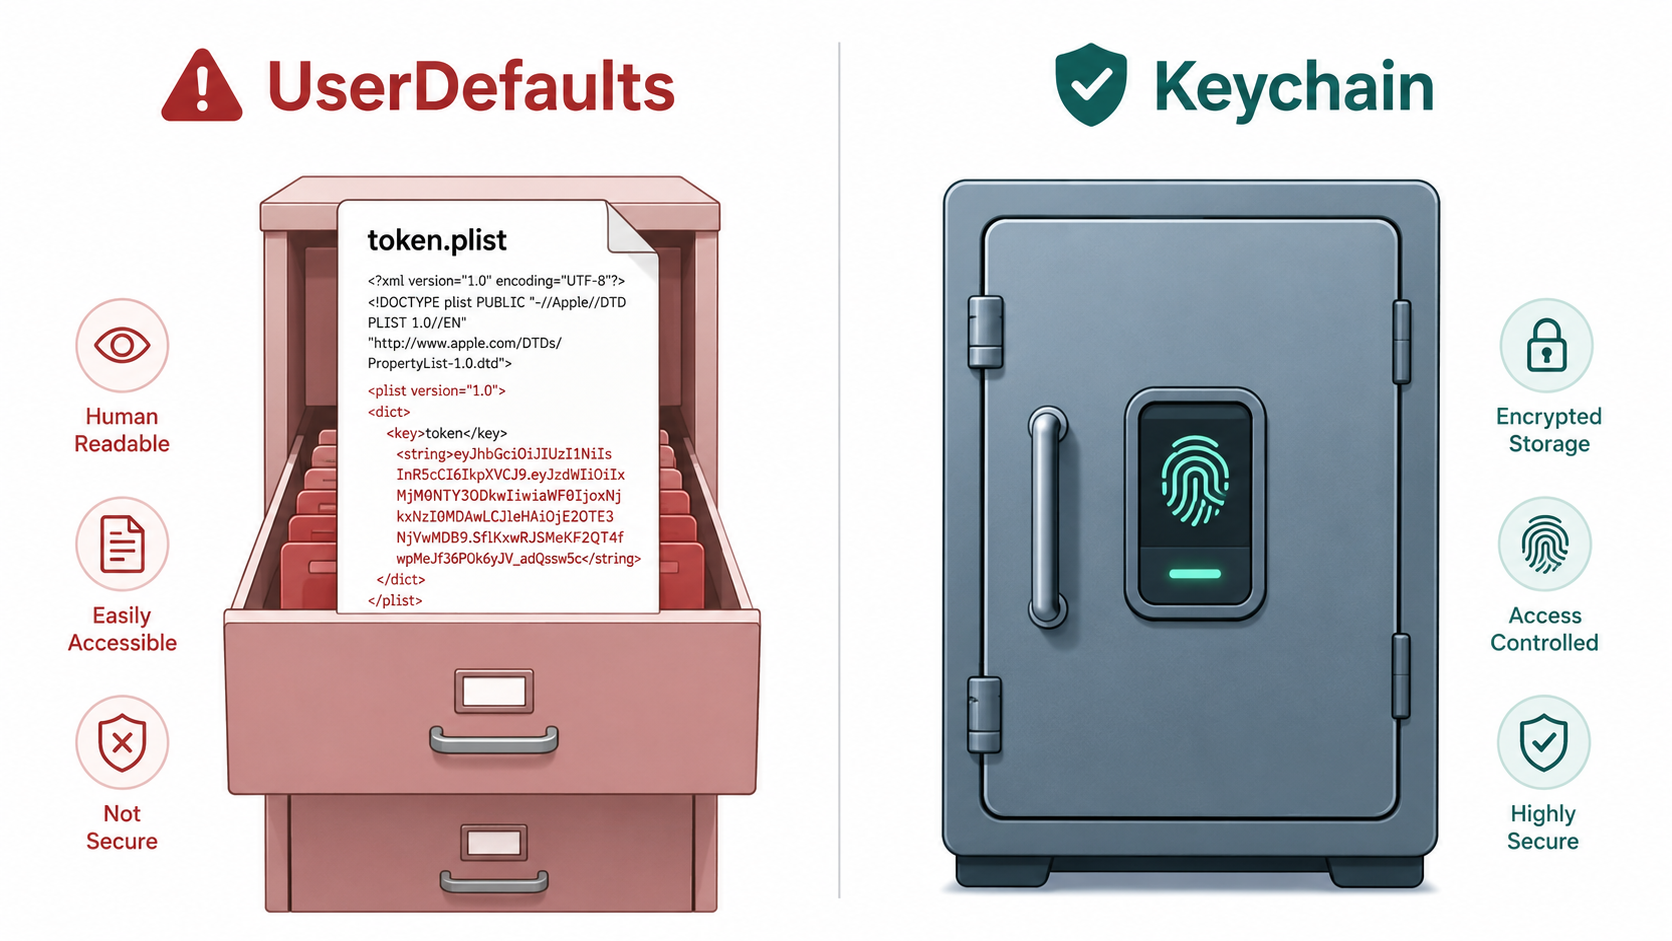
UserDefaults is stored as a plaintext plist on disk. Any process with sufficient permissions — including malware, or a backup extraction tool — can read it. Never store tokens, passwords, or any sensitive value in UserDefaults.
The Keychain is the correct solution. It is hardware-encrypted on modern devices and can be configured to require biometric authentication before reading.
// KeychainTokenStore.swift
import Security

final class KeychainTokenStore: TokenStore {
 private let accessTokenKey = "com.yourapp.accessToken"
 private let refreshTokenKey = "com.yourapp.refreshToken"

 func saveAccessToken(_ token: String) throws {
 try save(token, for: accessTokenKey)
 }

 var accessToken: String? {
 try? read(for: accessTokenKey)
 }

 func clearTokens() {
 delete(for: accessTokenKey)
 delete(for: refreshTokenKey)
 }

 // MARK: - Private Keychain Primitives

 private func save(_ value: String, for key: String) throws {
 let data = Data(value.utf8)
 let query: [String: Any] = [
 kSecClass as String: kSecClassGenericPassword,
 kSecAttrAccount as String: key,
 kSecValueData as String: data,
 kSecAttrAccessible as String: kSecAttrAccessibleWhenUnlockedThisDeviceOnly
 ]
 SecItemDelete(query as CFDictionary) // Delete existing before adding
 let status = SecItemAdd(query as CFDictionary, nil)
 guard status == errSecSuccess else {
 throw KeychainError.saveFailed(status)
 }
 }

 private func read(for key: String) throws -> String {
 let query: [String: Any] = [
 kSecClass as String: kSecClassGenericPassword,
 kSecAttrAccount as String: key,
 kSecReturnData as String: true,
 kSecMatchLimit as String: kSecMatchLimitOne
 ]
 var result: AnyObject?
 let status = SecItemCopyMatching(query as CFDictionary, &result)
 guard status == errSecSuccess,
 let data = result as? Data,
 let value = String(data: data, encoding: .utf8) else {
 throw KeychainError.readFailed(status)
 }
 return value
 }
 private func delete(for key: String) {
 let query: [String: Any] = [
 kSecClass as String: kSecClassGenericPassword,
 kSecAttrAccount as String: key
 ]
 SecItemDelete(query as CFDictionary)
 }
}
Note the use of kSecAttrAccessibleWhenUnlockedThisDeviceOnly. This is the strictest accessibility option: the token is only readable when the device is unlocked, and it does not migrate to new devices through iCloud backups. For apps requiring even higher security, combine this with kSecAccessControlBiometryCurrentSet to require Face ID before the Keychain item can be read.
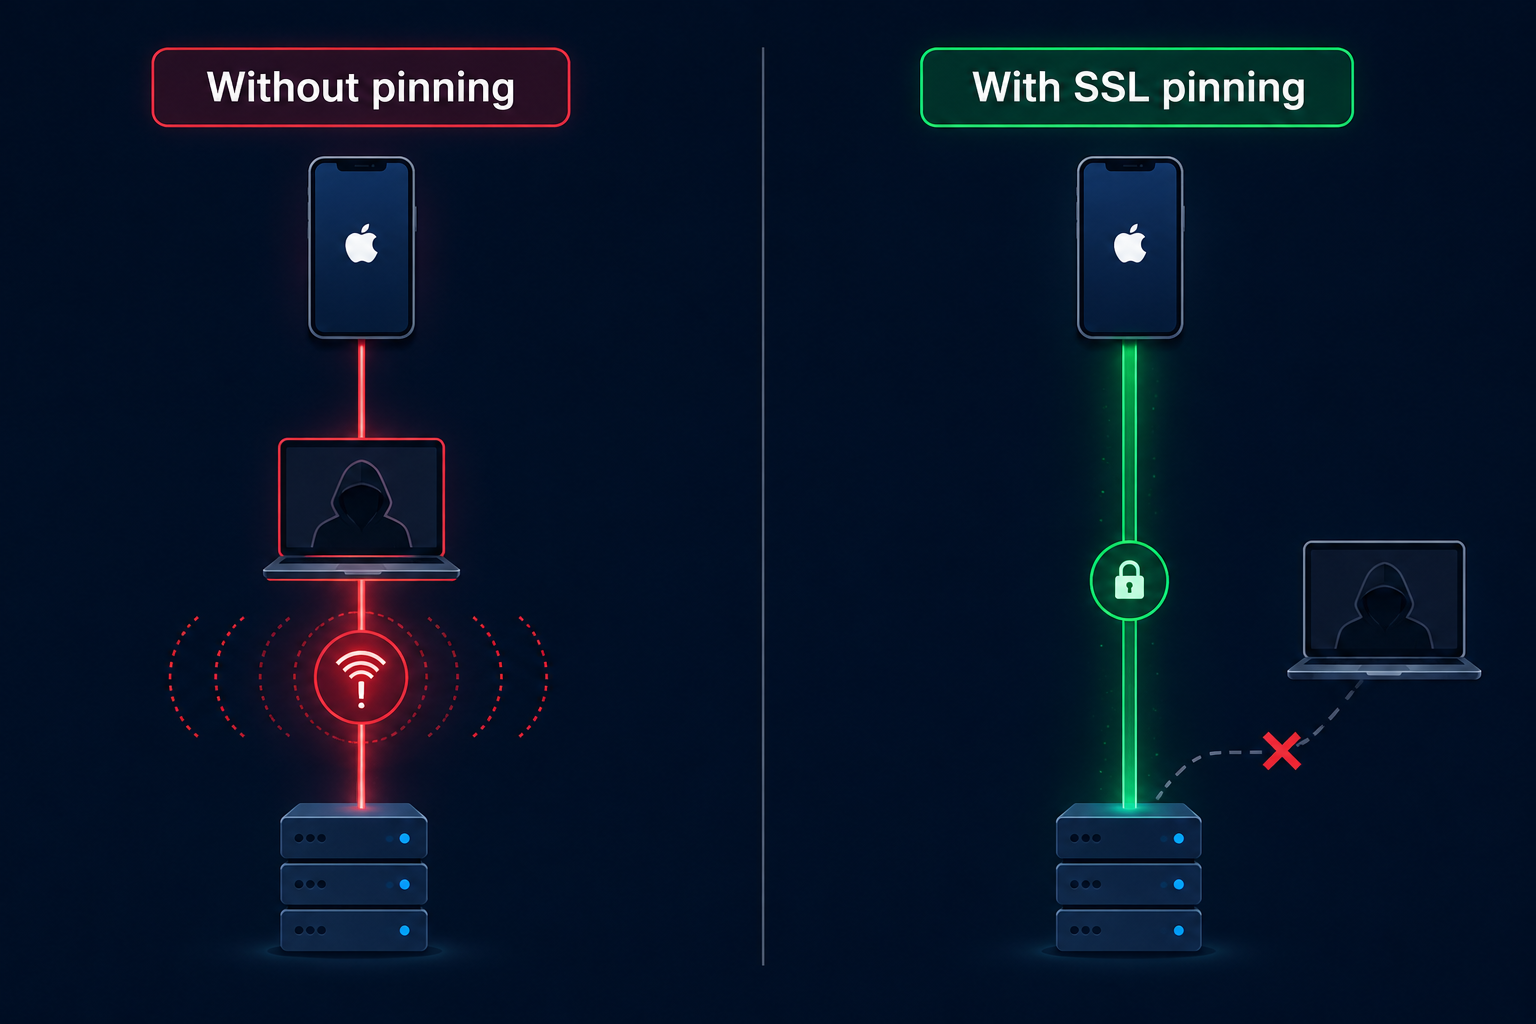
SSL Certificate Pinning
HTTPS trusts any certificate signed by a system-trusted certificate authority (CA). If an attacker can install a custom root CA on a device — easy on corporate MDM-managed devices or jailbroken phones — they can issue a certificate for your domain and intercept all TLS traffic transparently.
SSL pinning solves this by hardcoding your server's expected certificate (or public key hash) into the app, so the app rejects any certificate that does not match — even if it is technically valid.
// PinningURLSessionDelegate.swift
import CryptoKit

final class PinningURLSessionDelegate: NSObject, URLSessionDelegate {
 // SHA-256 hash of your server's DER-encoded public key
 private let pinnedPublicKeyHash = "BASE64_ENCODED_SHA256_HASH_OF_YOUR_PUBLIC_KEY"

 func urlSession(
 _ session: URLSession,
 didReceive challenge: URLAuthenticationChallenge,
 completionHandler: @escaping (URLSession.AuthChallengeDisposition, URLCredential?) -> Void
 ) {
 guard challenge.protectionSpace.authenticationMethod ==
 NSURLAuthenticationMethodServerTrust,
 let serverTrust = challenge.protectionSpace.serverTrust,
 let certificate = SecTrustCopyCertificateChain(serverTrust)
 .flatMap({ $0 as? [SecCertificate] })?.first else {
 completionHandler(.cancelAuthenticationChallenge, nil)
 return
 }

 var publicKey: SecKey?
 if #available(iOS 14, *) {
 publicKey = SecCertificateCopyKey(certificate)
 }

 guard let key = publicKey,
 let keyData = SecKeyCopyExternalRepresentation(key, nil) as Data? else {
 completionHandler(.cancelAuthenticationChallenge, nil)
 return
 }

 let hash = SHA256.hash(data: keyData)
 let hashString = Data(hash).base64EncodedString()

 if hashString == pinnedPublicKeyHash {
 completionHandler(.useCredential, URLCredential(trust: serverTrust))
 } else {
 completionHandler(.cancelAuthenticationChallenge, nil)
 }
 }
}

Instantiate your URLSession with this delegate:
let delegate = PinningURLSessionDelegate()
let session = URLSession(
 configuration: .default,
 delegate: delegate,
 delegateQueue: nil
)
Production tip: pin to your server's public key hash rather than the full certificate. Certificates rotate every year; public keys rotate far less frequently. Public key pinning prevents unnecessary app updates every time your certificate renews.
Protecting API Keys and Secrets
There is no truly safe way to store a secret inside a shipped binary — any secret in your app can be extracted by a motivated attacker. The correct architecture minimizes what the client knows.
Never do this:
// DANGEROUS: extractable from binary
let apiKey = "sk-prod-a8f3b2c1d4e5f6a7b8c9d0e1f2a3b4c5"
Correct approach — use XCConfig for build-time injection:
In your Config.xcconfig:
API_BASE_URL = https://api.example.com
In Info.plist:
<key>APIBaseURL</key>
<string>$(API_BASE_URL)</string>
Read it in code:
let baseURL = Bundle.main.infoDictionary?["APIBaseURL"] as? String ?? ""
For truly secret values (like server-to-server keys), they must never live on the client at all. Instead, proxy sensitive calls through your own backend. The iOS app authenticates to your server, and your server authenticates to the third-party API with its credentials. The client never sees the third-party key.
For CI/CD pipelines (GitHub Actions, Bitrise, Xcode Cloud), inject secrets via environment variables at build time. No secret ever lives in your Git repository.
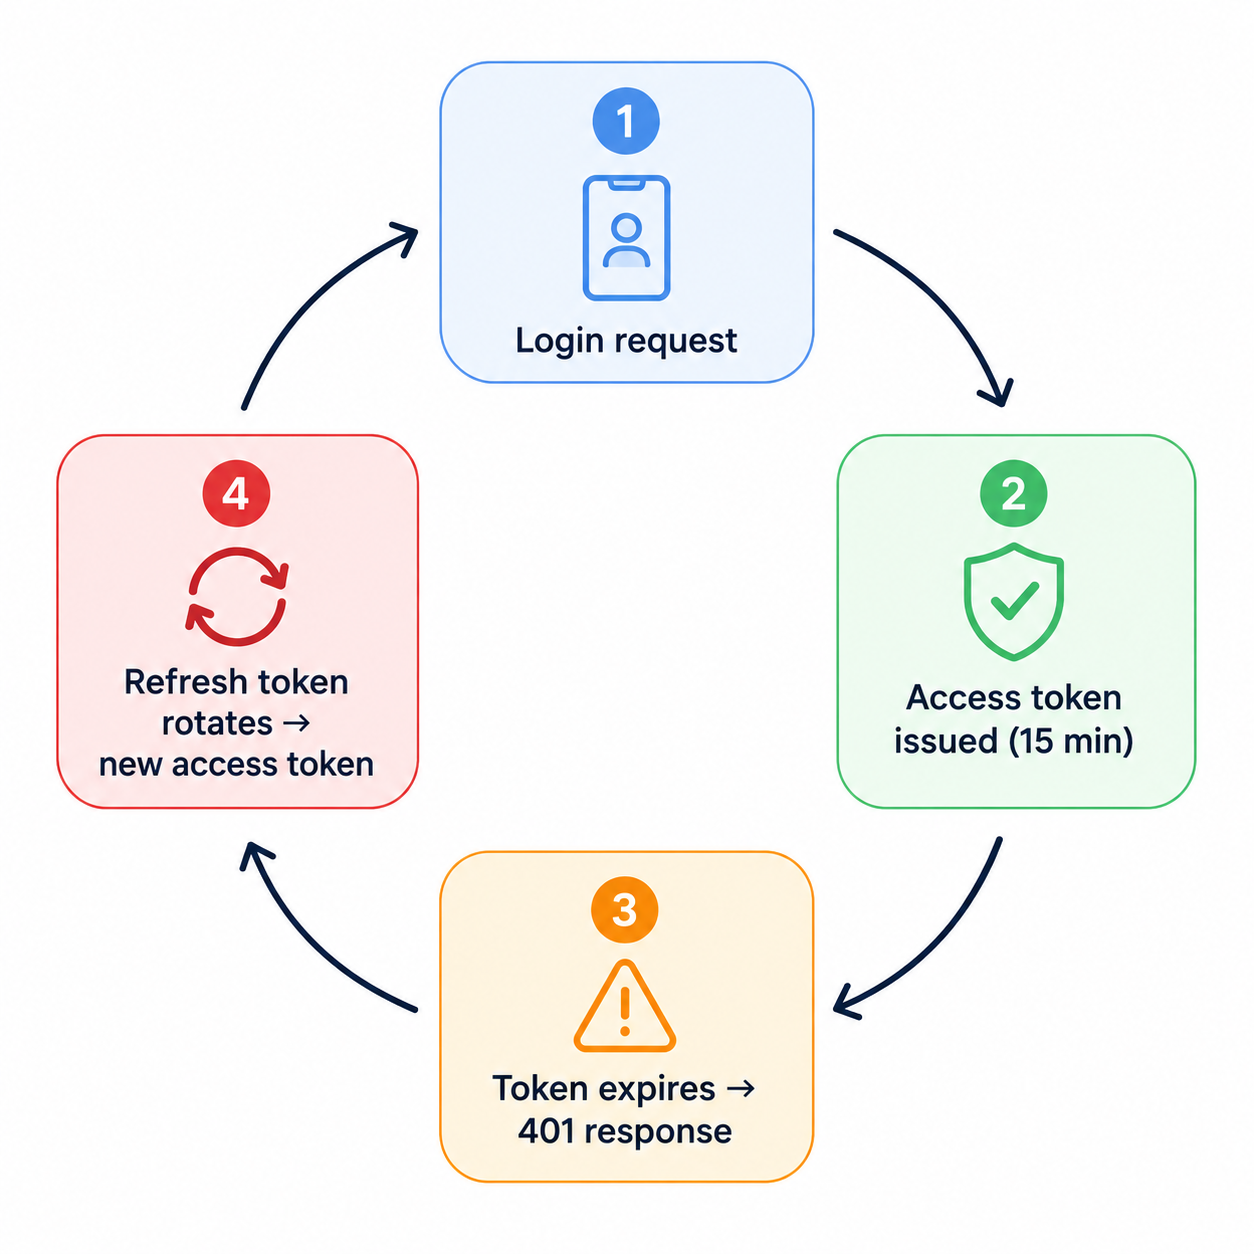
Authentication Best Practices: OAuth 2.0, JWT, and Token Refresh
Use OAuth 2.0 with PKCE (Proof Key for Code Exchange) for user authentication. Short-lived access tokens (15–60 minutes) limit the damage window of a stolen token. Refresh tokens must be stored in Keychain and rotated on every use (refresh token rotation).
A clean token refresh flow:
// TokenRefreshService.swift
actor TokenRefreshService {
 private var refreshTask: Task<String, Error>?

 func refreshAccessToken(using refreshToken: String) async throws -> String {
 // Coalesce concurrent refresh requests into one
 if let existing = refreshTask {
 return try await existing.value
 }

 let task = Task<String, Error> {
 defer { refreshTask = nil }

 var request = URLRequest(url: URL(string: "https://auth.example.com/token")!)
 request.httpMethod = "POST"
 request.setValue("application/x-www-form-urlencoded", forHTTPHeaderField: "Content-Type")
 request.httpBody = "grant_type=refresh_token&refresh_token=\(refreshToken)".data(using: .utf8)

 let (data, _) = try await URLSession.shared.data(for: request)
 let response = try JSONDecoder().decode(TokenResponse.self, from: data)
 return response.accessToken
 }

 refreshTask = task
 return try await task.value
 }
}
Using actor here is critical: it prevents race conditions where multiple in-flight requests all try to refresh the token simultaneously, each receiving a 401, each triggering a refresh, and only one succeeding — invalidating the others.
iOS Security Features Every Developer Should Use
Apple provides robust security primitives that many developers underutilize.
App Attest (iOS 14+): Cryptographically verifies that API requests originate from a genuine, unmodified version of your app on a real Apple device. Attach the attestation to your request headers and validate server-side to stop request spoofing and jailbroken-device abuse.
Secure Enclave + Biometrics: For apps handling financial or health data, store a private key in the Secure Enclave and require biometric authentication to sign each API request. This makes token theft useless without the user's face or fingerprint.
// Require biometric auth before reading a sensitive Keychain item
let access = SecAccessControlCreateWithFlags(
 nil,
 kSecAttrAccessibleWhenPasscodeSetThisDeviceOnly,
 [.biometryCurrentSet, .privateKeyUsage],
 nil
)!
File Protection: Any file your app writes — cached API responses, Core Data stores — should use NSFileProtectionComplete. This ensures files are encrypted at rest and inaccessible while the device is locked.
Real-World Production Example: Full Secure Flow
Here is how all of these layers compose into a complete login-to-logout flow:
// 1. LOGIN: Authenticate and store tokens
func login(username: String, password: String) async throws {
 let credentials = LoginRequest(username: username, password: password)
 let response = try await networkClient.request(.login(credentials), as: TokenResponse.self)

 // Store in Keychain immediately; never hold in memory longer than needed
 try tokenStore.saveAccessToken(response.accessToken)
 try tokenStore.saveRefreshToken(response.refreshToken)
}

// 2. SECURE API CALL: Token injected from Keychain by NetworkClient
func fetchUserProfile() async throws -> UserProfile {
 return try await networkClient.request(.userProfile, as: UserProfile.self)
 // NetworkClient automatically handles 401 → refresh → retry
}

// 3. LOGOUT: Purge all sensitive state
func logout() {
 tokenStore.clearTokens() // Wipe Keychain entries
 URLCache.shared.removeAllCachedResponses() // Clear URL cache
 HTTPCookieStorage.shared.removeCookies(since: .distantPast) // Clear cookies
 // Post notification to reset navigation state
 NotificationCenter.default.post(name: .userDidLogout, object: nil)
}
Notice that logout is not just a navigation action. It actively destroys every trace of the user session: tokens, cached network responses, and cookies. Any less than this leaves a security gap on shared or stolen devices.
Common Security Mistakes to Avoid
These are the mistakes that appear most often in production iOS code reviews:
- Storing tokens in UserDefaults: Readable by any process on a jailbroken device and included in unencrypted iTunes backups.
- Disabling ATS globally: Exposes every API call in the app to interception, not just the one you intended to exempt.
- Logging request headers in debug builds: Log files persist on device and may be included in crash reports sent to third-party analytics tools. Strip all authorization headers from logs unconditionally.
- Ignoring certificate validation warnings: If URLSession calls your delegate with a certificate challenge and you call completionHandler(.useCredential, ...) without validating, you have built a perfectly functional MITM attack surface into your app.
- Long-lived static tokens: Tokens that never expire mean a single theft is a permanent compromise. Enforce expiration server-side and implement refresh flows client-side.
- Caching API responses that contain PII: URLSession has an aggressive default cache. Disable it for endpoints returning user data, or ensure the cache itself is encrypted using file protection.
Performance and UX Considerations
Security does not have to mean a sluggish or frustrating user experience. A few practices keep both concerns satisfied:
Use exponential backoff with jitter for retry logic — this handles rate limiting gracefully without hammering the server and triggering further security blocks. Pre-emptively refresh the access token when it has less than five minutes of validity remaining (check the exp claim in the JWT), rather than waiting for a 401. This eliminates the latency of a mid-session token refresh.
For offline support, cache only non-sensitive data (public content, UI configuration) and use NSFileProtectionComplete for anything that touches user data. On connection restoration, re-validate the session before presenting any cached sensitive content.
Security Best Practices Checklist
Use this before every production release:
[✓] ATS enabled globally; no NSAllowsArbitraryLoads in Info.plist
[✓] All tokens stored in Keychain with kSecAttrAccessibleWhenUnlockedThisDeviceOnly
[✓] SSL certificate pinning implemented and tested against a proxy tool (Charles, mitmproxy)
[✓] No API keys or secrets in source code, Info.plist, or Git history
[✓] Secrets injected via XCConfig or CI/CD environment variables
[✓] OAuth 2.0 with PKCE used for user authentication
[✓] Access tokens expire within 60 minutes; refresh tokens rotate on each use
[✓] No sensitive data logged — Authorization, Set-Cookie, PII fields stripped from all logs
[✓] URLCache disabled or file-protected for endpoints returning user data
[✓] Logout clears Keychain, URL cache, and cookies
[✓] App Attest or DeviceCheck enabled for high-value API endpoints
[✓] Token refresh uses actor or similar mechanism to prevent race conditions
[✓] Biometric authentication required before reading high-sensitivity Keychain items
Conclusion
Mobile security is built through many small, correct decisions — not a single feature. Attackers target the weakest link, whether it’s insecure token storage, disabled ATS, or hardcoded secrets. By combining practices like HTTPS, SSL pinning, Keychain storage, and biometric protection, you create multiple layers of defense. Building security into your app from day one is simpler, cheaper, and essential for protecting user trust.