.png)


Swift Package Manager in new Project
Creating a New SPM Package from Scratch
When starting a new iOS or macOS project with Swift Package Manager from the beginning, you have two primary approaches: using Xcode or using the command line.
Method 1: Creating via Command Line (Official Approach)
Create a new library package
$ mkdir MyLibrary
$ cd MyLibrary
$ swift package init --type library
This command generates the following structure:
MyLibrary/
├── Package.swift (Manifest file - defines package configuration)
├── Sources/
│ └── MyLibrary/
│ └── MyLibrary.swift (Main source file)
├── Tests/
│ └── MyLibraryTests/
│ └── MyLibraryTests.swift
└── .gitignore
For executable packages, use: $ swift package init --type executable
Default Package.swift Structure
// swift-tools-version:5.9
import PackageDescription

let package = Package(
 name: "MyLibrary",
 platforms: [
 .iOS(.v13),
 .macOS(.v10_15)
 ],
 products: [
 .library(name: "MyLibrary", targets: ["MyLibrary"])
 ],
 dependencies: [
 // Add dependencies here
 ],
 targets: [
 .target(
 name: "MyLibrary",
 dependencies: []
 ),
 .testTarget(
 name: "MyLibraryTests",
 dependencies: ["MyLibrary"]
 )
 ]
)
Method 2: Creating via Xcode
1. Open Xcode
2. Go to File → New → Project
3. Select "Multiplatform" → "Package" template
4. Name your package and choose location
5. Xcode automatically generates the package structure with default Package.swift
Adding Dependencies in a New Project
When creating a new project, declare all dependencies in the Package.swift file before starting application development:
Example: Adding Multiple Dependencies
 let package = Package(
 name: "MyApp",
 platforms: [.iOS(.v15), .macOS(.v12)],
 products: [
 .library(name: "MyApp", targets: ["MyApp"])
 ],
 dependencies: [
 .package(url: "https://github.com/Alamofire/Alamofire.git", from: "5.8.0"),
 .package(url: "https://github.com/onevcat/Kingfisher.git", from: "7.0.0"),
 .package(url: "https://github.com/SnapKit/SnapKit.git", from: "5.6.0")
 ],
 targets: [
 .target(
 name: "MyApp",
 dependencies: [
 "Alamofire",
 "Kingfisher",
 "SnapKit"
 ]
 ),
 .testTarget(
 name: "MyAppTests",
 dependencies: ["MyApp"]
 )
 ]
)
Version Constraint Options (Official)
Building and Testing New Packages
Command-line operations for new packages:
Swift Package Manager in Exiting Projects
Adding SPM Dependencies to Existing Xcode Projects
For existing iOS or macOS projects that currently use CocoaPods, Carthage, or no dependency manager, adding SPM is straightforward through Xcode (version 11.0 or later).
Step-by-Step: Adding First Package via Xcode
1. Open your existing Xcode project (.xcodeproj file)
2. Select the project in the Navigator (blue project icon)
3. Click on the project name (NOT the target) to open Project Settings
4. Navigate to the "Package Dependencies" tab
5. Click the "+" button in the bottom left corner

6. Enter the package repository URL (e.g.,https://github.com/RevenueCat/purchases-ios.git)

7. Select the version constraint rule (recommended: "Up to Next Major Version")
8. Click "Add Package"

9. Xcode automatically resolves and fetches the package
10. Select which products to add to which targets
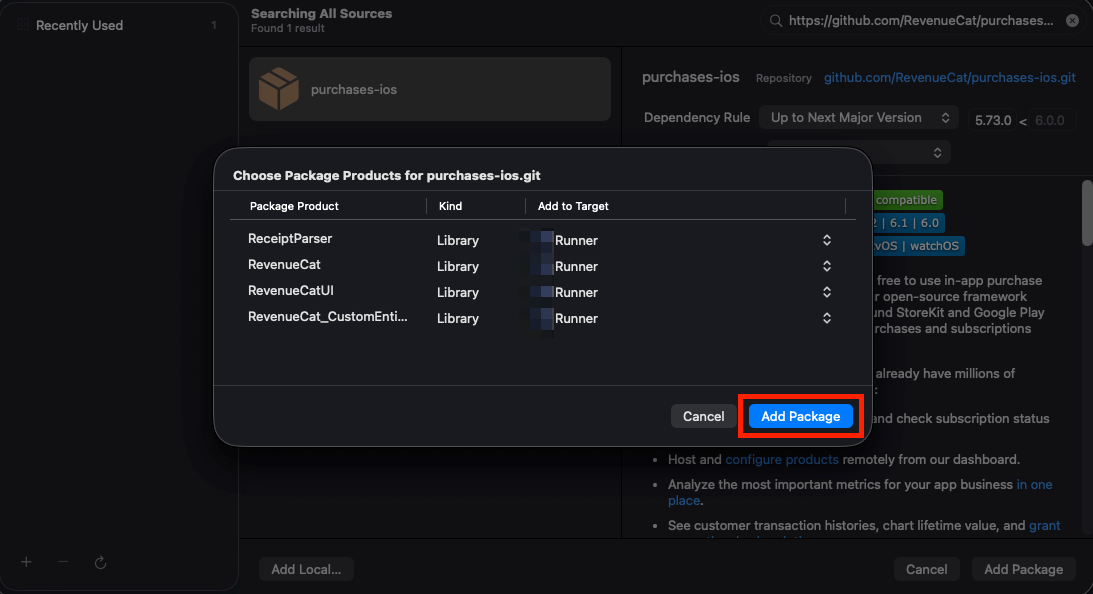
11. Click "Add Package" again to finalize
Linking Packages to Targets
After Xcode adds the package, it automatically appears in the build settings. You must then link the package product to your app target:
- In your project target → Build Phases → Link Binary With Libraries → Ensure the package framework is listed and enabled
- In your Swift code, import the package: import PackageName
Example: Importing and Using Alamofire
import Alamofire

func fetchUserData() {
 AF.request("https://api.example.com/user").responseJSON { response in
 switch response.result {
 case .success(let data):
 print("Data: \(data)")
 case .failure(let error):
 print("Error: \(error)")
 }
 }
}
Managing Package.resolved File
When you add a package via Xcode, a Package.resolved file is automatically generated and placed in:
xcodeproj/project.xcworkspace/xcshareddata/swiftpm/Package.resolved
- CRITICAL: Always commit Package.resolved to version control.
- This ensures all team members and CI/CD pipelines use identical dependency versions.
git add .xcodeproj/project.xcworkspace/xcshareddata/swiftpm/Package.resolvedMigrating from CocoaPods to SPM
Identify Equivalent SPM Packages
- Search for SPM equivalents at swiftpackageindex.com or GitHub. Most popular pods (Alamofire, Kingfisher, SwiftyJSON, etc.) have SPM support.
Add SPM Packages Incrementally
- Do NOT remove all CocoaPods at once. Add one or two SPM packages and test thoroughly.
Run Integration Tests
- After each package addition: Build the project, run unit tests, test the feature using that package.
Clean Up CocoaPods
- Once ALL dependencies are migrated to SPM, execute:
$ pod deintegrate
Then delete:
$ pod deintegrate
Podfile.lock
Pods/ directory
Commit and Update CI/CD
$ git add .
$ git commit -m "Migrate from CocoaPods to SPM"
$ git push
Update CI/CD pipelines: Remove pod install steps, xcodebuild will handle SPM automatically.
Creating and validating SPM Packages
Official Package.swift Requirements
According to official Swift.org documentation, every Package.swift must include:
- Tools Version Declaration (MANDATORY)
// swift-tools-version:5.9
This MUST be the first line. It specifies the minimum Swift version required to build. Valid versions:
5.0, 5.1, 5.2, 5.3, 5.4, 5.5, 5.6, 5.7, 5.8, 5.9
- Package Name
- Must be unique if published to package registries
- Used for import statements and dependency references
- Platforms Declaration
- Specify minimum deployment targets:
platforms: [
 .iOS(.v13),
 .macOS(.v10_15),
 .watchOS(.v6),
 .tvOS(.v13)
]
- Products Definition
- Specify what the package exports (libraries, executables):
products: [
 .library(name: "MyPackage", targets: ["MyPackage"])
]
- Targets Definition
- Include at least one target with source files:
targets: [
 .target(name: "MyPackage", dependencies: []),
 .testTarget(name: "MyPackageTests", dependencies: ["MyPackage"])
]
Complete Valid Package.swift Example
// swift-tools-version:5.9
import PackageDescription

let package = Package(
 name: "NetworkingKit",
 platforms: [
 .iOS(.v13),
 .macOS(.v10_15),
 .watchOS(.v6),
 .tvOS(.v13)
 ],
 products: [
 .library(
 name: "NetworkingKit",
 targets: ["NetworkingKit"]
 )
 ],
 dependencies: [
 .package(url: "https://github.com/Alamofire/Alamofire.git", from: "5.8.0")
 ],
 targets: [
 .target(
 name: "NetworkingKit",
 dependencies: ["Alamofire"]
 ),
 .testTarget(
 name: "NetworkingKitTests",
 dependencies: ["NetworkingKit"]
 )
 ]
)
Official Validation Commands
Before publishing, validate your package using these official commands:
Command 1: Validate Package Structure
$ cd MyPackage
$ swift package validate
Checks:
- Package.swift syntax is valid
- Required files exist (Sources/, Tests/)
- Target names are properly configured
Command 2: Dump Package Manifest (CRITICAL for SPI)
$ swift package dump-package
- Outputs your Package.swift as JSON. This command MUST succeed with valid JSON output. Swift Package Index (SPI) requires this.
- Example output:
{
 "name" : "NetworkingKit",
 "products" : [
 {
 "name" : "NetworkingKit",
 "targets" : ["NetworkingKit"],
 "type" : {"library" : []}
 }
 ],
 "targets" : [
 {
 "name" : "NetworkingKit",
 "type" : "regular"
 }
 ]
}
Command 3: Build and Test
$ swift build # Compiles package
$ swift test # Runs tests
Both commands MUST complete without errors. Test coverage is not mandatory but recommended.
Command 4: Show Dependencies
$ swift package show-dependencies
Displays dependency tree. Useful for auditing what your package depends on.
Package Structure Best Practices
Directory Organization:
MyPackage/
├── .gitignore
├── .github/ (Optional: GitHub Actions, templates)
├── Package.swift (REQUIRED: Package manifest)
├── Sources/
│ └── MyPackage/
│ ├── MyPackage.swift (Main public API)
│ ├── Internal.swift (Internal implementation)
│ └── ...
├── Tests/
│ └── MyPackageTests/
│ ├── MyPackageTests.swift
│ └── ...
├── README.md (RECOMMENDED: Package description)
├── LICENSE (REQUIRED: Open source license)
└── CHANGELOG.md (OPTIONAL: Version history)
File Requirements for Package Publishing
Publishing to Swift Package Index
Swift Package Index (SPI) Overview
Swift Package Index (SPI) is the official community registry for Swift packages, backed by Apple. It provides discovery, documentation hosting, and package listing. SPI is NOT a required registry; packages work with SPM by Git URL alone. However, publishing to SPI increases discoverability.
Mandatory Requirements for SPI Publishing
According to official SPI documentation, packages must meet these requirements:
Public Git Repository
- Requirement: Repository must be publicly accessible
- Test: Visit the repository URL in a browser; should load without authentication
- Example valid URLs:
https://github.com/user/package.git, https://gitlab.com/user/package.git
Valid Package.swift File
- Requirement: Root directory must contain Package.swift
- Must include swift-tools-version (first line)
- Must define name, products, and targets
- Test using:
$ swift package dump-package (must output valid JSON)
Swift Version Requirement
- Requirement: Package must be written in Swift 5.0 or later
- Tools version should be 5.5 or later for best compatibility: // swift-tools-version:5.5
Semantic Version Tags
- Requirement: At least one Git release tag following semantic versioning
- Examples of valid tags:
- v1.0.0, 1.0.0, v1.0.1, 2.5.0
- Create a tag using:
$ git tag v1.0.0
$ git push origin v1.0.0
Valid JSON from Package Dump
- Requirement: swift package dump-package must output valid, parseable JSON
- Test:
$ swift package dump-package | jq . (should not throw parse error)
Compiles Without Errors
- Requirement: Package must build successfully
- Test:
$ swift build (with latest Swift toolchain, must complete without compiler errors)
Code of Conduct Compliance
- Requirement: Package content and repository must comply with SPI Code of Conduct
- Includes: No discriminatory language, no malware, no illegal content
Recommended Requirements (Not Mandatory but Encouraged)
- README.md with:
- Package description and purpose
- Installation instructions (SPM syntax)
- Usage examples
- Supported Swift and platform versions
- LICENSE file with open source license text
- MIT, Apache 2.0, GPL, BSD all acceptable
- Comprehensive Tests:
- Tests should be in Tests/PackageNameTests/ directory
- Run tests:
$ swift test
- Documentation:
- DocC documentation for public APIs (Swift 5.5+)
- In-code comments explaining complex logic
Adding Package to Swift Package Index
Method 1: Via Web UI (Recommended)
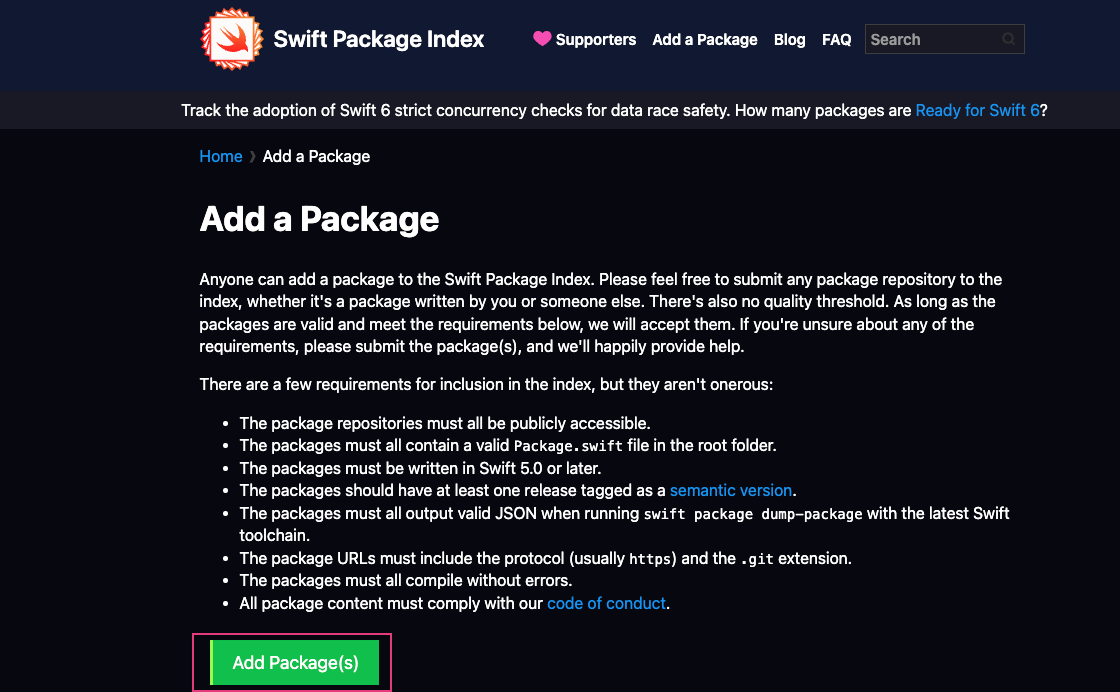
Step 1: Access the Add Package Page
- Navigate to the official Swift Package Index website and go to the Add a Package section.
Step 2: Review Submission Requirements
- Before proceeding, ensure you read and understand all the requirements for publishing a Swift Package on the platform.
Step 3: Initiate Package Addition
- Click on the “Add Package(s)” button to start the process of submitting your Swift Package. Ref :
Step 4: Redirect to GitHub
- After clicking the button, you will be redirected to the Swift Package Index GitHub repository where an issue template is used to generate your package submission request.
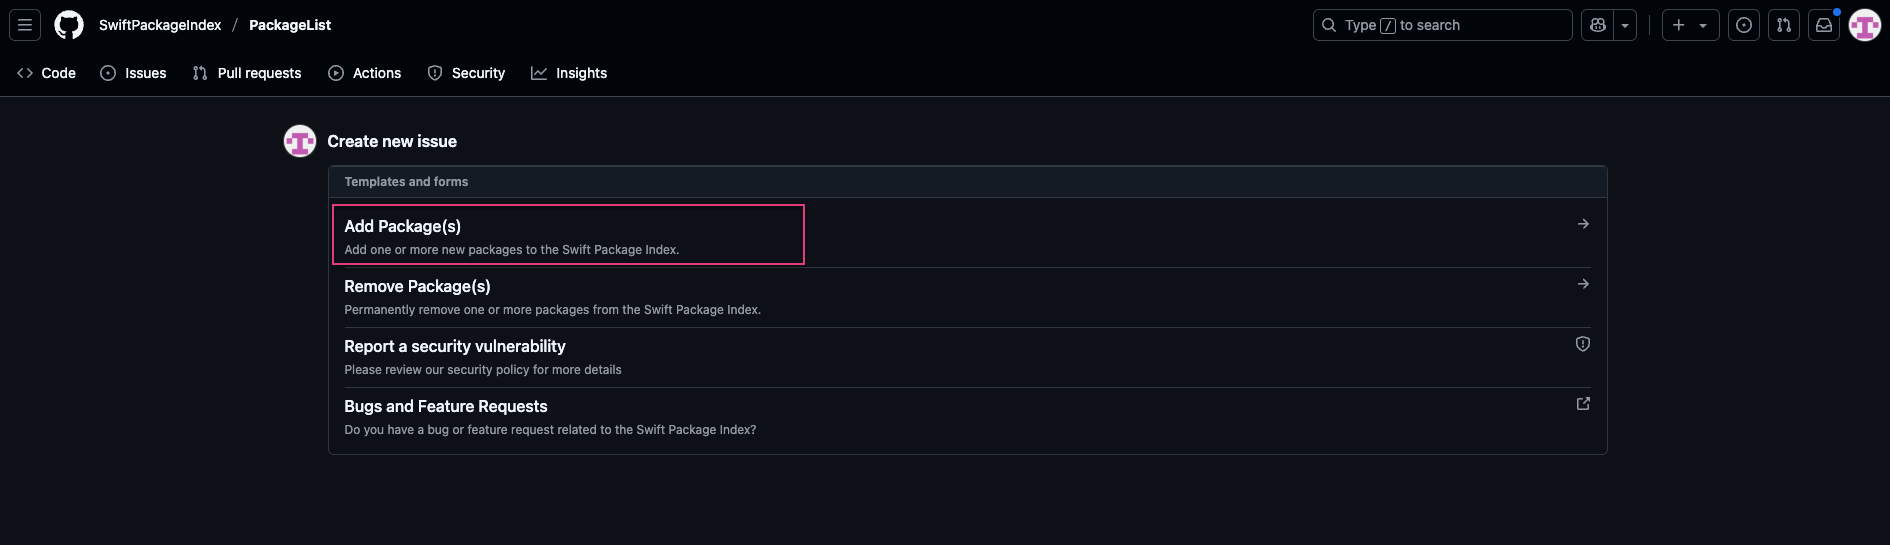
- Here you will see the following options:
- Add a New Package
- Remove an Existing Package
- Report a Security Issue for a Package
- Create a Bug Report or Feature Request for an Existing Package

- Step 5: Select Option 1
- Choose Option 1: Add a New Package to proceed with deploying your Swift Package.
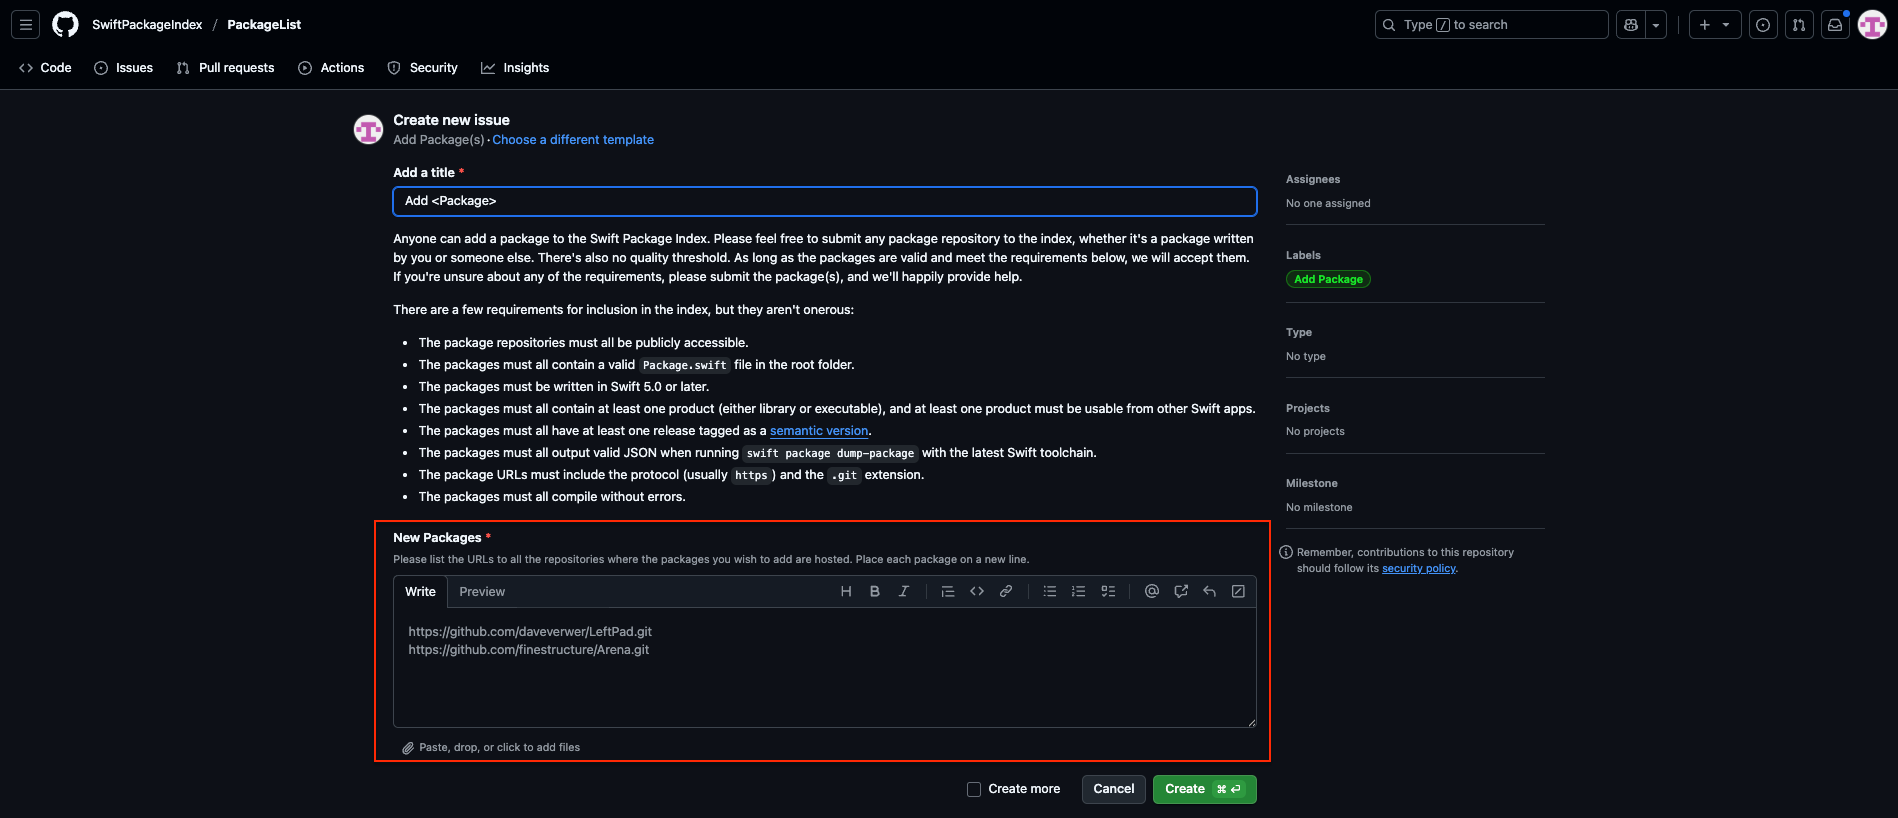
- Step 6: Set the Issue Title
- Provide a suitable title for the new package deployment in the issue form.
- In the "New Packages" section of the form, enter the GitHub URL of the package you wish to submit.
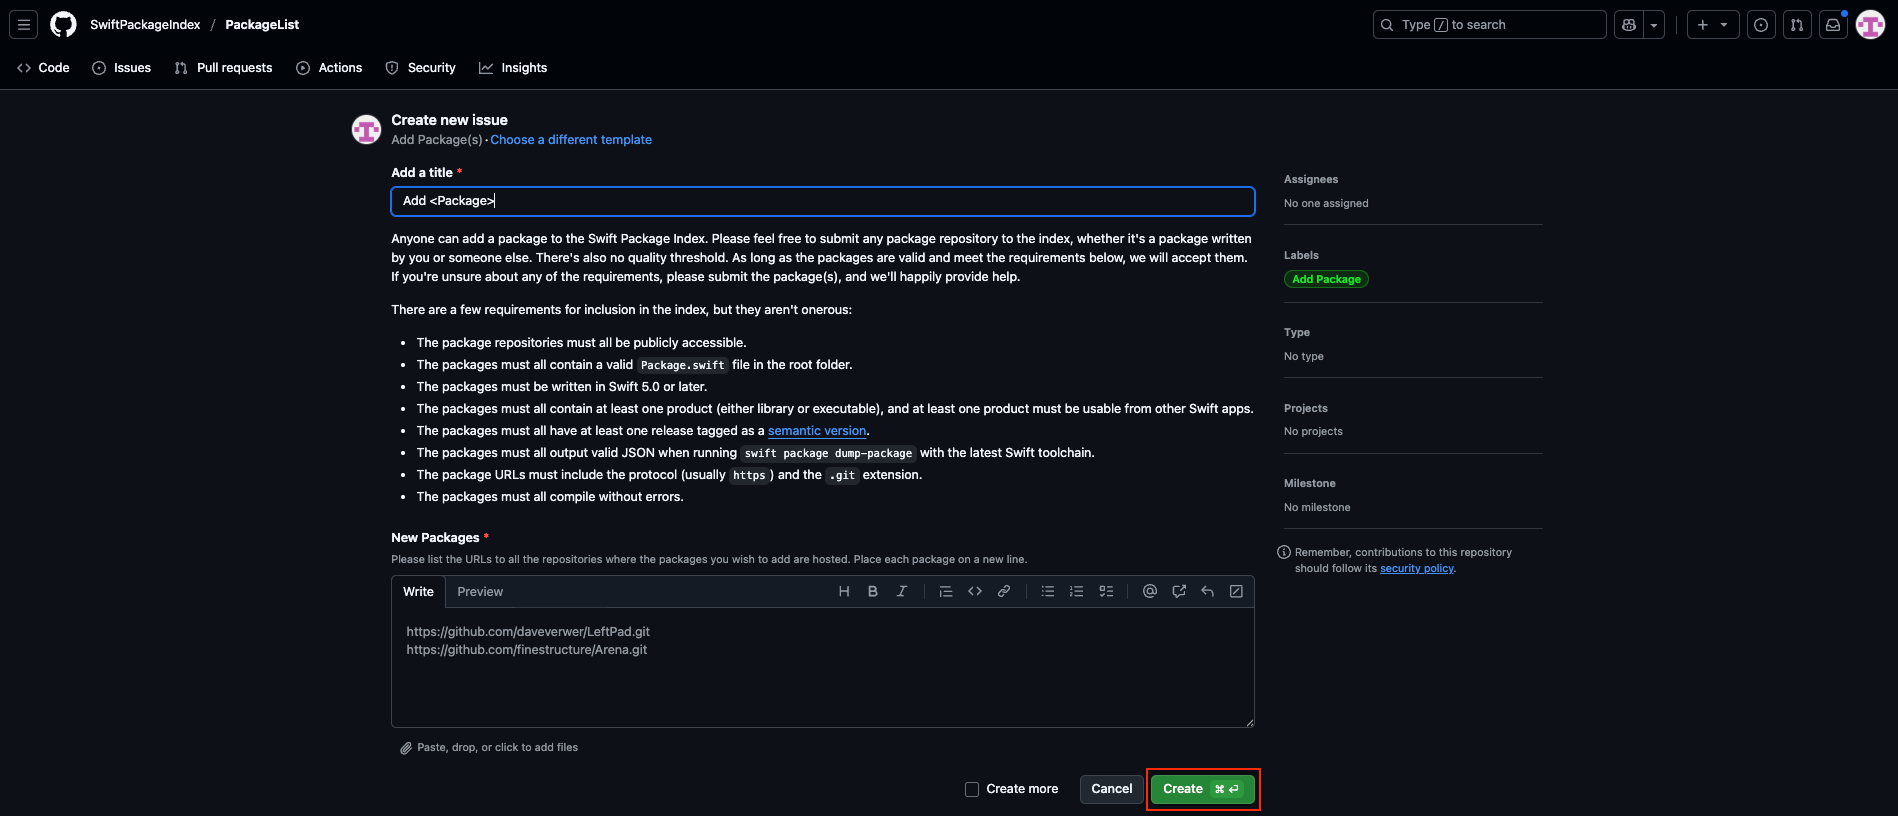
- Step 8: Submit the Request
- Click the “Create” button to submit the request for your Swift Package to be added to the Swift Package Index.
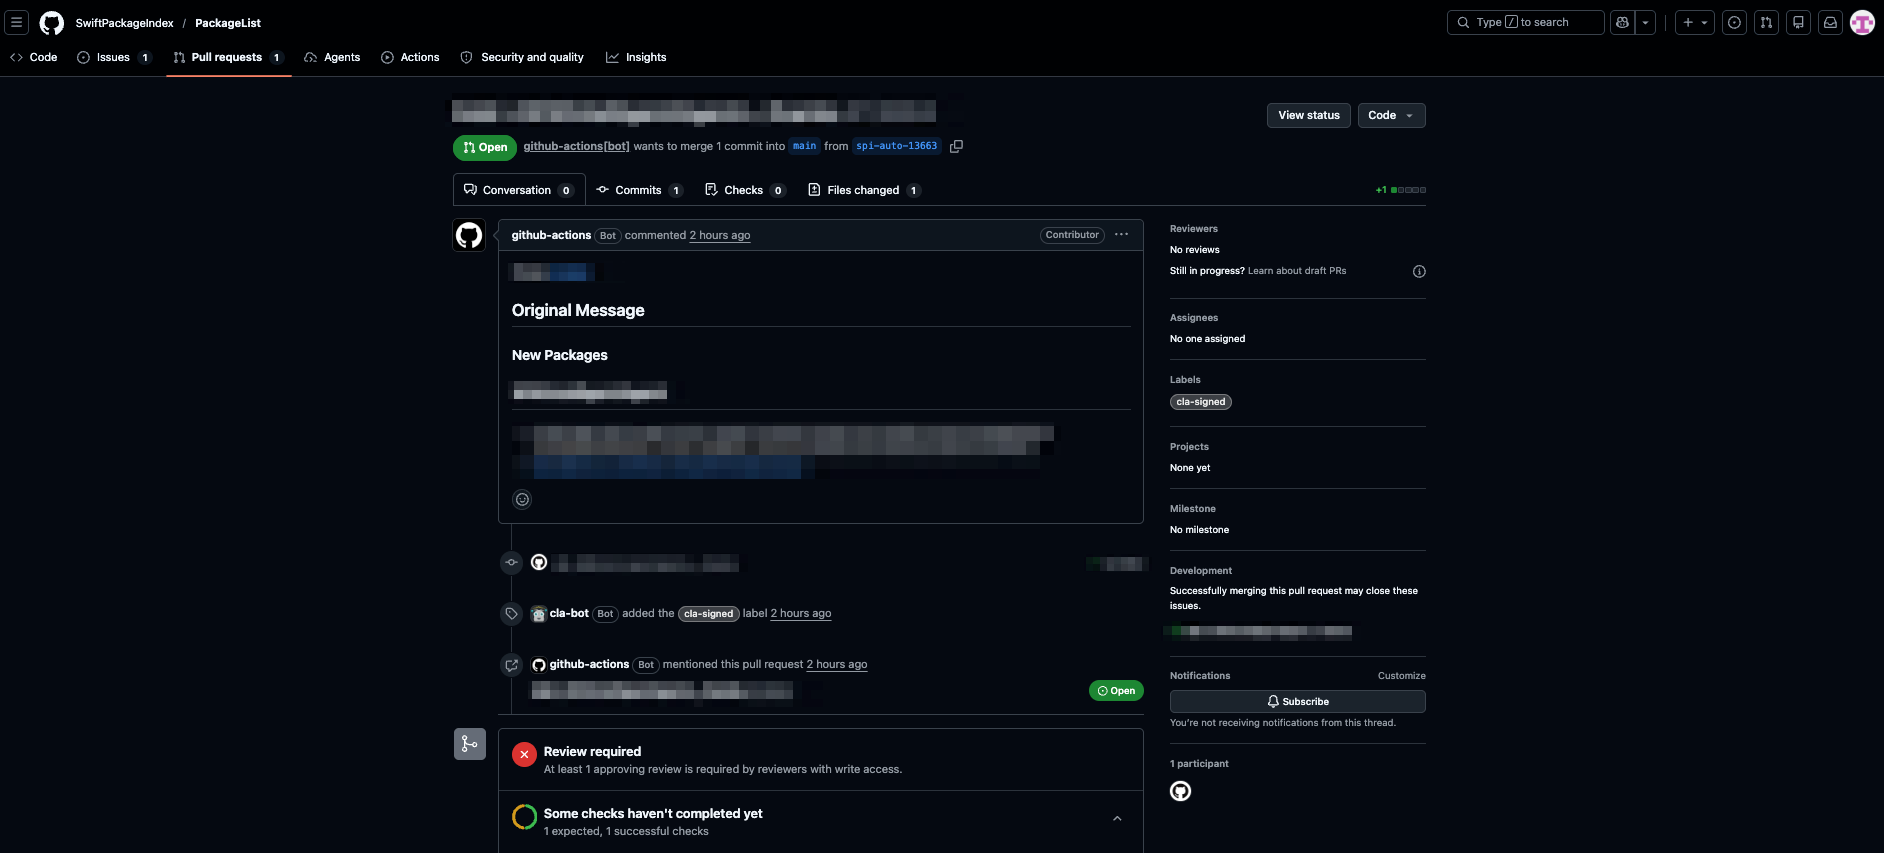
- Method 2: Via GitHub (Pull Request to PackageList)Alternative: Submit a PR to the PackageList repository
- Repository: https://github.com/SwiftPackageIndex/PackageList
- Edit: packages.json, add your package URL in alphabetical order
- The maintainers will review and merge if requirements are met
- Post-Publishing: What SPI Does
- After publishing to SPI, the service automatically:
- Indexes your package for discovery
- Generates and hosts DocC documentation (if available)
- Monitors new releases and updates package metadata
- Provides shields.io badges showing Swift version compatibility
- Tracks package statistics (downloads, popularity)
Create package locally
$ swift package init --type library --name MyPackage
$ cd MyPackage
Develop and test
$ swift build
$ swift test
Validate before publishing
$ git init
$ git add .
$ git commit -m "Initial commit"
$ git branch -M main
$ git remote add origin https://github.com/youruser/MyPackage.git
$ git push -u origin main
Create GitHub repository
$ git init
$ git add .
$ git commit -m "Initial commit"
$ git branch -M main
$ git remote add origin https://github.com/youruser/MyPackage.git
$ git push -u origin main
Create semantic version tag
$ git tag v1.0.0
$ git push origin v1.0.0
Add to Swift Package Index
# Visit: https://swiftpackageindex.com/add-a-package
# Enter: https://github.com/youruser/MyPackage.git
# Click "Add Package"
Monitor SPI for indexing status
# Visit: https://swiftpackageindex.com/youruser/MyPackage
Official Commands and validation References
Complete Command Reference
Validation Checklist Before Publishing
- First line: // swift-tools-version:X.X (where X.X >= 5.0)
- Package name is unique and follows naming conventions (lowercase, hyphen-separated)
- All required fields present: name, products, targets
- All targets have corresponding directories in Sources/ or Tests/
- swift package validate completes without errors
- swift build completes without errors
- swift test completes without errors
- swift package dump-package outputs valid JSON
- All external dependencies are publicly accessible
- All external dependencies have semantic version tags
- README.md exists with package description and usage
- LICENSE file exists (MIT, Apache 2.0, GPL, or other OSS license)
- .gitignore includes: .build/, .swiftpm/, .DS_Store
- Git repository is public (not private)
- At least one semantic version tag created (e.g., v1.0.0)
- CHANGELOG.md created (optional but recommended)
Troubleshooting Common Validation Issues
Problem: swift package dump-package outputs JSON errors
Solution: Check Package.swift syntax (missing commas, incorrect brackets). Run swift build to see specific syntax errors.
Problem: swift build fails with compiler errors
Solution: Review error messages. Ensure all imported dependencies are declared in Package.swift. Test with latest Swift version.
Problem: SPI shows "Repository not found" or "Invalid URL"
Solution: Ensure URL includes .git extension and is publicly accessible. Test URL in browser.
Problem: SPI shows "No valid versions found"
Solution: Create a semantic version Git tag (e.g., git tag v1.0.0 && git push origin v1.0.0).
Problem: Dependency resolution fails
Solution: Run swift package resolve. Check that dependency URLs are correct and public. Verify version constraints are compatible.
Problem: Tests fail but package builds
Solution: Fix test issues. Tests can fail, but they should run without crashing. Check test target dependencies in Package.swift.
Version Constraint Reference
Quick reference for all version constraint types:
Summary and Quick Start Guide
For New Projects:
swift package init --type library --name MyPackage
cd MyPackage
swift build && swift test
For Existing Projects:
# In Xcode:
# 1. File → Add Package Dependencies
# 2. Enter package URL
# 3. Choose version constraint
# 4. Select target to link
# 5. Commit Package.resolved to git
Conclusion
Swift Package Manager has matured into the go-to dependency solution for iOS and macOS development — and this guide covers everything you need to use it confidently, from initializing a package to publishing on the Swift Package Index.
Whether you're starting fresh, migrating from CocoaPods, or sharing your own library with the community, the workflow is consistent: keep your Package.swift clean, use semantic versioning, validate before publishing, and always commit Package.resolved. Follow these fundamentals and SPM will rarely give you trouble.
Build it, validate it, publish it — and let the Swift community find it.