.png)


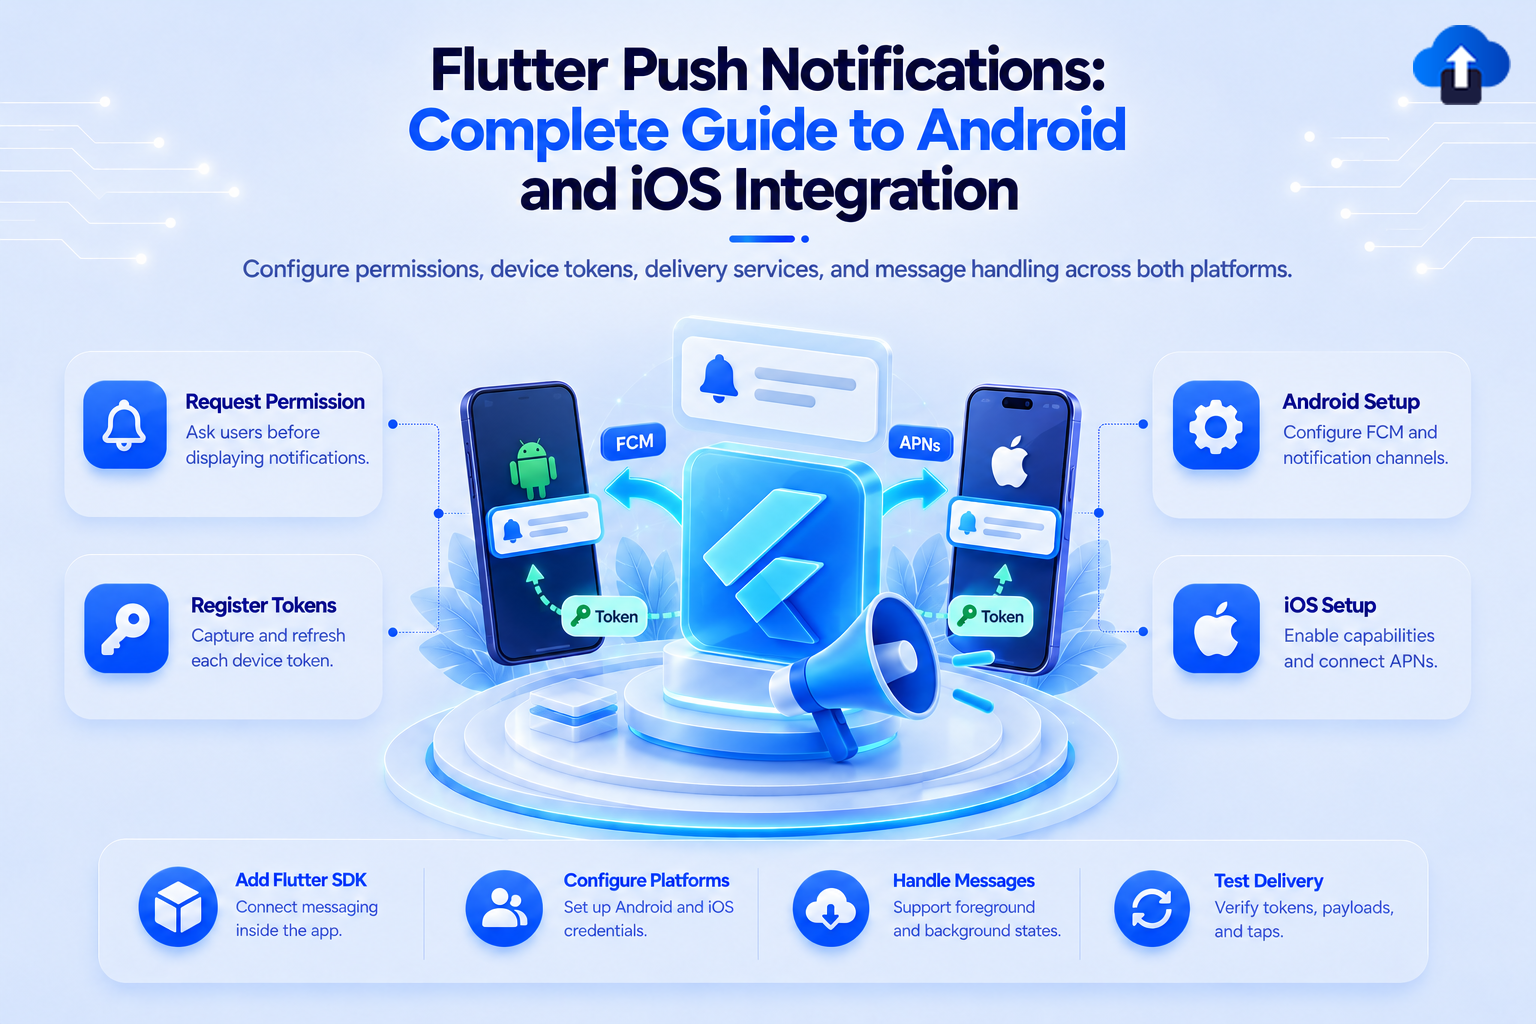
Push notifications are an essential part of modern mobile applications. From order updates and payment confirmations to chat messages and personalized engagement, they help applications communicate with users even when the app is not actively being used.
However, implementing push notifications in Flutter involves more than displaying a message. Developers must configure platform-specific credentials, handle notification permissions, register devices, manage notification interactions, and account for differences between Android and iOS.
AppsOnAir Push Notifications provides a Flutter SDK that integrates with the native push notification infrastructure on both platforms through a unified Dart API.
In this guide, we will walk through the integration process, configure Android and iOS, initialize the SDK, and explore implementation considerations that matter when building real-world Flutter applications.
Problem Statement
Implementing push notifications in a cross-platform application introduces several challenges.
Although Flutter allows developers to share most of their application code, push notification delivery still depends on platform-specific services and configuration.
Common challenges include:
- Platform-specific setup: Android uses Firebase Cloud Messaging (FCM), while iOS uses Apple Push Notification service (APNs).
- Device registration: Applications must register devices correctly before they can receive push notifications.
- Permission management: Users can deny, disable, or revoke notification permissions.
- Notification interactions: Applications must handle notification taps and route users to the appropriate screen.
- Foreground notifications: Notifications received while the application is open may require different handling from notifications received in the background.
- Device and OS restrictions: Background execution and silent notification delivery are subject to operating system limitations.
Maintaining separate implementations for these behaviors can increase development and maintenance effort.
The AppsOnAir Flutter Push Notification SDK provides a unified API for common notification operations while handling much of the native integration internally.
Solution / Approach
The AppsOnAir Flutter SDK wraps the native AppsOnAir push notification SDKs for Android and iOS.
It provides a common Dart interface for device registration, notification permissions, notification interactions, user identification, tags, subscription management, and other notification-related functionality.
The integration involves the following steps:
- Configure an application in the AppsOnAir portal.
- Configure the required push notification credentials.
- Add the Flutter SDK dependency.
- Configure Android and iOS.
- Initialize the SDK.
- Handle permissions and notification interactions.
- Test notification delivery on physical devices.
Prerequisites
Before starting, make sure you have:
- A Flutter development environment.
- An existing Flutter application.
- An AppsOnAir account and an application configured in the portal.
- A Firebase project for Android push notifications.
- An Apple Developer account for iOS push notifications.
- Access to a physical Android or iOS device for testing platform-specific behavior.
The published package lists these minimum requirements:
Check the current package documentation before integrating the SDK, as requirements may change between releases.
Step 1: Configure Your Application in AppsOnAir
Start by creating or selecting your application in the AppsOnAir portal.
Navigate to your application's settings and locate the Keys & IDs section.
Copy the App ID. You will use it to associate your mobile application with the corresponding AppsOnAir configuration.
The App ID identifies the application to the SDK. It is different from the API key used for server-to-server API requests.
Security note: Never embed your secret API key in Flutter application code. Mobile application binaries can be inspected, so secret credentials must remain on your backend.
Step 2: Configure Push Notification Credentials
Before installing the SDK, configure the credentials required for each platform.
Android: Firebase Cloud Messaging
Android push delivery uses Firebase Cloud Messaging. Make sure your Firebase project is configured for your Android application's package name.
Download the google-services.json file and place it at: android/app/google-services.json
Ensure that the Google Services Gradle plugin is configured in your Android project.
For projects using Kotlin Gradle files, the configuration may look like this.
In the root android/build.gradle.kts:
plugins {
    id("com.google.gms.google-services") version "4.4.2" apply false
}
In android/app/build.gradle.kts:
plugins {
    id("com.google.gms.google-services")
}
Use the plugin version supported by your project's Gradle and Android Gradle Plugin configuration.
iOS: Apple Push Notification service
iOS push delivery requires APNs credentials.
Create an APNs authentication key in the Apple Developer portal and configure the required credentials in AppsOnAir.
Make sure your application has the appropriate bundle identifier and push notification capability.
Credential configuration is a one-time setup for an application environment, but it should still be verified when changing bundle identifiers, signing configurations, or Apple Developer accounts.
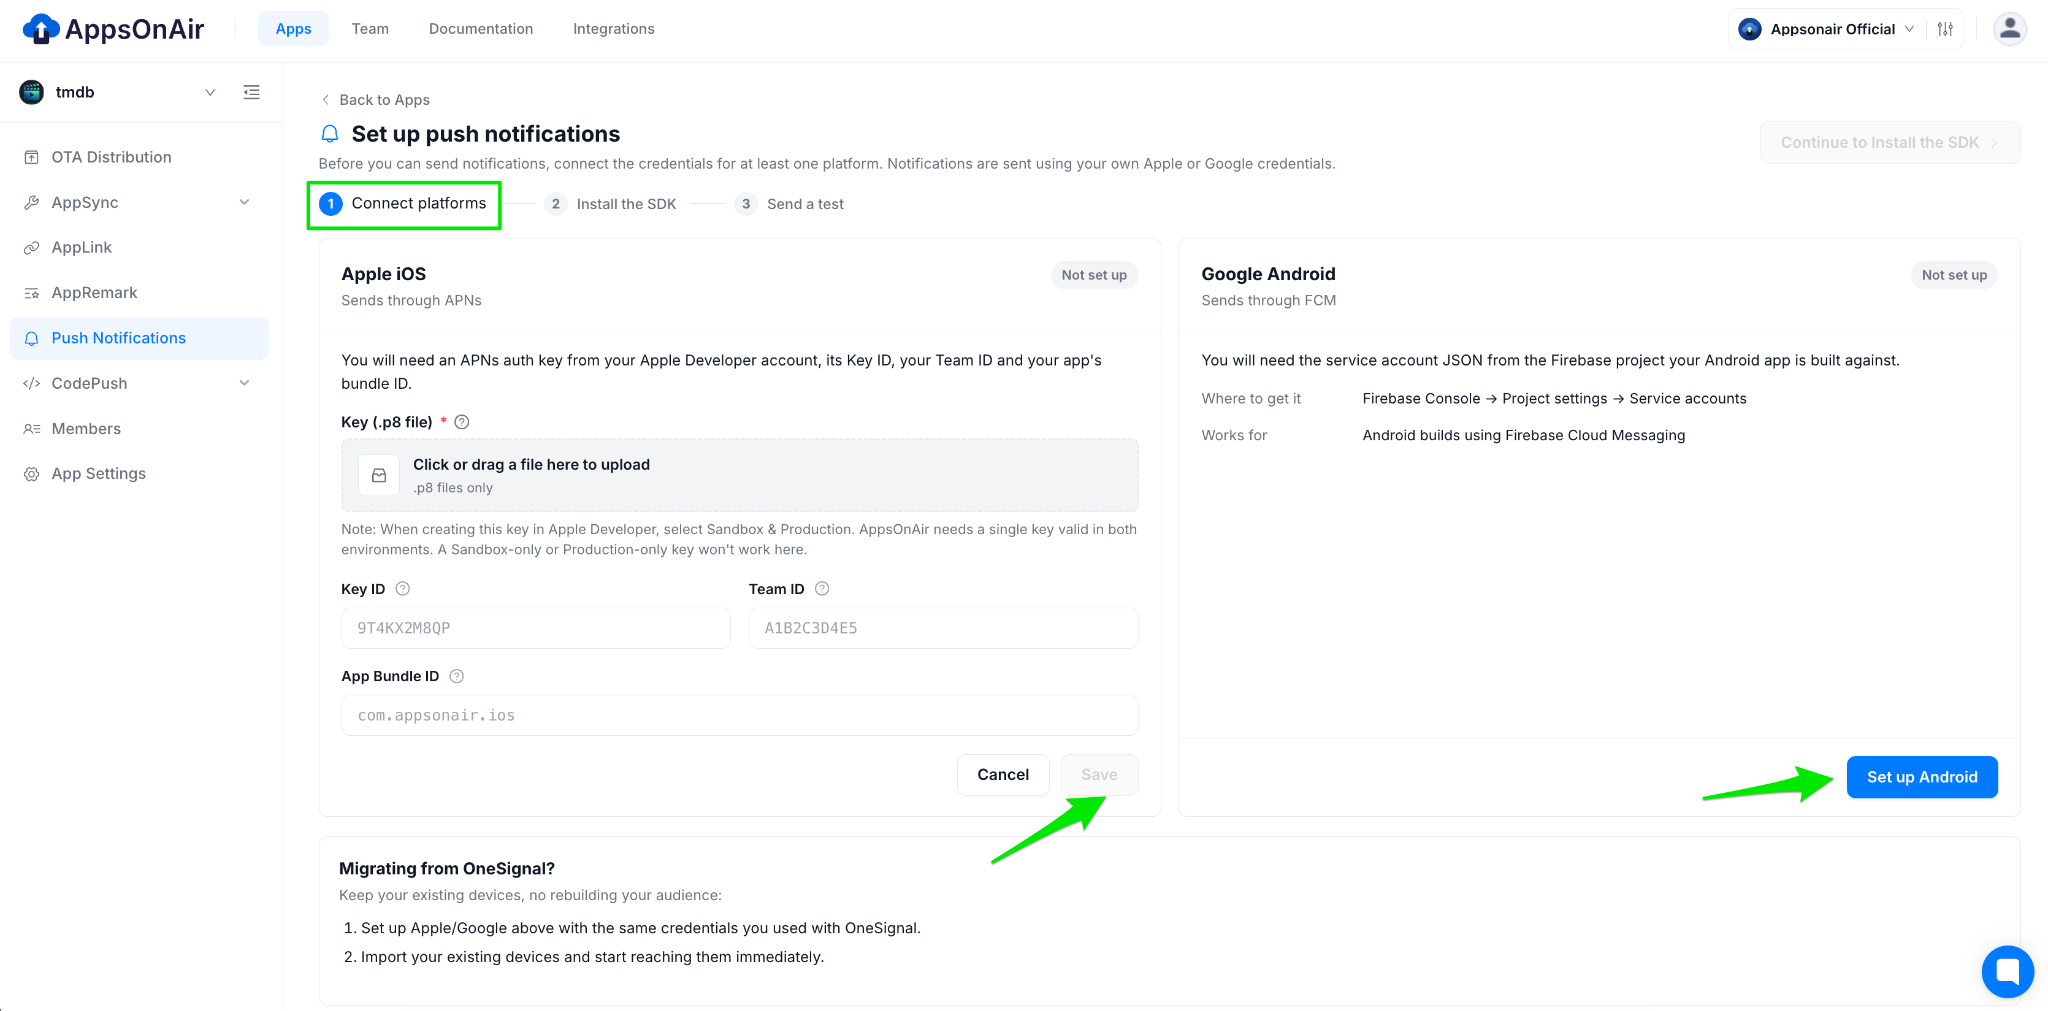
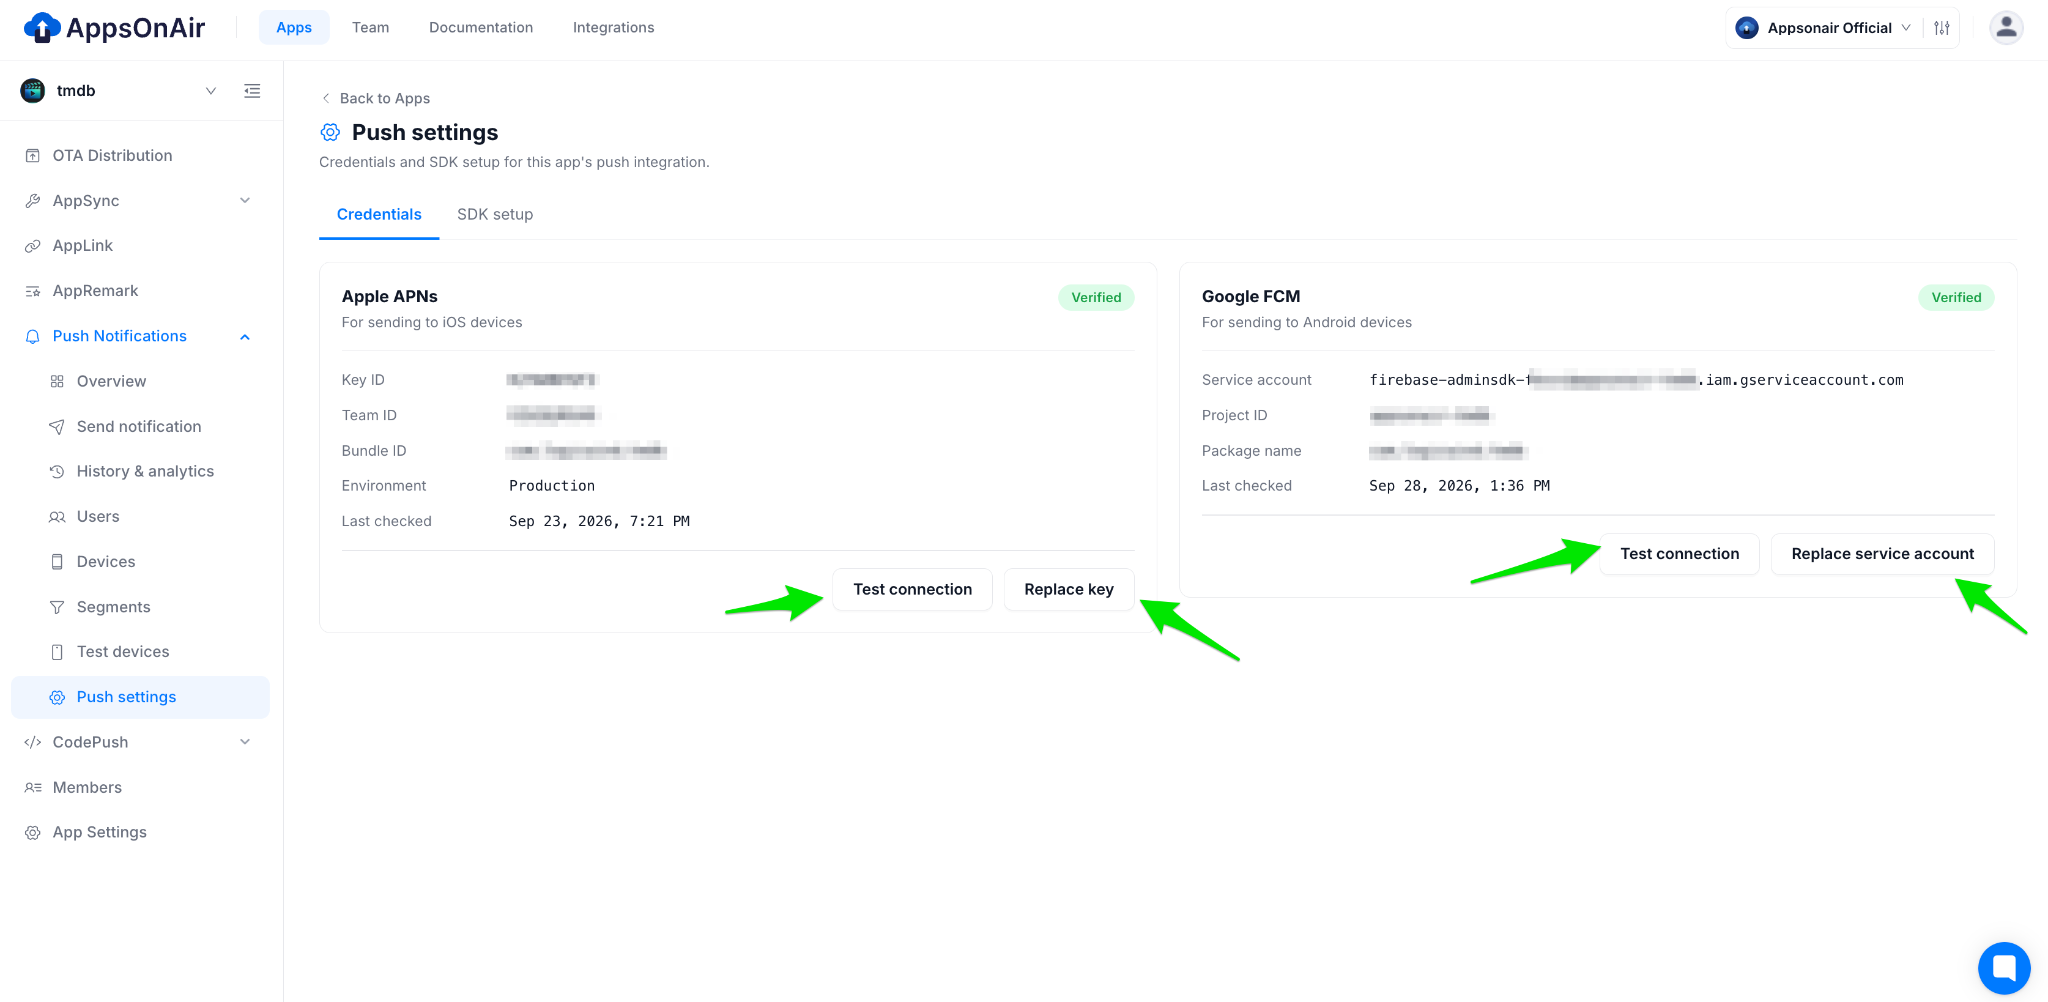
AppsOnAir Push Configuration
Credential configuration is a one-time setup following items needed.
- iOS App BundleID and Android Package name.
- Firebase Google Services Account Json on file for Android
- iOS TeamID and KeyID from the apple developer account.
- .P8 file for iOS from the apple developer account. (Make sure .p8 key should be Sandbox & production environment only)
For more details you visit documentation.
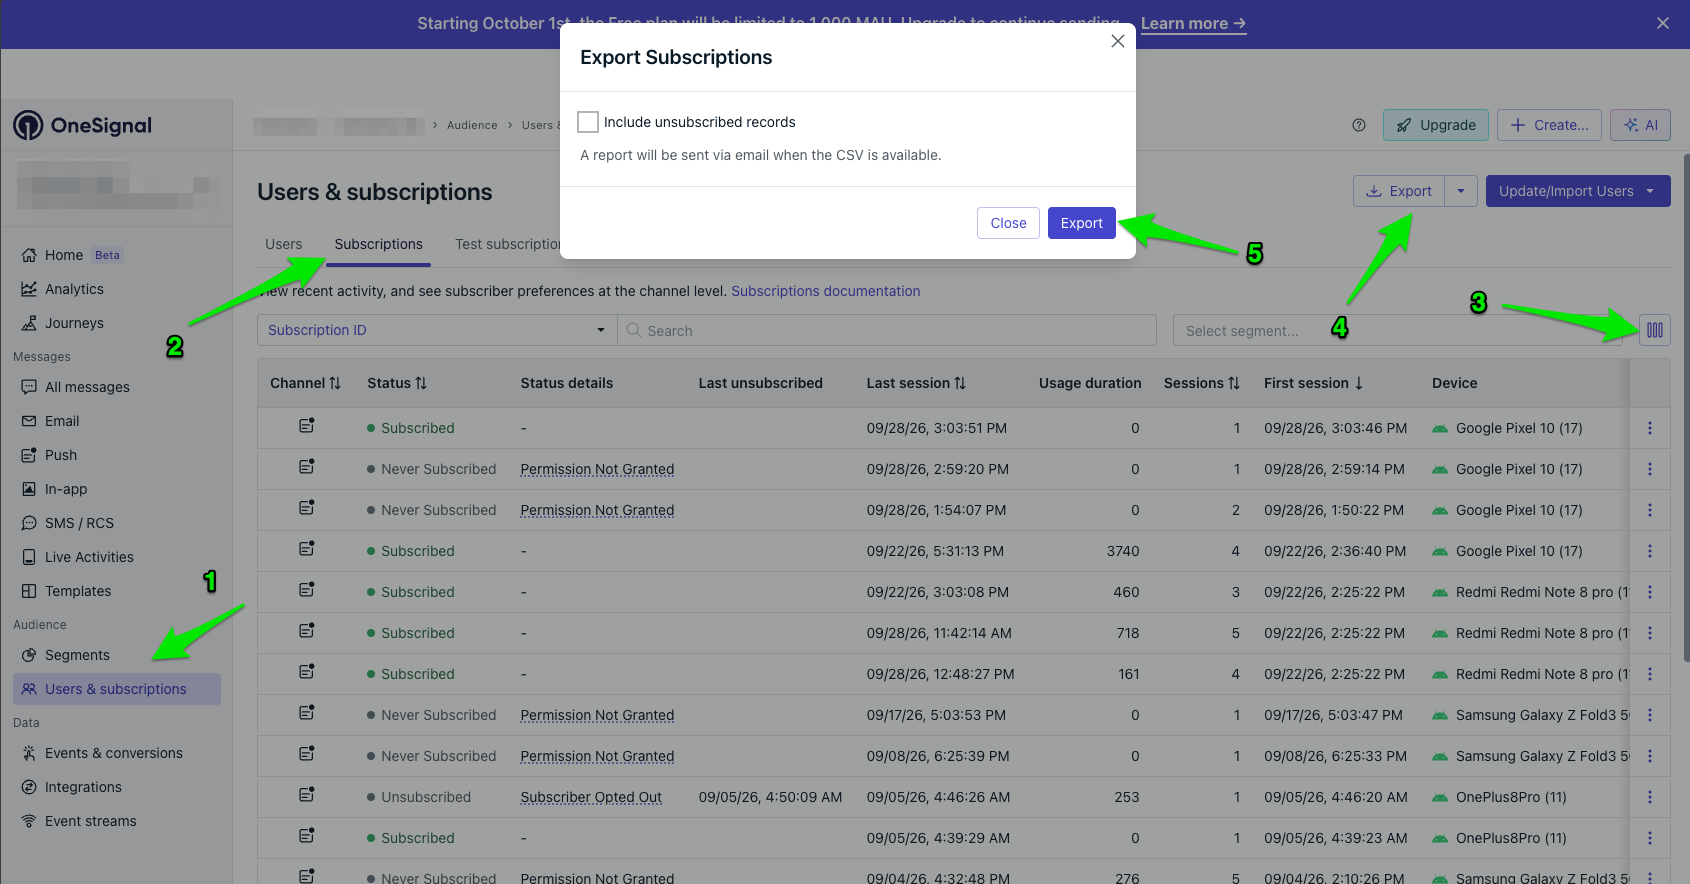
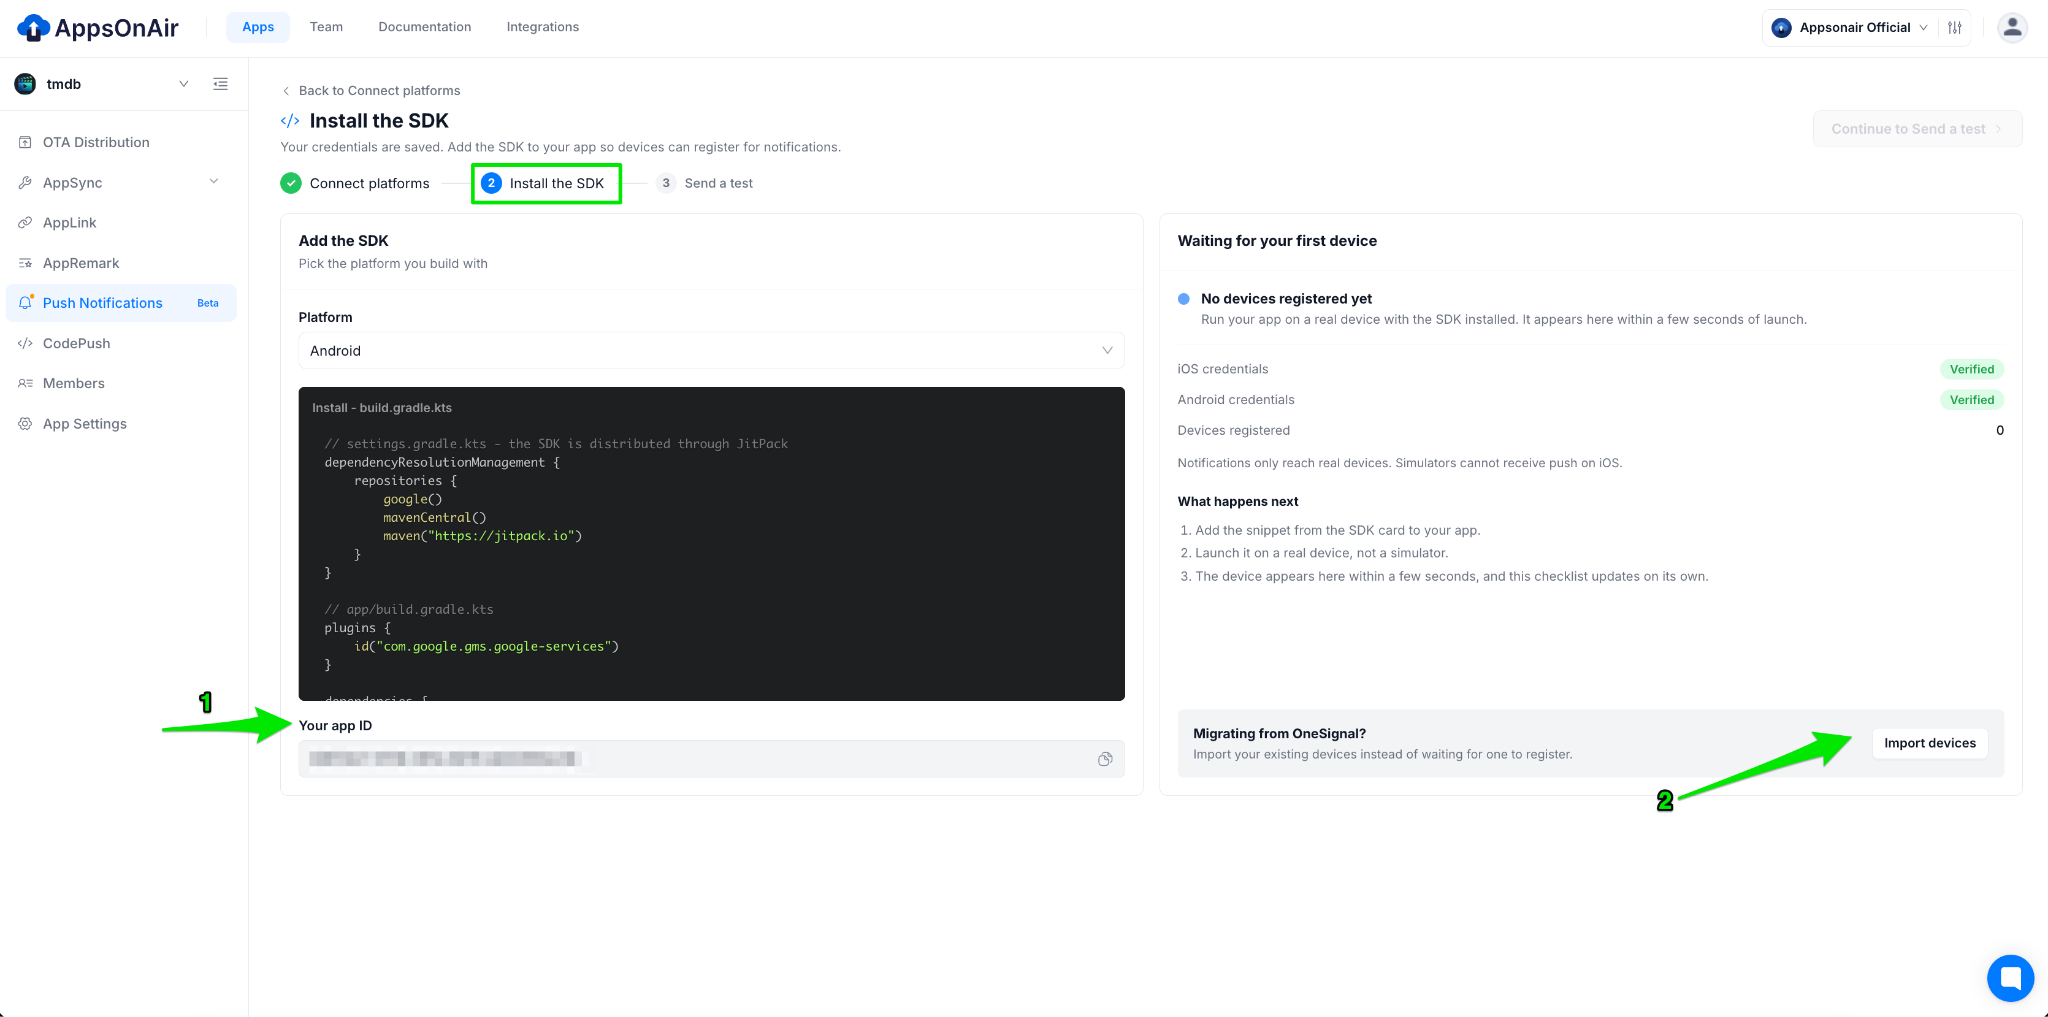
If you want to migrate your Existing OneSignal Push notification to AppsOnAir Push notification service you need export data from OneSignal Dashboard and received via email. Import all you existing data in AppsOnAir web portal under push notification section during first time setup as well as under devices section just tap on import devices CTA
To migrate your existing OneSignal push notification setup to AppsOnAir Push Notifications, export your existing data from the OneSignal Dashboard. You’ll receive the exported data via email.
Once you have the data, import it into the AppsOnAir web portal using either of these options:
- During the initial setup: Import your existing data in the Push Notifications section.
- Anytime later: Navigate to the Devices section and click the Import Devices CTA to import your existing device data.
For more information visit OneSignal migration guide.
Step 3: Install the Flutter SDK
Add the SDK to your Flutter project by running:
flutter pub add appsonair_flutter_apppushThen resolve dependencies:
flutter pub getAlternatively, add the dependency manually to pubspec.yaml:
dependencies:
  appsonair_flutter_apppush: ^1.0.7-beta
The version above reflects the package version listed when this article was prepared. Verify the latest release before publishing or integrating the SDK.
Important: The package is currently in beta. Pin and test the exact version used by your application, and evaluate its stability and compatibility before considering a production rollout.
Step 4: Configure Android
Open: android/app/src/main/AndroidManifest.xml
Add the AppsOnAir App ID inside the <application> element.
<application
    android:label="your_app_name"
    android:name="${applicationName}"
    android:icon="@mipmap/ic_launcher">

    <meta-data
        android:name="AppsonairAppId"
        android:value="YOUR_APPS_ON_AIR_APP_ID" />

</application>
Replace the placeholder with your actual App ID. for more details please check this documentation link to get AppID
The native AppsOnAir push SDK and its transitive dependencies are published through JitPack. Ensure that your Android project includes the JitPack repository in its existing dependency resolution configuration.
For projects using android/settings.gradle.kts, the repository configuration can look like this:
dependencyResolutionManagement {
    repositories {
        google()
        mavenCentral()
        maven("https://jitpack.io")
    }
}
Use the repository configuration appropriate for your project's existing Gradle structure. Avoid adding duplicate repository declarations unnecessarily.
Configure the notification icon:
Android notification icons require special attention.
A full-colour launcher icon is not suitable as the small notification icon because Android renders the visible portions of this icon as a monochrome silhouette.
Configure a dedicated notification icon for SDK-rendered notifications:
<meta-data
    android:name="com.appsonair.apppush.default_notification_icon"
    android:resource="@drawable/ic_notification" />
For notifications rendered directly by Firebase, configure the corresponding Firebase metadata:
<meta-data
    android:name="com.google.firebase.messaging.default_notification_icon"
    android:resource="@drawable/ic_notification" />

<meta-data
    android:name="com.google.firebase.messaging.default_notification_color"
    android:resource="@color/notification_accent" />
Create the notification drawable and accent colour resource referenced by this configuration.
Using a dedicated notification icon avoids the common problem of a white square appearing in the notification shade.
Step 5: Configure iOS
Open: ios/Runner/Info.plist
Add your AppsOnAir App ID:
<key>AppsonairAppId</key>
<string>YOUR_APPS_ON_AIR_APP_ID</string>
Replace the placeholder with the App ID associated with your application.
Next, open the iOS project in Xcode.
Select the Runner target and navigate to Signing & Capabilities.
Add the following capabilities:
- Push Notifications
- Background Modes → Remote notifications
The Remote notifications background mode is necessary for the silent and data-only notification scenarios described in the SDK documentation.
The SDK handles several native notification registration and callback operations internally, so the standard Flutter-generated AppDelegate.swift can generally remain unchanged.
However, custom native notification handling in an existing application should be reviewed carefully to avoid conflicting delegates or duplicate event processing.
Testing requirement: APNs device tokens may not be issued on the iOS Simulator. Test registration and actual push delivery on a physical iOS device.
Step 6: Initialize the SDK
Once the platform configuration is complete, initialize the SDK from your Flutter application.
The basic initialization pattern is:
import 'package:appsonair_flutter_apppush/appsonair_flutter_apppush.dart';
import 'package:flutter/material.dart';

void main() async {
  WidgetsFlutterBinding.ensureInitialized();

  runApp(const MyApp());

  await AppPushService.initialize();
}

class MyApp extends StatelessWidget {
  const MyApp({super.key});

  @override
  Widget build(BuildContext context) {
    return const MaterialApp(
      home: Scaffold(
        body: Center(
          child: Text('Push notifications enabled'),
        ),
      ),
    );
  }
}
The example demonstrates the initialization pattern. Adapt it to your application's existing startup architecture.
In an application with dependency injection, startup services, or a state management framework, initialize the SDK through a clearly defined application lifecycle rather than scattering initialization calls across widgets.
Important implementation detail: Initialize the SDK once, as early as practical in the application lifecycle.
On iOS, initialization order also matters when handling notification taps that launch the application from a terminated state. Register notification click listeners after
AppPushService.initialize() so the native event bridge is ready before listeners are attached.
For applications that require precise startup sequencing, follow the latest SDK documentation and test notification taps with the application in foreground, background, and terminated states.
Step 7: Handle Notification Permissions
Installing the SDK does not mean that the user has automatically granted permission to display notifications.
Applications should handle notification permissions explicitly and provide appropriate context before requesting permission when necessary.
The SDK exposes permission-related functionality through AppPushService.Notifications.
For example:
final permission =
    AppPushService.Notifications.permission;

final canRequest =
    AppPushService.Notifications.canRequestPermission;
Use these values to determine the current permission state and whether another permission request can be made.
The SDK also exposes a permission request method:
await AppPushService.Notifications.requestPermission(
  fallbackToSettings: true,
);
Check the current API documentation for the precise permission-state types and behavior supported by your installed SDK version.
Permission-handling best practices
- Explain the value of notifications before requesting permission.
- Avoid repeatedly prompting users who have already denied permission.
- Provide an appropriate path to application settings when the operating system no longer presents the permission dialog.
- Treat OS-level permission separately from the SDK's push subscription state.
This distinction matters because an application may have an active SDK subscription while the operating system prevents notifications from being displayed.
Step 8: Associate Notifications with Users
Many applications need to send notifications to a specific signed-in user rather than treating every installation as anonymous.
For example, an e-commerce application might need to notify a customer when an order is shipped. A collaboration application might notify a user when a teammate mentions them in a discussion.
The SDK exposes user identification methods.
After your application has authenticated a user, associate the device with your application's stable user identifier:
await AppPushService.login(externalUserId);
When the user signs out, remove the association:
await AppPushService.logout();
When the user signs out, remove the association:
Here, externalUserId represents the identifier maintained by your application.
Use a stable, non-sensitive identifier rather than a value that can change frequently.
Production consideration: Make sure the user association follows your authentication lifecycle. A device shared by multiple users must not continue receiving notifications intended for the previous account.
Also, do not assume that push notification targeting replaces backend authorization. Sensitive information should still be protected by your application's normal authentication and authorization controls.
Step 9: Use Tags for Audience Segmentation
Tags can help applications classify devices according to application-specific attributes.
For example, a shopping application might maintain a user's preferred category or an application might record a non-sensitive onboarding state.
The SDK exposes methods for adding tags:
await AppPushService.User.addTagWithKey(
  'preferred_category',
  'electronics',
);
Multiple tags can also be added together:
await AppPushService.User.addTags({
  'preferred_category': 'electronics',
  'onboarding_completed': 'true',
});
These examples illustrate the API pattern. Configure your actual tags according to the data model and targeting capabilities supported by your AppsOnAir account.
Tag management recommendations
- Use consistent tag names across application releases.
- Remove or update tags when the underlying attribute changes.
- Avoid storing passwords, authentication tokens, or unnecessary personal information in tags.
- Keep tag values small and meaningful.
- Verify that the audience segmentation rules match the intended notification recipients.
Tags are useful for targeting, but they should not become a substitute for a properly designed application data model.
Step 10: Handle Notification Interactions
Receiving a notification is only part of the implementation. A good notification experience should also take users to the correct destination when they tap it.
For example:
- An order notification should open the relevant order details.
- A chat notification should open the appropriate conversation.
- A payment notification should open the corresponding transaction screen.
The SDK exposes notification click listeners through its notification manager.
A listener can be registered using the following pattern:
await AppPushService.initialize();
AppPushService.Notifications.addClickListener(
  (event) {
    // Inspect the notification event.
    // Route the user to the appropriate destination.
  },
);
Use a routing layer
Avoid putting all navigation logic directly inside the notification callback.
Instead, extract the notification's intended destination, validate the payload, and pass a navigation intent to your application's routing layer.
This approach is particularly useful when the application has to wait for authentication, restore application state, or load data before navigating.
For example, if a notification points to an order that belongs to a signed-in user, verify that the user is authenticated and that the backend authorizes access to that order.
A notification payload should never be treated as proof that a user is authorized to view a resource.
Step 11: Control Foreground Notification Display
Notifications received while the application is open can require different handling from notifications received in the background.
The SDK provides a foreground notification display listener.
This can be useful when an application wants to display its own in-app banner, suppress a system notification, or apply a custom presentation strategy.
The general approach is to register the foreground display listener and decide whether the default display behavior should be prevented.
For example, an application that is already displaying the relevant conversation might suppress a duplicate notification banner.
Follow the SDK's documented event-handling API and invoke its prevention method synchronously when suppression is required.
Test this behavior separately from background notification delivery because foreground presentation and system-managed notification display are different execution paths.
Step 12: Test the Integration
A successful build does not necessarily mean that push notifications are configured correctly.
Test the complete notification lifecycle on both platforms.
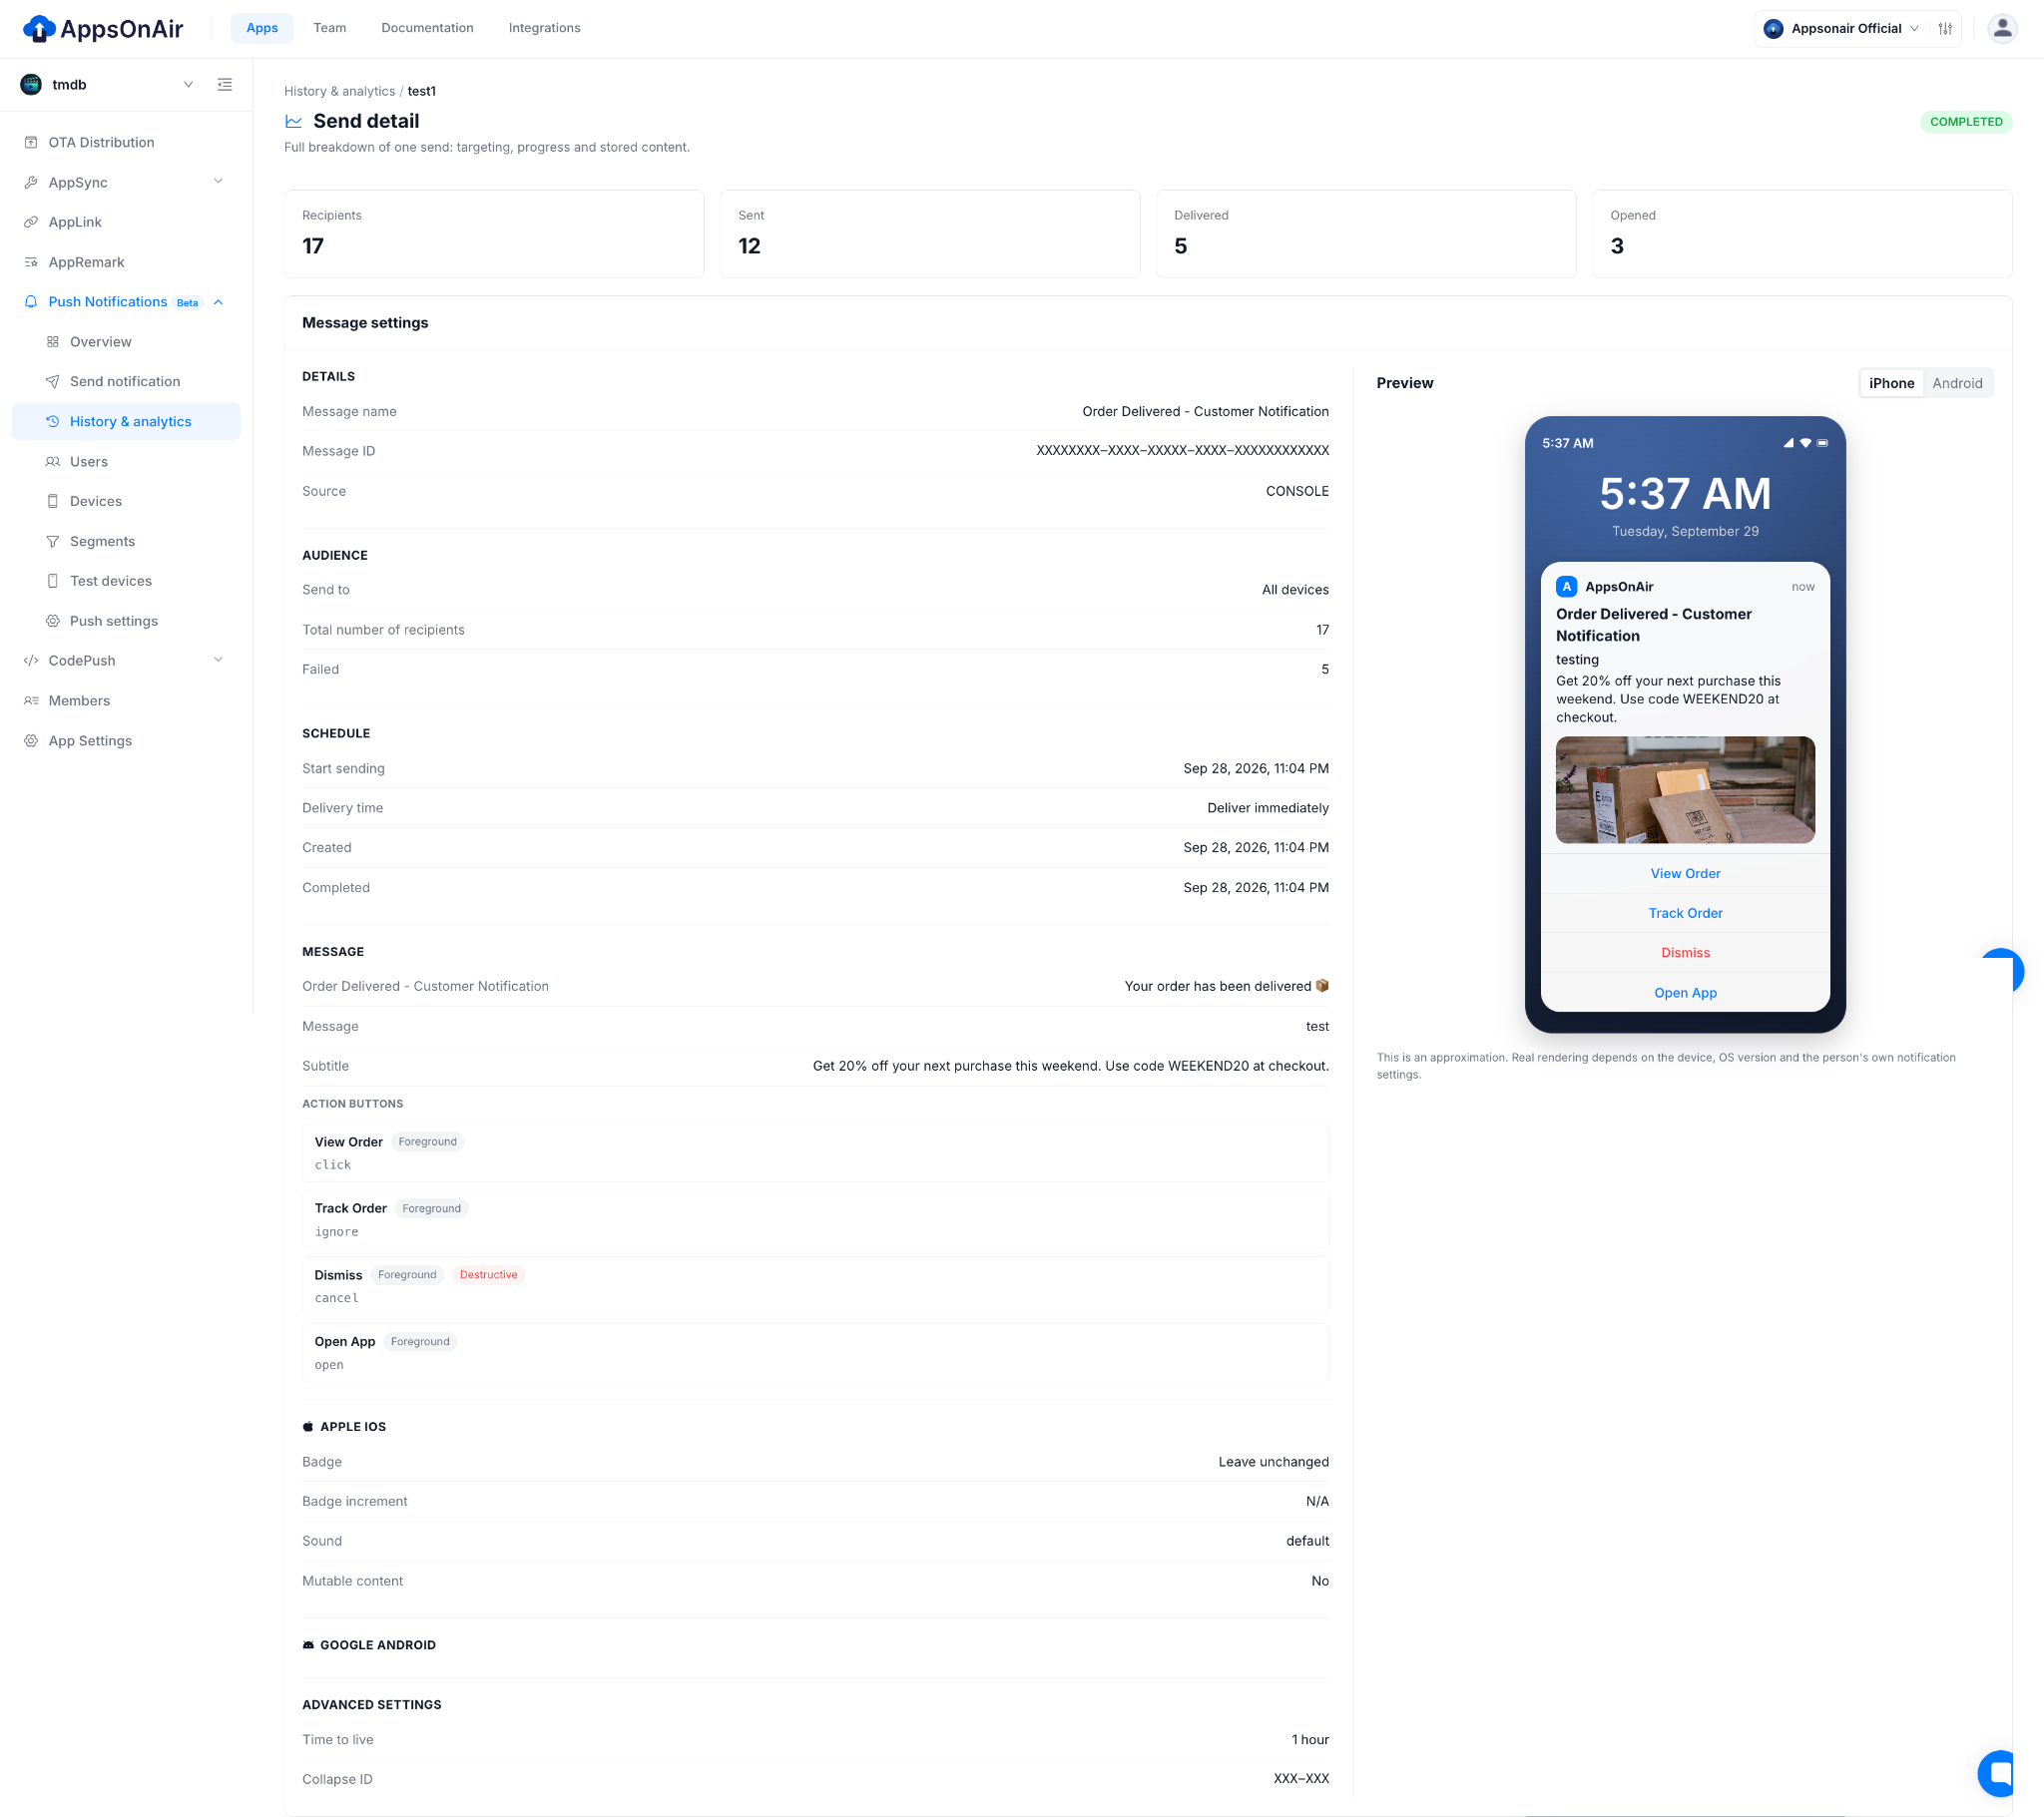
For iOS, use a physical device to validate APNs registration and delivery.
For Android, verify Firebase configuration, application identifiers, Gradle dependencies, and notification channel behavior.
When diagnosing a problem, enable SDK debug logging in development builds and inspect the relevant native logs.
Best Practices and Trade-Offs
Keep push notification logic outside UI widgets
Notification initialization, subscription management, and event processing should have a clearly defined lifecycle.
Placing these operations in frequently rebuilt widgets can result in duplicate listeners, repeated initialization, or difficult-to-reproduce navigation issues.
Separate OS permission from application subscription state
The SDK's opt-in and opt-out functionality is distinct from the operating system's notification permission.
Treat them as separate states in your application's user experience.
Design notification payloads carefully
Keep payloads focused on the information needed to identify the destination or notification type.
For sensitive information, fetch the authoritative data from your backend after validating the user's authentication and authorization.
Test background behavior on real devices
Background execution depends on operating system policies, device state, and application lifecycle conditions.
Silent notifications should not be treated as a guaranteed mechanism for executing arbitrary background work.
Pin and validate SDK versions
The Flutter package is currently in beta, and its public API may change between releases.
Before upgrading:
- Review the changelog.
- Validate Android and iOS builds.
- Test notification registration and delivery.
- Test foreground, background, and terminated-app interactions.
- Check native dependency and signing configuration.
- Maintain a rollback strategy for application releases.
Protect credentials
The AppsOnAir App ID is used for application identification. The secret API key is intended for server-to-server API requests.
Never place secret API credentials in the Flutter application, public repositories, or client-side configuration.
Common Pitfalls to Avoid
1. Adding the App ID to the wrong configuration file
Android and iOS use different configuration files. Verify that the App ID is present in the correct location for each platform.
2. Forgetting the Firebase configuration
Android push delivery depends on the Firebase configuration matching the application being built.
3. Testing APNs registration only in the simulator
Use a physical iOS device to validate actual APNs registration and delivery.
4. Registering notification listeners too early
On iOS, notification taps that launch the application can occur before Flutter finishes initializing. Follow the SDK's required initialization and listener registration order.
5. Treating permission as a one-time decision
Users can change notification permissions in system settings. Your application should account for permission changes rather than assuming that the initial decision remains valid.
6. Assuming silent pushes always execute
Operating system restrictions can prevent or delay background processing. Keep critical business operations on the server instead of relying on silent push delivery.
7. Ignoring the beta status
A beta SDK requires additional compatibility and regression testing. Do not assume that the current public API or native dependency configuration will remain unchanged.
Conclusion
Push notification integration in Flutter requires coordination between application code, native platform configuration, device registration, permissions, and notification lifecycle handling.
The AppsOnAir Flutter Push Notification SDK provides a unified Dart API for Android and iOS, helping developers manage common notification operations without implementing every platform interaction independently.
A reliable integration should focus on more than successfully sending a test notification. It should also account for permission changes, user identity, foreground behavior, notification taps, background execution, and security.
Start with a small integration, validate the complete notification lifecycle on physical devices, and expand the implementation only after the core behavior is reliable.
Because the SDK is currently in beta, verify the latest documentation and package changelog before adopting it in a production application.
References
- AppsOnAir Flutter Push Notification SDK documentation
- AppsOnAir Flutter Push Notification package on pub.dev
- AppsOnAir Flutter Push Notification SDK source code on GitHub
- AppsOnAir Push Configuration documentation
- AppsOnAir Push Notifications FAQs