.png)


1. Introduction
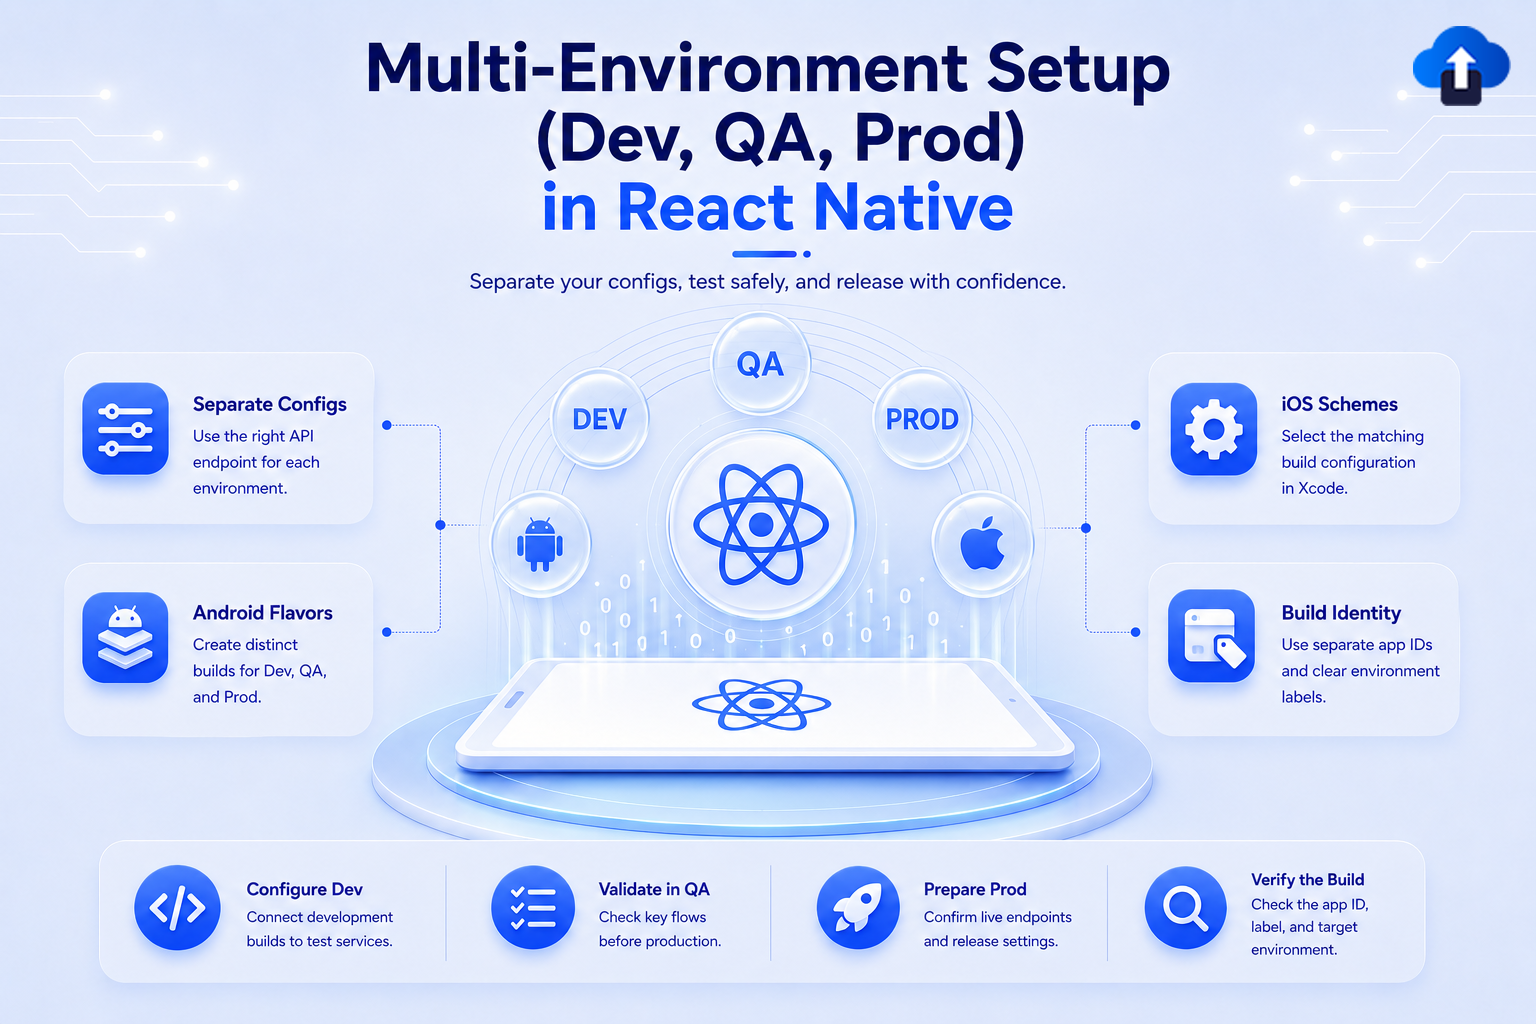
Every production React Native app needs at least three environments: development, QA, and production. Yet a surprising number of teams skip this setup early on, ship manual config changes per release, and eventually deal with consequences that range from embarrassing to catastrophic.
Common Problems Without Environment Separation
- A developer forgets to switch API_URL before building a QA release. QA now tests against the production database with real user data.
- The build pipeline creates a single binary that goes through Dev → QA → Prod. Testers approve a build, but the production binary is different because someone manually changed a value.
- Two apps (Dev and Prod) share the same bundle ID — installing the dev version silently overwrites the production app on a tester's device.
- Firebase crash reports from QA testers flood the production dashboard, making real incident response harder.
What Each Environment Represents
- Dev — your local or shared development server. Hot reloading on, verbose logging, mock services allowed.
- QA — a stable, deployable build that mirrors production behavior. Connects to staging APIs. Used for manual and automated testing before release.
- Prod — the real thing. Strict config, no debug tooling, real Firebase, real analytics.
2. Understanding Environment Strategy
Before writing a single line of config, agree on what changes and what stays the same across environments.
What Changes vs. What Stays Constant
What Stays Constant
- Core business logic and navigation structure
- Component library and UI
- Third-party SDK keys that don't vary by environment
- Test identifiers and accessibility labels
3. Managing .env Files with react-native-config
Create three .env files at the root of your project — one per environment. Add all three to .gitignore. Never commit them. Instead, commit a .env.example that documents the required keys with placeholder values.
.env.dev
API_URL=https://dev.api.com
APP_ENV=development
APP_NAME=MyApp Dev
SENTRY_DSN=https://dev-key@sentry.io/123
ENABLE_FLIPPER=true
.env.qa
API_URL=https://staging.api.com
APP_ENV=qa
APP_NAME=MyApp QA
SENTRY_DSN=https://qa-key@sentry.io/456
ENABLE_FLIPPER=false
.env.prod
API_URL=https://api.com
APP_ENV=production
APP_NAME=MyApp
SENTRY_DSN=https://prod-key@sentry.io/789
ENABLE_FLIPPER=false
Installing react-native-config
npm install react-native-config
# iOS
cd ios && pod install
Usage in JavaScript / TypeScript
import Config from 'react-native-config';

const apiClient = axios.create({
  baseURL: Config.API_URL,
  timeout: 10000,
});

if (Config.APP_ENV !== 'production') {
  console.log('Running in non-prod mode:', Config.APP_ENV);
}
Accessing Variables in Android Native Code
// Kotlin
val apiUrl = BuildConfig.API_URL
Accessing Variables in iOS Native Code
// Swift
let apiUrl = ReactNativeConfig.env(for: "API_URL")

// Objective-C
NSString *apiUrl = [ReactNativeConfig envFor:@"API_URL"];
4. Android Setup — Build Flavors
Android build flavors are Gradle's native mechanism for generating multiple APK/AAB variants from a single codebase. Each flavor can have its own package name, resources, assets, and source sets. This is the right tool for React Native multi-environment setup on Android — not a shell script that swaps .env files.
Configuring android/app/build.gradle
android {
    compileSdkVersion 34
    defaultConfig {
        applicationId "com.myapp"
        minSdkVersion 23
        targetSdkVersion 34
        versionCode 1
        versionName "1.0"
    }

    flavorDimensions "environment"

    productFlavors {
        dev {
            dimension "environment"
            applicationIdSuffix ".dev"
            versionNameSuffix "-dev"
            resValue "string", "app_name", "MyApp Dev"
        }
        qa {
            dimension "environment"
            applicationIdSuffix ".qa"
            versionNameSuffix "-qa"
            resValue "string", "app_name", "MyApp QA"
        }
        prod {
            dimension "environment"
            resValue "string", "app_name", "MyApp"
        }
    }

    buildTypes {
        debug { debuggable true }
        release {
            minifyEnabled true
            proguardFiles getDefaultProguardFile('proguard-android-optimize.txt'),
                         'proguard-rules.pro'
            signingConfig signingConfigs.release
        }
    }
}
Key Fields Explained
- applicationIdSuffix — appends to the base applicationId, making each flavor install as a separate app. com.myapp.dev and com.myapp coexist on device.
- versionNameSuffix — appends to the version name so QA teams can confirm which build they're on (1.0-qa).
- resValue — injects a string resource, which sets the launcher app name per flavor without duplicate XML files.
Linking react-native-config to Flavors
project.ext.envConfigFiles = [
    devDebug: ".env.dev",
    devRelease: ".env.dev",
    qaDebug: ".env.qa",
    qaRelease: ".env.qa",
    prodDebug: ".env.prod",
    prodRelease: ".env.prod",
]
apply from: project(':react-native-config').projectDir.getPath()
           + "/react-native-config.gradle"
Separate google-services.json Per Flavor
Place Firebase config files at flavor-specific source paths. Gradle automatically picks the correct file based on the active flavor at build time — no manual swapping needed.
android/app/src/dev/google-services.json
android/app/src/qa/google-services.json
android/app/src/prod/google-services.json
Running Android Builds
# Dev debug (local development)
npx react-native run-android --variant=devDebug

# QA release (for distribution)
cd android && ./gradlew assembleQaRelease

# Production AAB (for Play Store)
cd android && ./gradlew bundleProdRelease
5. iOS Setup — Schemes and Build Configurations
A scheme in Xcode defines what happens when you build, run, test, or archive your app. It maps to a build configuration (Debug or Release by default). For multi-environment setup, you create additional configurations and schemes — one per environment.
Step 1 — Create New Build Configurations
In Xcode: Project → Info tab → Configurations. Duplicate Debug and name the copies Debug.Dev and Debug.QA. Duplicate Release for Release.Dev, Release.QA, and Release.Prod.
Step 2 — Create .xcconfig Files
ios/
  config/
    Dev.xcconfig
    QA.xcconfig
    Prod.xcconfig
Dev.xcconfig
PRODUCT_BUNDLE_IDENTIFIER = com.myapp.dev
APP_DISPLAY_NAME = MyApp Dev
QA.xcconfig
PRODUCT_BUNDLE_IDENTIFIER = com.myapp.qa
APP_DISPLAY_NAME = MyApp QA
Prod.xcconfig
PRODUCT_BUNDLE_IDENTIFIER = com.myapp
APP_DISPLAY_NAME = MyApp
Step 3 — Duplicate Schemes
In Xcode: Product → Scheme → Manage Schemes. Duplicate your main scheme three times. Mark all three as Shared so they are committed to source control.
- MyAppDev — mapped to Debug.Dev (Run) and Release.Dev (Archive)
- MyAppQA — mapped to Debug.QA (Run) and Release.QA (Archive)
- MyAppProd — mapped to Debug (Run) and Release.Prod (Archive)
Separate GoogleService-Info.plist Per Environment
Add a Run Script build phase that copies the correct Firebase config at build time:
if [ "${CONFIGURATION}" == "Release.Prod" ]; then
  cp "${PROJECT_DIR}/Firebase/Prod/GoogleService-Info.plist" \
     "${BUILT_PRODUCTS_DIR}/${PRODUCT_NAME}.app/GoogleService-Info.plist"
elif [ "${CONFIGURATION}" == "Release.QA" ] || \
     [ "${CONFIGURATION}" == "Debug.QA" ]; then
  cp "${PROJECT_DIR}/Firebase/QA/GoogleService-Info.plist" \
     "${BUILT_PRODUCTS_DIR}/${PRODUCT_NAME}.app/GoogleService-Info.plist"
else
  cp "${PROJECT_DIR}/Firebase/Dev/GoogleService-Info.plist" \
     "${BUILT_PRODUCTS_DIR}/${PRODUCT_NAME}.app/GoogleService-Info.plist"
fi
Linking react-native-config to iOS Schemes
In each scheme's Pre-actions (Edit Scheme → Build → Pre-actions), add a script to copy the correct .env file:
# For MyAppDev scheme pre-action
cp "${PROJECT_DIR}/../.env.dev" "${PROJECT_DIR}/../.env"
Running iOS Builds
# Dev
npx react-native run-ios --scheme MyAppDev

# QA
npx react-native run-ios --scheme MyAppQA --configuration Release.QA

# Production archive (typically via Fastlane)
xcodebuild -workspace ios/MyApp.xcworkspace \
           -scheme MyAppProd -configuration Release.Prod archive
6. Folder Structure Best Practice
Avoid scattering Config.API_URL calls throughout your codebase. Centralize all environment-specific config in one place so that changing how env variables are sourced requires editing one file, not forty.
Recommended Structure
src/
  config/
    env.ts       ← reads react-native-config, validates, exports typed object
    index.ts     ← re-exports config; only file other modules import from
  services/
    api.ts       ← uses config.apiUrl, never Config.API_URL directly
  utils/
    logger.ts    ← enabled only when config.isDev
  components/
    EnvBadge.tsx ← visible badge in dev/QA builds only
src/config/env.ts
import Config from 'react-native-config';

if (!Config.API_URL) {
  throw new Error('Missing required env variable: API_URL');
}

export const env = {
  apiUrl: Config.API_URL,
  appEnv: Config.APP_ENV as 'development' | 'qa' | 'production',
  sentryDsn: Config.SENTRY_DSN,
  isDev: Config.APP_ENV === 'development',
  isProd: Config.APP_ENV === 'production',
} as const;
src/services/api.ts
import axios from 'axios';
import { env } from '@/config';

export const apiClient = axios.create({
  baseURL: env.apiUrl,
  timeout: env.isProd ? 15000 : 30000,
});
7. Automating Environment Builds with CI/CD
GitHub Actions — QA Build
name: QA Build
on:
  push:
    branches: [release/qa]

jobs:
  android-qa:
    runs-on: ubuntu-latest
    steps:
      - uses: actions/checkout@v4
      - uses: actions/setup-node@v4
        with: { node-version: 20 }
      - run: npm ci
      - name: Write QA env file
        run: echo "${{ secrets.ENV_QA }}" > .env.qa
      - name: Build QA APK
        run: cd android && ./gradlew assembleQaRelease
      - name: Upload to Firebase App Distribution
        uses: wzieba/Firebase-Distribution-Github-Action@v1
        with:
          appId: ${{ secrets.FIREBASE_APP_ID_QA }}
          token: ${{ secrets.FIREBASE_TOKEN }}
          file: android/app/build/outputs/apk/qa/release/app-qa-release.apk
Fastlane Setup
# fastlane/Fastfile
lane :qa do
  match(type: "adhoc", app_identifier: "com.myapp.qa")
  gym(
    scheme: "MyAppQA",
    configuration: "Release.QA",
    export_method: "ad-hoc",
    output_directory: "./builds"
  )
  firebase_app_distribution(
    app: ENV["FIREBASE_APP_ID_QA"],
    ipa_path: "./builds/MyApp.ipa",
    groups: "qa-testers"
  )
end

lane :prod do
  match(type: "appstore", app_identifier: "com.myapp")
  gym(scheme: "MyAppProd", configuration: "Release.Prod")
  upload_to_app_store
end
Store all .env.* file contents as encrypted CI secrets. Never bake them into the repository.
8. Common Mistakes Teams Make
9. Production-Ready Best Practices
Lock Production Config in CI
The .env.prod file should only ever exist on your CI runner, injected from a secrets manager. No developer's local machine should have production credentials without an operational reason.
Restrict OTA Updates by Environment
If you use Expo Updates or CodePush, configure separate deployment keys and channels per environment. A QA OTA bundle should never roll out to production users.
CodePush.sync({
  deploymentKey: env.isProd
    ? PROD_DEPLOYMENT_KEY
    : env.appEnv === 'qa'
    ? QA_DEPLOYMENT_KEY
    : DEV_DEPLOYMENT_KEY,
});
Separate Crash Reporting DSNs
Initialize Sentry with the DSN from your environment config, not a hardcoded value. This keeps crash dashboards clean and allows you to set separate alert thresholds per environment.
Show an Environment Badge in Non-Prod Builds
A floating badge (Dev or QA) in the corner of the screen during testing prevents confusion. Testers immediately know which environment they're on without checking build metadata.
// components/EnvBadge.tsx
import { env } from '@/config';

export const EnvBadge = () => {
  if (env.isProd) return null;
  return (
    <View style={styles.badge}>
      <Text style={styles.label}>{env.appEnv.toUpperCase()}</Text>
    </View>
  );
};

// Mount in App.tsx -- renders only in Dev and QA
Automate Everything
If a build step requires a human to rename a file, update a constant, or switch a toggle — it will eventually be done wrong. Every manual step is a potential release incident. If you can script it, script it.
10. Conclusion
Multi-environment setup in React Native is not a nice-to-have — it is table stakes for any app with real users and a real development team. Without it, you are one forgotten config change away from QA data in production, a crashed release cycle, or a security incident.
The setup described in this guide gives you a system where:
- The correct environment config is selected automatically at build time, not manually by a developer.
- Each environment installs as a separate app with a distinct icon and name.
- Firebase, Sentry, and API credentials are isolated per environment.
- Your CI pipeline produces validated, reproducible builds for each environment without human intervention.